Storage Boxx is an open-source PHP Inventory Management System. With a built-in webcam QR scanner, NFC scanner, passwordless login, and an optional experimental AI assistant.
TABLE OF CONTENTS
DOWNLOAD & INSTALLATION
First, here are the download links for the impatient folks who don’t want to read through everything.
SYSTEM REQUIREMENTS
- LAMP/WAMP/MAMP/XAMPP
- Apache Mod Rewrite
- PHP MYSQL PDO Extension
- PHP OpenSSL Extension
- At least PHP 8.0
- Take note – Webcam, NFC and Passwordless (Web Authentication) support depends on the user’s device and browser.
LICENSE & DOWNLOAD
GitHub | GitHub – AI Assistant | SourceForge
Storage Boxx is released under the MIT License. You are free to use it for personal and commercial projects, and modify it as you see fit. On the condition that the software is provided “as-is”. There are no warranties provided and “no strings attached”. Code Boxx and the authors are not liable for any claims, damages, or liabilities.
INSTALLATION
- Download from GitHub/Sourceforge into your HTTP folder.
- Access
http://your-site.comin the browser and walk through the installer.
SORRY FOR THE ADS...
But someone has to pay the bills, and sponsors are paying for it. I insist on not turning Code Boxx into a "paid scripts" business, and I don't "block people with Adblock". Every little bit of support helps.
Buy Me A Coffee Code Boxx eBooks
HOW TO USE
So far so good? Let us now go through a quick crash course on how to use Storage Boxx.
QUICKSTART GUIDE
EQUIPMENT RECOMMENDATIONS
- Webcam – If you are using a desktop without a webcam, a simple one only costs about $20~30.
- USB QR Code scanner – Alternatively, a “dedicated barcode scanner” will cost about $30~40 bucks.
- NFC tags – 10 pieces of Ntag213 only cost 2-3 bucks. Buy them in bulk, and one piece will only cost a few cents.
- Fingerprint sensors – These are kind of expensive… But I got lucky with a $25 “Made in China” that works just fine.
- Label printer – Print your QR codes. There are Bluetooth ones that can pair with smartphones.
FOR THE DEVELOPERS
This section is for the developers, with a couple of development notes for customization.
FAQ
“AJAX error”? Migrating to another domain? NFC “not working”? Check out the FAQ section.
BUILT ON CORE BOXX
- At least go through the very short tutorial.
- Thereafter, go into the deeper concepts:
- Storage Boxx has also adopted the following modules:
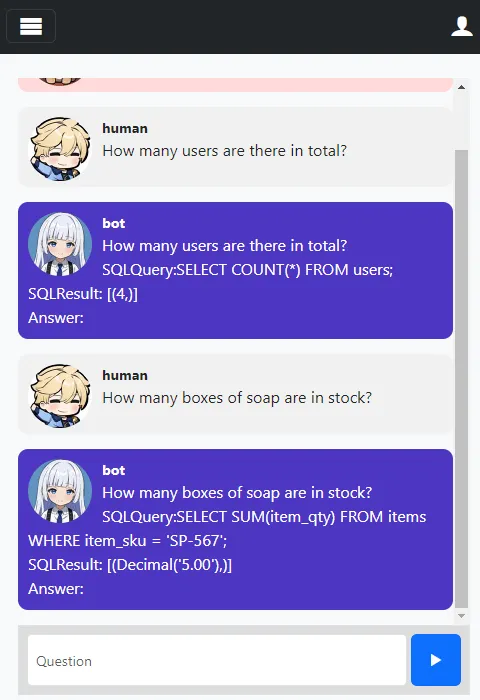
AI ASSISTANT
So, you may have noticed that the AI Assistant is “missing” or “not working” out of the box. It’s a long story.
REQUIREMENTS
- Python – Yes, Python. Not PHP. Version 3.9 to 3.10 seems to work fine at the time of writing.
- Microsoft C++ Build Tools
- CMake
- Nvidia CUDA Toolkit – If you have an Nvidia graphics card.
- An Nvidia graphics card with at least 8GB VRAM is highly recommended. You can TRY to run on CPU, but it is painfully slow and practically useless.
INSTALLATION
- Copy/unzip this module into your existing Storage Boxx folder.
- I have tried multiple AI models, codellama-7b-instruct.Q5_K_M.gguf is the only one that produced decent(ish) results – Download that into
chatbot/modelsor choose a better/larger/smarter model on your own. - Edit
chatbot/a_settings.py, change themodel_nameto your own. - BE WARNED, GIGABYTES WORTH OF DOWNLOAD! –
0-setup.bat(Windows)0-setup.sh(Linux).
LAUNCH
- Run
1-bot.bat(Windows)1-bot.sh(Linux/Mac), this will deploy the bot athttp://your-site.com:8008. - Just access
http://your-site.com/ai(must be signed in).
Hello, I am getting following error:
Fatal error: Uncaught RuntimeException: Unable to create the key in C:\xampp\htdocs\lib\webpush\web-token\jwt-core\Util\ECKey.php:98 Stack trace: #0 C:\xampp\htdocs\lib\webpush\web-token\jwt-core\Util\ECKey.php(72): Jose\Component\Core\Util\ECKey::createECKeyUsingOpenSSL(‘P-256’) #1 C:\xampp\htdocs\lib\webpush\web-token\jwt-key-mgmt\JWKFactory.php(69): Jose\Component\Core\Util\ECKey::createECKey(‘P-256’, Array) #2 C:\xampp\htdocs\lib\webpush\minishlink\web-push\src\VAPID.php(165): Jose\Component\KeyManagement\JWKFactory::createECKey(‘P-256’) #3 C:\xampp\htdocs\lib\CORE-Install.php(132): Minishlink\WebPush\VAPID::createVapidKeys() #4 C:\xampp\htdocs\index.php(2): require(‘C:\\xampp\\htdocs…’) #5 {main} thrown in C:\xampp\htdocs\lib\webpush\web-token\jwt-core\Util\ECKey.php on line 98
Can you advice?
Thank you
XludodX
As it is, unable to generate keys. Something is wrong with your OpenSSL installation. See section 1B – https://code-boxx.com/php-push-notifications/
I’m trying Storage Boxx on my hosted web server. It works, at least to show the config page. But when I hit “GO” button there is an error with:
Unable to connect to database – SQLSTATE[HY000] [1045] Access denied for user ‘Sql635819_2’@’31.11.36.236’ (using password: YES)
I think there something wrong in building the DB_USER name, but no result from searching the code base. In my opinion the problem depends from the fact that siet files are on a IF that’s different from MySql DB. My web server is: 31.11.36.236 and my mysql db is: 62.149.150.182. I’ve specified the ip for database server in the setup form.
Please help me.
Cheers
Luigi Visintin
lib/CORE-Config.php – Section (C) database.
hi is there a demo site for storage boxx project.
also looking to hire developer for projects thanks mike
Sorry, there are no demos for all the PHP/Python/Node projects. Don’t think you will want to hire an overpriced developer and content creator. 😉
https://code-boxx.com/faq/#nodemo
https://code-boxx.com/faq/#hire
We should be able to download a database and the files so we can simply upload them to our server 🙂 and connect. Can you provide a database and the files? 🙂 I have fought for two days, and my server won’t do it.
No idea what you are trying to do here… There’s already an automated installer? All the source files are available for download here and on GitHub? If you want to manually install, see “MANUAL INSTALLATION” above.
P.S. If you have zero experience, I will highly suggest you start with the raw basics or hire your own web developer. Good luck.
When i go on login page, apache response “page not found” after a success installation
EDIT – Whoever encounters the same problem in the future, it’s either:
1)
MOD_REWRITEis enabled, butAllowOverrideis not properly set.2) SSL issues. Apache is not serving the pages and/or static assets properly.
Will try to add more checks, but fingers crossed. PHP has limited or no access to these Apache settings.