Welcome to a tutorial on how to send push notifications in PHP. It is not a secret that web browsers are capable of displaying notifications, but just how can we send push notifications from a PHP server? Read on for the example!
TABLE OF CONTENTS
DOWNLOAD & NOTES
Here is the download link to the example code, so you don’t have to copy-paste everything.
EXAMPLE CODE DOWNLOAD
Just click on “download zip” or do a git clone. I have released it under the MIT license, so feel free to build on top of it or use it in your own project.
SORRY FOR THE ADS...
But someone has to pay the bills, and sponsors are paying for it. I insist on not turning Code Boxx into a "paid scripts" business, and I don't "block people with Adblock". Every little bit of support helps.
Buy Me A Coffee Code Boxx eBooks
PHP PUSH NOTIFICATIONS
All right, let us now get into the example of how to send push notifications in PHP.
STEP 1) SERVER SETUP
1A) PHP WEB PUSH LIBRARY
Before we start with the code, let us deal with the foundations. First, we need to download the PHP Web Push library.
- Install Composer package manager if you have not already done so.
- Open the command line or terminal.
- Navigate to your HTTP folder. For example,
cd d:/http. - Run
composer require minishlink/web-push.
That’s all. The Web Push library will be downloaded into the vendor/ folder.
1B) PHP OPENSSL
Next, enable the OpenSSL extension in PHP. The installation is different depending on your OS and build.
- Linux
- It is as simple as
sudo apt-get install openssl. - Or
yum install opensslfor the CentOS users. - Then,
php -i | grep -i openssl.
- It is as simple as
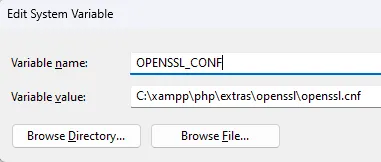
- Windows – I am using XAMPP and OpenSSL is already included. But a hiccup got me stumped for a while.
- Start > Search for “system environment” > “Edit the system environment variables” > “Environment variables”.
- Add a new system variable called
OPENSSL_CONFand point it to theopenssl.cnffile. By default, it is located atxampp\php\extras\openssl\openssl.cnf.
For all other platforms and troubleshooting, please do your own research. It’s just too much to cover in this mini-section.
STEP 2) GENERATE VAPID KEYS
<?php
require "vendor/autoload.php";
use Minishlink\WebPush\VAPID;
print_r(VAPID::createVapidKeys());
D:\http>php 2-vapid-keys.php
Array
(
[publicKey] => GENERATE-YOUR-OWN
[privateKey] => GENERATE-YOUR-OWN
)VAPID stands for Voluntary Application Server Identification. Simply put, generating a pair of public and private keys to prevent your push notifications from getting hijacked. This script only needs to run once, but you can always run this again to generate a new pair of keys.
P.S. If OpenSSL is not properly installed, createVapidKeys() will return a false.
P.P.S. The private key should only be used on the server side. Do not expose it publicly.
STEP 3) CLIENT PAGE
3A) GET PERMISSION TO SHOW NOTIFICATIONS
// (A) OBTAIN USER PERMISSION TO SHOW NOTIFICATION
window.onload = () => {
  // (A1) ASK FOR PERMISSION
  if (Notification.permission === "default") {
    Notification.requestPermission().then(perm => {
      if (Notification.permission === "granted") {
        regWorker().catch(err => console.error(err));
      } else {
        alert("Please allow notifications.");
      }
    });
  }

  // (A2) GRANTED
  else if (Notification.permission === "granted") {
    regWorker().catch(err => console.error(err));
  }

  // (A3) DENIED
  else { alert("Please allow notifications."); }
}
Now that we have generated the keys, let’s put them aside for a minute. The first thing we need on the HTML page is to get the user’s permission to display notifications. Yes, we cannot proceed if notifications are blocked.
3B) REGISTER SERVICE WORKER
// (B) REGISTER SERVICE WORKER
async function regWorker () {
  // (B1) YOUR PUBLIC KEY - CHANGE TO YOUR OWN!
  const publicKey = "YOUR-PUBLIC-KEY";

  // (B2) REGISTER SERVICE WORKER
  navigator.serviceWorker.register("4-sw.js", { scope: "/" });

  // (B3) SUBSCRIBE TO PUSH SERVER
  navigator.serviceWorker.ready
  .then(reg => {
    reg.pushManager.subscribe({
      userVisibleOnly: true,
      applicationServerKey: publicKey
    }).then(
      // (B3-1) OK - TEST PUSH NOTIFICATION
      sub => {
        var data = new FormData();
        data.append("sub", JSON.stringify(sub));
        fetch("5-push-server.php", { method: "POST", body : data })
        .then(res => res.text())
        .then(txt => console.log(txt))
        .catch(err => console.error(err));
      },

      // (B3-2) ERROR!
      err => console.error(err)
    );
  });
}
Once we have the user’s permission to display notifications, the next step is to register a service worker. For those who have never heard of it, a service worker is simply Javascript that runs in the background. Even when the user is not on the website itself. A couple of important points here:
- (B1) A gentle reminder to change the public key to your own.
- (B2) Register
4-sw.jsas a service worker. - (B3) Take extra note of these.
reg.pushManager.subscribe(...)Pass in the public key and subscribe the service worker to the push server.sub => { fetch... }Immediately send the subscribed workersubto the server, and request a test push notification.
STEP 4) SERVICE WORKER
// (A) INSTANT WORKER ACTIVATION
self.addEventListener("install", evt => self.skipWaiting());

// (B) CLAIM CONTROL INSTANTLY
self.addEventListener("activate", evt => self.clients.claim());

// (C) LISTEN TO PUSH
self.addEventListener("push", evt => {
  const data = evt.data.json();
  // console.log("Push", data);
  self.registration.showNotification(data.title, {
    body: data.body,
    icon: data.icon,
    image: data.image
  });
});
Well, this should be pretty self-explanatory. This service worker displays push notifications received from the server.
STEP 5) PHP PUSH SERVER
// (A) LOAD WEB PUSH LIBRARY
require "vendor/autoload.php";
use Minishlink\WebPush\Subscription;
use Minishlink\WebPush\WebPush;
// (B) GET SUBSCRIPTION
$sub = Subscription::create(json_decode($_POST["sub"], true));
// (C) NEW WEB PUSH OBJECT - CHANGE TO YOUR OWN!
$push = new WebPush(["VAPID" => [
"subject" => "your@email.com",
"publicKey" => "YOUR-PUBLIC-KEY",
"privateKey" => "YOUR-PRIVATE-KEY"
]]);
// (D) SEND TEST PUSH NOTIFICATION
$result = $push->sendOneNotification($sub, json_encode([
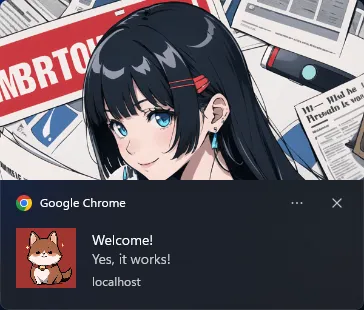
"title" => "Welcome!",
"body" => "Yes, it works!",
"icon" => "PUSH-php-A.png",
"image" => "PUSH-php-B.png"
]));
$endpoint = $result->getRequest()->getUri()->__toString();
// (E) SHOW RESULT - OPTIONAL
if ($result->isSuccess()) {
// echo "Successfully sent {$endpoint}.";
} else {
// echo "Send failed {$endpoint}: {$result->getReason()}";
// $result->getRequest();
// $result->getResponse();
// $result->isSubscriptionExpired();
}Following up on the fetch call in the Javascript, this PHP script will handle the push notification.
- (A) Load the Web Push library. Captain Obvious saves the day once again.
- (B) Remember that the Javascript will send over a “subscribed service worker”? That’s that.
- (C to E) We simply send a test push notification to the “subscribed service worker”.
The end. Congratulations, you have just sent out your first push message.
EXTRAS
That’s all for the tutorial, and here is a small section on some extras and links that may be useful to you.
NOT HOW IT USUALLY WORKS…
Of course, this simplified example is not how a production server works.
- In
3-perm-sw.html (B3)– We should sendsub, the “subscribed service worker” to the server and save it into a database first. - At a later date, we manually call
5-push-server.php. This script will retrieve all subscribers from the database, and mass sends out the push notifications. - Also in
5-push-server.php (E), delete the user from the database when$result->isSubscriptionExpired()istrue.
HOW TO “SAVE SUBSCRIBER TO DATABASE”
I left that out because MYSQL is not the only database in the world… Also because it’s a little off-topic for this example. If you want a “working example”, check out the web push module of my Core Boxx open-source project:
lib/SQL-WebPush.sqllib/LIB-Push.php
I DENIED PERMISSION TO SHOW NOTIFICATIONS
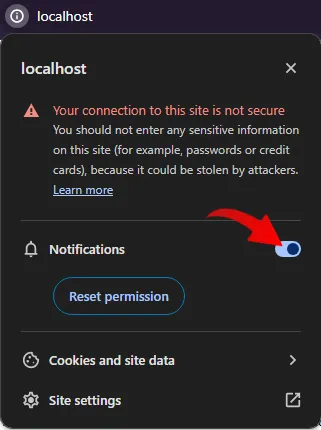
Once denied, the browser will never prompt for permission again. The only way is to click on the icon next to the URL bar, and manually enable the notifications.
COMPATIBILITY CHECKS
- Arrow Functions – CanIUse
- Service Workers – CanIUse
- Push API – CanIUse
A “Grade A” browser is required for this example to work properly.
LINKS & REFERENCES
- Push Notifications With NodeJS – Code Boxx
- PHP Web Push Library – GitHub
- Push API – MDN
- Web Push Protocol – web.dev
THE END
Thank you for reading, and we have come to the end. I hope that it has helped you to better understand, and if you want to share anything with this guide, please feel free to comment below. Good luck and happy coding!
Dear Mr Toh,
I managed to debug and find the mistake I was making. Thank you for
your answer.
While I was checking the functionality on the iphone I found that it looks like the javascript requesting for the permission in order to call the regWorker function
is not managing to get the permission.
Notification.requestPermission().then(perm => {
if (Notification.permission === ‘granted’) {
regWorker().catch(err => console.error(err));
} else {
alert(‘Please allow notifications.Thank you’);
}
});
It is always asking ‘Please allow notifications. Thank you’ as if Notification.requestPermission() is not doing its job. Did you try it on the iphone? Am I missing something.
Btw, I created a manifest.json file so it looks like the home screen installation
is working properly.
See “COMPATIBILITY CHECKS” above, Push API for iOS Safari – Requires website to first be added to the Home Screen. Delivered silently, meaning no sound, vibration, haptics or screen wake.. AND I am too poor to buy a half-eaten apple. 🙁
P.S. I have no other ways to test this otherwise, Apple is well-known for messing up web development and not following global standards.
I don’t usually do this, but your tutorial literally helped me accomplish and establishing a working web push notification on my website.
Thanks a million 👍
Dear Mr Toh,
I checked the same link of the previous email I sent you with the
Samsung browser and it is working. But it is not working with
Firefox and Chrome. Do you know why? Am I doing something wrong?
Thank you in advance.
ciao marco
https://code-boxx.com/faq/#notwork