
The Stone Age of the Internet is long over, and if you are wondering if we can build a camera web app using pure Javascript – Yes, we can. This is a small experiment of mine to not just “take a photo with the webcam”, but to also make it offline capable. That’s right, this is an installable serverless Javascript Camera PWA. Read on!
ⓘ I have included a zip file with all the source code at the start of this tutorial, so you don’t have to copy-paste everything… Or if you just want to dive straight in.
TABLE OF CONTENTS
DOWNLOAD & NOTES

Firstly, here is the download link to the example code as promised.
QUICK NOTES & REQUIREMENTS
- This is not a “newbie-friendly” open-source project and example – It involves the use of service workers, cache storage, and webcam access.
- Too much of a hassle to create an “online example”, just download the source code or grab it from GitHub.
- “Grade A” browser required, alongside an
https://server.http://localhostis fine for testing too.
LICENSE & DOWNLOAD
This project is released under the MIT License. You are free to use it for your own personal and commercial projects, modify it as you see fit. On the condition that there the software is provided “as-is”. There are no warranties provided and “no strings attached”. Code Boxx and the authors are not liable for any claims, damages, or liabilities.
HOW IT WORKS

Not going to explain everything line-by-line (will take forever), but here’s a quick walkthrough of the Javascript Camera PWA.
PART 1) SINGLE PAGE APP
1A) MAIN CAMERA VIEW
<!-- (A) MAIN CAMERA VIEW -->
<div id="camWrap">
  <!-- (A1) VIDEO LIVE FEED -->
  <video id="camFeed" autoplay></video>

  <!-- (A2) CAMERA CONTROLS -->
  <div id="camControls">
    <button id="btnPics" class="mi btn" onclick="cam.view(1)" disabled>
      collections
    </button>
    <button id="btnSnap" class="mi btn" onclick="cam.snap()" disabled>
      photo_camera
    </button>
    <button id="btnAbout" class="mi btn" onclick="cam.view(2)">
      help
    </button>
  </div>

  <!-- (A3) FLASH SCREEN -->
  <div id="camFlash"></div>
</div>
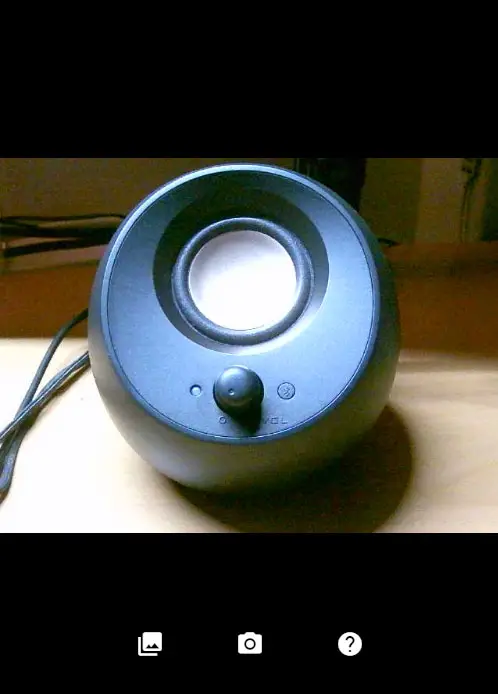
Look no further, there is only a single js-cam.html page in the project. There are “two views on one page”, we have the “main camera page” on the top:
<video id="camFeed">This is where we will feed the webcam into.<div id="camControls">Don’t think this needs much explanation. Take photo, gallery, and about buttons.<div id="camFlash">A dummy container to show a “flash effect” when taking a shot.
1B) GALLERY VIEW
<!-- (B) GALLERY -->
<div id="galWrap" class="hide">
  <!-- (B1) BACK BUTTON -->
  <div id="galHead">
    <div id="galBack" class="mi btn" onclick="cam.view(0)">clear</div>
  </div>

  <!-- (B2) GALLERY PICTURES -->
  <div id="galPics"></div>

  <!-- (B3) GALLEY ITEMS TEMPLATE -->
  <template id="galTemplate"><div class="pic">
    <img class="img">
    <div class="control">
      <button class="mi btn btnsm del">delete</button>
      <button class="mi btn btnsm get">file_download</button>
      <button class="mi btn btnsm share">share</button>
    </div>
  </div></template>
</div>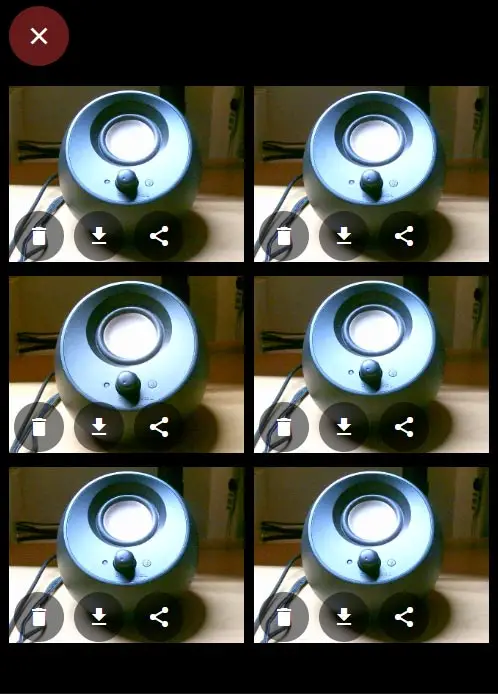
Next, we have a page to show all the shots taken by the camera.
<div id="galBack">Click to go back to the camera page.<div id="galPics">Container to show the pictures.<template id="galTemplate">The gallery items template.
PART 2) CAMERA JAVASCRIPT
2A) APP INIT
var cam = {
  // (A) INIT APP
  cache : null,  // pictures cache storage
  aClick : null, // click sound
  hViews : null, // html screens - [main, gallery, about]
  hFeed : null,  // html video tag
  hFlash : null, // html flash screen effect
  hTimer : null, // html flash screen effect timer
  init : async () => {
    // (A1) REQUIREMENTS CHECK - MEDIA DEVICES
    if (!"mediaDevices" in navigator) {
      alert("Your browser does not support media devices API.");
      return;
    }

    // (A2) REQUIREMENTS CHECK - CACHE STORAGE
    if (!"caches" in window) {
      alert("Your browser does not support cache storage.");
      return;
    }

    // (A3) REQUIREMENTS CHECK - SERVICE WORKER
    if (!"serviceWorker" in navigator) {
      alert("Your browser does not support service workers.");
      return;
    }

    // (A4) CREATE CACHE STORAGE FOR PICTURES
    cam.cache = await caches.open("MyPics");

    // (A5) REGISTER SERVICE WORKER
    try {
      await navigator.serviceWorker.register("CB-worker.js");
    } catch (err) {
      alert("Error registering service worker");
      console.error(err);
    }

    // (A6) GET CAMERA PERMISSION + START APP
    navigator.serviceWorker.ready.then(reg => {
      navigator.mediaDevices.getUserMedia({ video: true })
      .then(stream => {
        // (A6-1) CAMERA CLICK SOUND
        // https://freesound.org/people/kwahmah_02/sounds/260138/
        cam.aClick = new Audio("assets/click.mp3");

        // (A6-2) GET HTML + ENABLE CONTROLS
        cam.hViews = [
          document.getElementById("camWrap"),
          document.getElementById("galWrap"),
          document.getElementById("aboutWrap")
        ];
        cam.hFeed = document.getElementById("camFeed");
        cam.hFlash = document.getElementById("camFlash");
        gallery.hPics = document.getElementById("galPics");
        gallery.hTemplate = document.getElementById("galTemplate").content;
        cam.hFeed.srcObject = stream;
        document.getElementById("btnPics").disabled = false;
        document.getElementById("btnSnap").disabled = false;
      })
      .catch(err => {
        alert("Error initializing camera.")
        console.error(err);
      });
    });
  },
  // ...
};
window.addEventListener("load", cam.init);
On page load, cam.init() is the first thing that runs. Basically:
- (A1 to A3) Checks if the browser has all the required features.
- (A4 to A6) Set up a storage cache, install a service worker, and get permission to access the camera.
- (A6) Set up the HTML interface when everything is good to go.
2B) TAKE A PHOTO
// (B) TAKE A SNAPSHOT
snap : () => {
  // (B1) FEEDBACK
  if (!cam.aClick.ended) {
    cam.aClick.pause();
    cam.aClick.currentTime = 0;
  }
  cam.aClick.play();
  clearTimeout(cam.hTimer);
  cam.hFlash.classList.add("show");
  cam.hTimer = setTimeout(() => {
    cam.hFlash.classList.remove("show");
    clearTimeout(cam.hTimer);
  }, 100);

  // (B2) CAPTURE VIDEO FRAME TO CANVAS
  let canvas = document.createElement("canvas"),
      ctx = canvas.getContext("2d"),
      vw = cam.hFeed.videoWidth,
      vh = cam.hFeed.videoHeight;
  canvas.width = vw;
  canvas.height = vh;
  ctx.drawImage(cam.hFeed, 0, 0, vw, vh);

  // (B3) CANVAS TO CACHE STORAGE
  canvas.toBlob(blob => {
    let url = URL.createObjectURL(blob);
    fetch(url).then(async (res) => {
      // (B3-1) GET NEXT RUNNING NUMBER
      let i = 1;
      while (true) {
        let check = await cam.cache.match("pic-"+i+".png");
        if (check) { i++; continue; }
        else { break; }
      }

      // (B3-2) SAVE IMAGE INTO CACHE
      cam.cache.put("pic-"+i+".png", res);
      URL.revokeObjectURL(url);
    });
  });
},
How does “take a photo” work? Long story short:
- Create a
canvasobject. - Capture the current frame on
<video id="camFeed">into thecanvas. - Convery
canvasinto a PNG file, and save it into the cache storage.
Yes, client-side Javascript cannot access the file system at the time of writing. The only safe place to save files is cache storage.
2C) SWITCH VIEW/PAGE
// (C) SWITCH BETWEEN PAGES
// 0 = main, 1 = gallery, 2 = about
view : n => {
  for (let [i,v] of Object.entries(cam.hViews)) {
    if (i==n) { v.classList.remove("hide"); }
    else { v.classList.add("hide"); }
  }
  if (n==1) { gallery.list(); }
}
Remember that there is a “main” and “gallery” view in js-cam.html? This function is used to switch between the pages.
PART 3) GALLERY JAVASCRIPT
3A) GALLERY INIT
var gallery = {
  // (A) LIST GALLERY
  hPics : null, // html gallery wrapper
  hTemplate : null, // html image item template
  list : () => {
    gallery.hPics.innerHTML = "";
    cam.cache.keys().then(keys => keys.forEach(req => {
      let item = gallery.hTemplate.cloneNode(true);
      item.querySelector(".img").src = req.url;
      item.querySelector(".del").onclick = () => gallery.del(req.url);
      item.querySelector(".get").onclick = () => gallery.get(req.url);
      gallery.hPics.appendChild(item);
    }));
  },
  // ...
};
When the user clicks on the “gallery” button, gallery.list() takes over. Pretty much just “HTML stuff” here –
- Switch to the gallery view.
- Read the cache storage and draw the HTML gallery items.
3B) DELETE GALLERY ITEM
// (B) DELETE AN IMAGE
del : pic => { if (confirm("Delete image?")) {
  cam.cache.delete(pic).then(res => gallery.list());
}},
Self-explanatory – Delete a selected photo from the cache storage.
3C) DELETE GALLERY ITEM
// (C) DOWNLOAD AN IMAGE
get : pic =>
  cam.cache.match(pic)
  .then(res => res.blob())
  .then(blob => {
  let a = document.createElement("a"),
  url = URL.createObjectURL(blob);
  a.href = url;
  a.download = "pic.png";
  a.click();
  a.remove();
  URL.revokeObjectURL(url);
}),
The not-so-convenient part of a web app… To retrieve a photo that is inside the cache storage, we have to do a “force download”.
3D) SHARE GALLERY ITEM
// (D) SHARE AN IMAGE
share : pic =>
  cam.cache.match(pic)
  .then(res => res.blob())
  .then(blob => navigator.share({
    files: [new File([blob], pic, { type: blob.type })],
    title: new URL(pic).pathname.replace(/^.*[\\\/]/, ""),
    text: "JSCamera Share Picture"
  }))
Yes, Javascript has a built-in “web share” – Share to social media, email, messaging, and whatever app that “clicks” with web share.
PART 4) PROGRESSIVE WEB APP
4A) HTML HEADERS
<!-- WEB APP & ICONS -->
<link rel="icon" href="assets/favicon.png" type="image/png">
<meta name="mobile-web-app-capable" content="yes">
<meta name="theme-color" content="white">
<link rel="apple-touch-icon" href="assets/icon-512.png">
<meta name="apple-mobile-web-app-capable" content="yes">
<meta name="apple-mobile-web-app-status-bar-style" content="black">
<meta name="apple-mobile-web-app-title" content="JS Camera">
<meta name="msapplication-TileImage" content="assets/icon-512.png">
<meta name="msapplication-TileColor" content="#ffffff">

<!-- WEB APP MANIFEST -->
<!-- https://web.dev/add-manifest/ -->
<link rel="manifest" href="CB-manifest.json">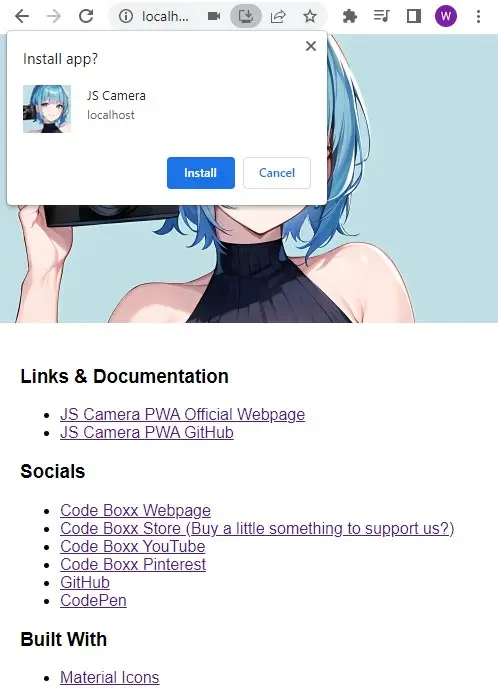
Some people may think that creating a PWA is a “very complicated” task… Well, not quite. All we need is:
- Add web app icons and descript meta tags into
<head>. - Specify a web manifest file.
- Install a service worker – Already done so in
js-cam.js.
4B) WEB MANIFEST
{
  "short_name": "Camera",
  "name": "JS Camera",
  "icons": [{
    "src": "assets/favicon.png",
    "sizes": "64x64",
    "type": "image/png"
  }, {
    "src": "assets/icon-512.png",
    "sizes": "512x512",
    "type": "image/png"
  }],
  "start_url": "js-cam.html",
  "scope": "/",
  "background_color": "white",
  "theme_color": "white",
  "display": "standalone"
}
The web manifest file is what it is, a file containing information about your web app – The name, icons, themes, settings, etc…
4C) SERVICE WORKER
// (A) CREATE/INSTALL CACHE
self.addEventListener("install", evt => {
  self.skipWaiting();
  evt.waitUntil(
    caches.open("JSCam")
    .then(cache => cache.addAll([
      "assets/click.mp3",
      "assets/favicon.png",
      "assets/icon-512.png",
      "assets/maticon.woff2",
      "assets/js-cam.css",
      "assets/js-cam.js",
      "assets/js-cam-gallery.js",
      "CB-manifest.json",
      "js-cam.html"
    ]))
    .catch(err => console.error(err))
  );
});

// (B) CLAIM CONTROL INSTANTLY
self.addEventListener("activate", evt => self.clients.claim());

// (C) LOAD FROM CACHE FIRST, FALLBACK TO NETWORK IF NOT FOUND
self.addEventListener("fetch", evt => evt.respondWith(
  caches.match(evt.request).then(res => res || fetch(evt.request))
));
For those who are new, a service worker is only “Javascript that runs in the background”. In this one:
- (A) We create a storage cache and save all the project files into it.
- (C) Hijack all the browser fetch requests. If the requested file is found in the cache, use it; Fallback to the network if not.
In short, this enables the app to run in “offline mode”.
EXTRA BITS & LINKS

That’s all for the tutorial, and here is a small section on some extras and links that may be useful to you.
COMPATIBILITY CHECKS
- Arrow Functions – CanIUse
- Service Workers – CanIUse
- Cache Storage – CanIUse
- Media Devices – CanIUse
Most of the required features are already well-supported on modern “Grade A” browsers.
THE END

Thank you for reading, and we have come to the end. I hope that it has helped you to better understand, and if you want to share anything with this guide, please feel free to comment below. Good luck and happy coding!
Hello,
great project. I’m developing a camera PWA that should be as powerful as native camera apps. But I lack programming experience in Javascript.
Via a link it is possible to save the photos taken on smartphones and iphones. Now I want to display all the photos taken on a HTML page.
Question: Can you please explain to me how to program something like this?
Study the app. We are saving to a storage cache, not to a folder. Client-side Javascript does not have direct read/write access to folders at the time of writing. The end.
https://code-boxx.com/faq/#help “Explain everything”
P.S. Search for “Flutter” or “Apache Cordova” if you are interested. PWAs are not a replacement for native apps. At least not yet.