
There sure are a lot of these “white noise” or “relaxation sound” apps these days. But know what? They are actually pretty easy to create with modern HTML/CSS/JS – Just create multiple new Audio() and set them to loop infinitely. But let’s take it one step up, and create an offline web app in this guide – Read on!
ⓘ I have included a zip file with all the source code at the start of this tutorial, so you don’t have to copy-paste everything… Or if you just want to dive straight in.
TABLE OF CONTENTS
DOWNLOAD & NOTES

Firstly, here is the download link to the example code as promised.
QUICK NOTES & REQUIREMENTS
- This is not quite a “newbie-friendly” open-source project and example – It involves the use of service workers, cache storage, and media element API.
- Too much of a hassle to create an “online example”, just download the source code or grab it from GitHub.
- “Grade A” browser required, alongside an
https://server.http://localhostis fine for testing too. - To set your own sounds, check out part 2 of “how it works” below.
LICENSE & DOWNLOAD
This project is released under the MIT License. You are free to use it for your own personal and commercial projects, and modify it as you see fit. On the condition that there the software is provided “as-is”. There are no warranties provided and “no strings attached”. Code Boxx and the authors are not liable for any claims, damages, or liabilities.
HOW IT WORKS

Not going to explain everything line-by-line (will take forever), but here’s a quick walkthrough of the Javascript Relax Sounds PWA.
PART 1) SOUNDS LIST
var sounds = [
  { name: "Rain", ico: "grain", src: "rain.webm" },
  { name: "Chimes", ico: "notifications_active", src: "chimes.webm" },
  { name: "Crickets", ico: "bug_report", src: "crickets.webm" },
  { name: "Campfire", ico: "local_fire_department", src: "campfire.webm" },
  { name: "Fountain", ico: "water_drop", src: "fountain.webm" },
  { name: "Bird", ico: "flutter_dash", src: "bird.webm" }
];
First, we start with “Captain Obvious”. Don’t think it needs an explanation, the list of available sounds, the name, and icon. Feel free to add more by yourself.
PART 2) USER INTERFACE
2A) THE HTML
<!-- (A) SOUNDS -->
<div id="sWrap"></div>
The HTML is pretty much an empty <div>. We will run through the above sounds and generate the buttons in Javascript.
2B) JAVASCRIPT INIT & DRAW HTML
var ss = {
  // (A) INITIALIZE
  init : () => {
    // (A1) CHECK - AUDIO
    if (!"audio" in window) {
      alert("Your browser does not support HTML audio.");
      return;
    }

    // (A2) CHECK - SERVICE WORKER
    if (!"serviceWorker" in navigator) {
      alert("Your browser does not support service workers.");
      return;
    }

    // (A3) CHECK - CACHE STORAGE
    if (!"caches" in window) {
      alert("Your browser does not support cache storage.");
      return;
    }

    // (A4) REGISTER SERVICE WORKER
    navigator.serviceWorker.register("js-relax-worker.js");

    // (A5) DRAW HTML SOUND BUTTONS
    let wrap = document.getElementById("sWrap");
    for (let sound of sounds) {
      let button = document.createElement("div");
      button.className = "sound";
      button.innerHTML = `<div class="mi">${sound.ico}</div>
      <div class="control">
        <div class="name">${sound.name}</div>
        <input class="vol" type="range" min="0.1" max="1" step="0.1" value="1" disabled>
      </div>`;
      sound.hIco = button.querySelector(".mi");
      sound.hVol = button.querySelector(".vol");
      sound.hIco.onclick = () => ss.preload(sound);
      wrap.appendChild(button);
    }
  },
  // ...
};
window.onload = ss.init;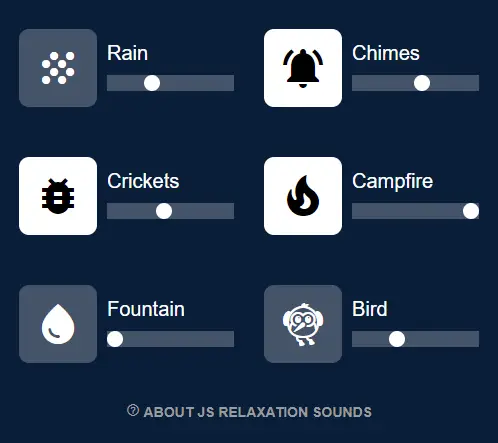
On window load, ss.init() will run.
- (A1 to A3) Checks if the browser supports the required features.
- (A4) Register a service worker. This is required to make an “installable web app”.
- (A5) Loop through
soundsabove and generate their respective HTML buttons.
PART 3) PRELOAD SOUND & TOGGLE PLAY/PAUSE
// (B) PRELOAD SOUND
preload : sound => {
  // (B1) FADE ICON TO INDICATE "NOW LOADING"
  sound.hIco.style.opacity = 0.5;
  sound.hIco.onclick = "";

  // (B2) CREATE AUDIO OBJECT
  sound.player = new Audio("assets/" + sound.src);
  sound.player.loop = true;
  sound.player.autoplay = true;

  // (B3) ON SOUND LOADED
  sound.player.oncanplaythrough = () => {
    // (B3-1) SET CSS ON PLAY/PAUSE
    sound.player.onplay = () => sound.hIco.classList.add("playing");
    sound.player.onpause = () => sound.hIco.classList.remove("playing");

    // (B3-2) CLICK BUTTON TO PLAY/PAUSE
    sound.hIco.onclick = () => ss.toggle(sound);

    // (B3-3) ENABLE VOLUME CONTROL
    sound.hVol.onchange = () => sound.player.volume = sound.hVol.value;
    sound.hVol.disabled = false;

    // (B3-4) "UNFADE" ICON + START PLAYING NOW
    sound.hIco.style.opacity = 1;
    sound.hIco.classList.add("playing");
    sound.player.play();
  };

  // (B4) ATTACH SOUND SOURCE - START LOAD
  sound.player.src = "assets/" + sound.src;
},

// (C) PLAY/PAUSE
toggle : sound => {
  if (sound.player.paused) { sound.player.play(); }
  else { sound.player.pause(); }
}
- (B) Take note, we do not preload all the sounds automatically… Slow servers are going to suffer. Thus, we run
ss.preload()once when the user first clicks on the sound – This will load the selected sound, enable the controls, and start playing when ready. - (C) All subsequent clicks on the loaded sound will simply toggle play/pause.
PART 4) INSTALLABLE WEB APP
4A) HTML META HEADERS
<!-- WEB APP MANIFEST -->
<!-- https://web.dev/add-manifest/ -->
<link rel="manifest" href="js-relax-manifest.json">

<!-- ANDROID + CHROME + APPLE + WINDOWS APP -->
<meta name="mobile-web-app-capable" content="yes">
<meta name="theme-color" content="white">
<link rel="apple-touch-icon" href="assets/icon-512.png">
<meta name="apple-mobile-web-app-capable" content="yes">
<meta name="apple-mobile-web-app-status-bar-style" content="black">
<meta name="apple-mobile-web-app-title" content="JS Relax">
<meta name="msapplication-TileImage" content="assets/icon-512.png">
<meta name="msapplication-TileColor" content="#ffffff">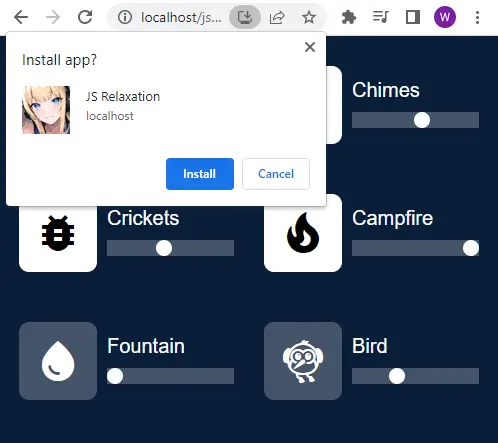
We already have a complete web app. But to take this one step further and turn it into an “installable web app”, there are 3 things to address.
- HTML meta headers – Specify the app name and icons. Quite a pain, but the above is what I gathered from the Internet.
- Define a web manifest file.
- Register a service worker.
4B) WEB MANIFEST
{
  "short_name": "JS Relaxation",
  "name": "JS Relaxation",
  "icons": [{
    "src": "assets/favicon.png",
    "sizes": "64x64",
    "type": "image/png"
  }, {
    "src": "assets/icon-512.png",
    "sizes": "512x512",
    "type": "image/png"
  }],
  "start_url": "js-relax.html",
  "scope": "/",
  "background_color": "white",
  "theme_color": "white",
  "display": "standalone"
}
Well, a manifest file is what it is. A file containing the app name, icon, theme, settings, information, etc…
4C) SERVICE WORKER
// (A) CREATE/INSTALL CACHE
self.addEventListener("install", evt => {
  self.skipWaiting();
  evt.waitUntil(
    caches.open("JSSleep")
    .then(cache => cache.addAll([
      "assets/favicon.png",
      "assets/icon-512.png",
      "assets/head-pwa-relax.webp",
      "assets/maticon.woff2",
      "assets/js-relax.css",
      "assets/js-relax-sounds.js",
      "assets/js-relax.js",
      "js-relax-manifest.json",
      "js-relax.html",
      "assets/bird.webm",
      "assets/campfire.webm",
      "assets/chimes.webm",
      "assets/crickets.webm",
      "assets/fountain.webm",
      "assets/rain.webm"
    ]))
    .catch(err => console.error(err))
  );
});

// (B) CLAIM CONTROL INSTANTLY
self.addEventListener("activate", evt => self.clients.claim());

// (C) LOAD FROM CACHE FIRST, FALLBACK TO NETWORK IF NOT FOUND
self.addEventListener("fetch", evt => evt.respondWith(
  caches.match(evt.request).then(res => res || fetch(evt.request))
));
Finally, for the uninitiated – A “service worker” is simply Javascript that runs in the background.
- (A) Create a local cache and save all the specified files.
- (C) Offline capabilities – Try to load the required files from the cache first, and fallback to loading from the network if not available.
In simple terms, this worker does the “offline app magic”.
EXTRA BITS & LINKS

That’s all for the tutorial, and here is a small section on some extras and links that may be useful to you.
COMPATIBILITY CHECKS
- Arrow Functions – CanIUse
- Service Workers – CanIUse
- Cache Storage – CanIUse
- Audio Element – CanIUse
- Add To Home Screen – CanIUse
Most of the required features are already well-supported on modern “Grade A” browsers.
FREE SOUNDS?
There are plenty of websites to get free sounds. Just do a “free sound download” on the Internet. Here are a few:
PERFORMANCE & LIMITATIONS
As you can see, this web app simply creates multiple new Audio("SOUND.MP3") and plays them. Most modern smartphones should have sufficient processing power to handle multiple sounds playing at once. But still, the older or lower-end phones are going to suffer. After all, Javascript does not have the same level of performance as a native app.
Also, the page needs to stay on the screen to keep playing on mobile devices. Although there are ways around this, by turning it into a Cordova app and working with background music.
IMPROVEMENT IDEAS
Yes, this simple “sleep sounds” PWA works. But there is still room for improvement – Volume sliders for individual sounds, a timer to “switch off all sounds”, or even the crazy stuff of connecting to a health tracker with the Web Bluetooth API. But for now, I shall put these on the “wish list”.
THE END

Thank you for reading, and we have come to the end. I hope that it has helped you to better understand, and if you want to share anything with this guide, please feel free to comment below. Good luck and happy coding!