Welcome to a tutorial on how to display dynamic HTML content in Javascript. Yes, the Stone Age of the Internet is long over, and we now live in an age of non-static HTML pages. Be it refreshing the shopping cart after adding an item, loading more content, or updating a section of the page.
There are a number of ways to dynamically manipulate HTML contents with Javascript:
- Directly change the contents with
innerHTMLandouterHTML. - Create new HTML elements and insert them.
- Load and insert HTML content with AJAX.
- Load data with AJAX, and generate a table or list.
- Dynamically load CSS files.
But just how does each method work exactly? Read on for the examples!
TLDR – QUICK SLIDES
[web_stories_embed url=”https://code-boxx.com/web-stories/dynamic-html-content-with-javascript/” title=”Dynamic HTML Content With Javascript” poster=”https://code-boxx.com/wp-content/uploads/2021/11/STORY-JS-20230518.webp” width=”360″ height=”600″ align=”center”]
Fullscreen Mode – Click Here
TABLE OF CONTENTS
DYNAMIC CONTENT WITH JAVASCRIPT
 All right, let us now get into the examples of manipulating dynamic HTML content in Javascript.
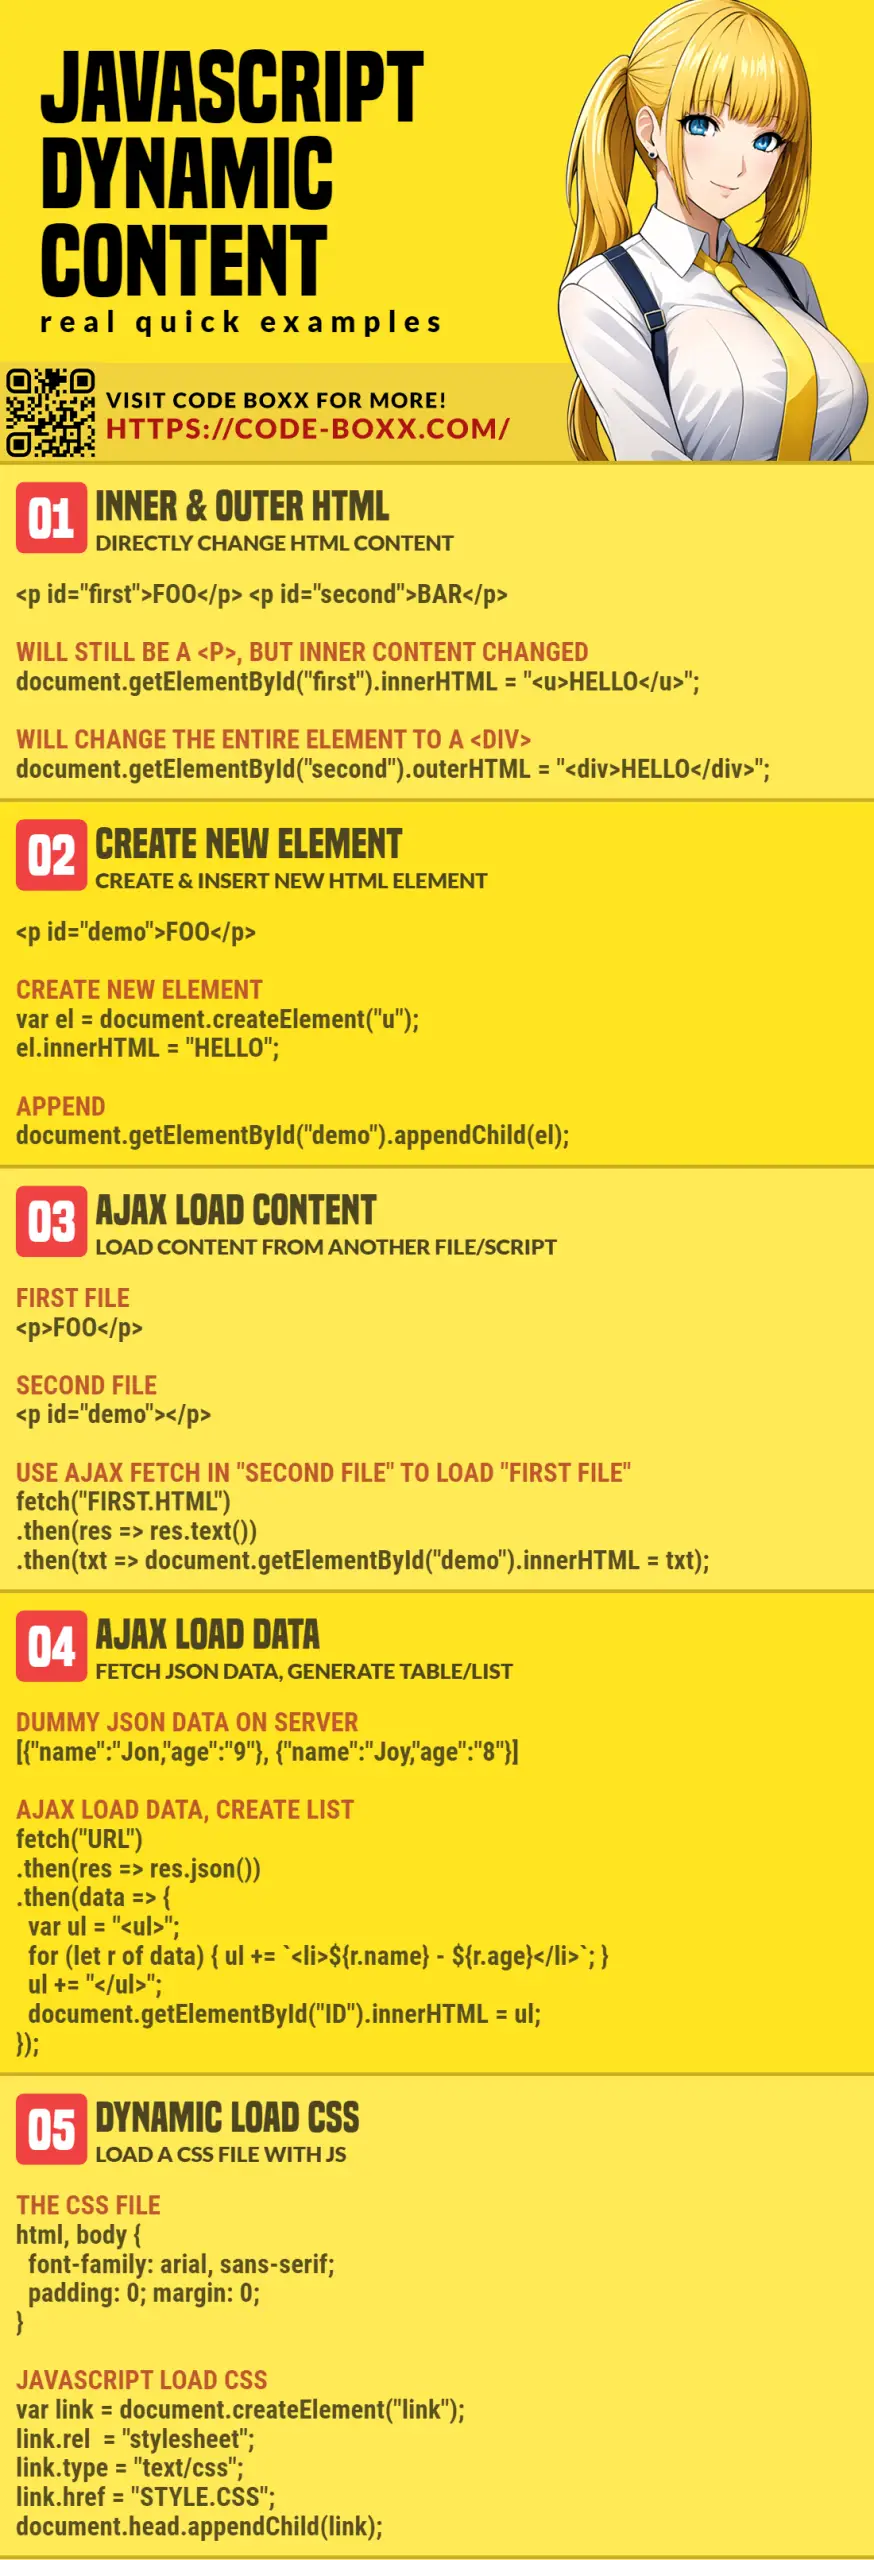
1) CHANGE CONTENTS WITH INNERHTML & OUTERHTML
<!-- (A) HTML PARAGRAPHS -->
<p id="first">
  Lorem ipsum dolor sit amet, consectetur adipiscing elit.
</p>
<p id="second">
  Vivamus semper eleifend lectus, sed faucibus massa cursus a.
</p>

<!-- (B) REPLACE HTML -->
<script>
window.addEventListener("load", () => {
  // (B1) REPLACE THE ENTIRE <P> ELEMENT WITH <STRONG>
  var first = document.getElementById("first");
  first.outerHTML = "<strong>FOO BAR!</strong>";

  // (B2) WILL STILL BE A <P>, BUT CONTENT WILL BE CHANGED.
  var second = document.getElementById("second");
  second.innerHTML = "<u>FOO</u> <i>BAR</i>";
});
</script>
So just what are the innerHTML and outerHTML properties? I suppose the above example is very much self-explanatory.
- The
innerHTMLrefers to the contents of the given element. - The
outerHTMLrefers to the entire element itself.
2) CREATE HTML ELEMENT & INSERT
<!-- (A) HTML -->
<div id="first">
  Lorem ipsum dolor sit amet, consectetur adipiscing elit.
</div>

<!-- (B) CREATE & INSERT ELEMENT -->
<script>
window.addEventListener("load", () => {
  // (B1) CREATE NEW HTML ELEMENT
  var element = document.createElement("strong");
  element.innerHTML = "FOO BAR!";

  // (B2) ATTACH TO <DIV>
  document.getElementById("first").appendChild(element);

  // (B3) TO ATTACH NEW ELEMENT TO <BODY>
  element = document.createElement("p");
  element.innerHTML = "Lorem ipsum dolor sit amet.";
  document.body.appendChild(element);
});
</script>
This is kind of the “object-oriented” way of dealing with HTML elements:
- Create a new element –
var el = document.createElement("TAG"); - Set the contents –
el.innerHTML = "CONTENT"; - Append it –
document.getElementById("ID").appendChild(el);
3) AJAX LOAD CONTENT
<!-- (A) HTML CONTAINER -->
<div id="container"></div>
<input type="button" value="AJAX Load" onclick="aload();">

<!-- (B) AJAX LOAD -->
<script>
function aload () {
  fetch("3B-contents.html")
  .then(res => res.text())
  .then(txt => document.getElementById("container").innerHTML = txt);
}
</script><p>
Lorem ipsum dolor sit amet, consectetur adipiscing elit.
</p>For you guys who have not heard of AJAX before, it is the abbreviation for “Asynchronous Javascript And XML”. In layman’s terms, loading content and data without refreshing the entire page. Very useful – We can use it to send data to the server, fetch data from the server, or even load more content.
P.S. Take note that AJAX will only work with http://, not file://.
4) AJAX LOAD DATA & GENERATE TABLE/LIST
<!-- (A) HTML CONTAINER -->
<div id="container"></div>
<input type="button" value="Load Data" onclick="aload();">

<!-- (B) AJAX LOAD JSON DATA -->
<script>
function aload () {
  // (B1) AJAX LOAD JSON DATA
  fetch("4B-dummy.json")
  .then(res => res.json())
  .then(data => {
    var table = "<table>";
    for (let person of data) {
      table += `<tr><td>${person.name}</td><td>${person.email}</td></tr>`;
    }
    table += "</table>";
    document.getElementById("container").innerHTML = table;
  });
}
</script>[
{"name":"John Doe","email":"john@doe.com"},
{"name":"Jane Doe","email":"jane@doe.com"},
{"name":"Josh Doe","email":"josh@doe.com"},
{"name":"Juliet Doe","email":"juliet@doe.com"},
{"name":"Joy Doe","email":"joy@doe.com"}
]This is a follow-up to the previous AJAX example – Yes, we can parse an array of JSON data from the server, and generate a table or list with it. I will not go through the server-side processing as it is out-of-scope for this tutorial – Read my other guide for PHP JSON if you are interested.
5) DYNAMICALLY LOAD CSS FILES
<!-- (A) DUMMY HTML -->
<div id="container">
  Lorem ipsum dolor sit amet, consectetur adipiscing elit.
</div>
<input type="button" value="Load CSS" onclick="aload();">

<!-- (B) INSERT CSS -->
<script>
function aload () {
  var link = document.createElement("link");
  link.rel = "stylesheet";
  link.type = "text/css";
  link.href = "5B-style.css";
  document.head.appendChild(link);
}
</script>html, body {
font-family: arial, sans-serif;
padding: 0;
margin: 0;
}
#container {
padding: 10px;
font-size: 1.5em;
background: #ffe0db;
}Remember that we can create HTML tags from earlier? Yes, we can even create <link> tags and insert them into the <head> section – Effectively, dynamically loading CSS files.
DOWNLOAD & NOTES

Here is the download link to the example code, so you don’t have to copy-paste everything.
SORRY FOR THE ADS...
But someone has to pay the bills, and sponsors are paying for it. I insist on not turning Code Boxx into a "paid scripts" business, and I don't "block people with Adblock". Every little bit of support helps.
Buy Me A Coffee Code Boxx eBooks
EXAMPLE CODE DOWNLOAD
Click here for the source code on GitHub gist, just click on “download zip” or do a git clone. I have released it under the MIT license, so feel free to build on top of it or use it in your own project.
EXTRA BITS & LINKS

That’s it for all the examples, and here are some small extras that may be useful.
THE SUMMARY
FUNCTIONS & PROPERTIES
| Function/property | Description | Reference Link |
ELEMENT.innerHTML |
Get/set the inner HTML of the element. | Click Here |
ELEMENT.outerHTML |
Get/set the HTML of the entire element. | Click Here |
createElement(TAG NAME) |
Create a new HTML element. | Click Here |
TARGET.appendChild(ELEMENT) |
Append a new element into the container. | Click Here |
AJAX FETCH
fetch("URL")
.then(res => res.text()) // read server response as text
.then(response => {
  console.log(response); // whatever the server response is
});
P.S. If you need to fetch from another website (cross-domain) – It is possible, but some Cross-Origin Resource Sharing (CORS) settings need to be done. Check out my other fetch CORS tutorial.
JSON
| Function | Description |
JSON.parse(STRING) |
Decode given JSON string back into array/object. |
JSON.stringify(ARRAY) |
Encode the given array/object into a JSON string. |
TUTORIAL VIDEO
INFOGRAPHIC CHEAT SHEET
THE END

Thank you for reading, and we have come to the end of this guide. I hope that it has helped you to create a better dynamic HTML page, and if you have anything to share with this guide, please feel free to comment below. Good luck and happy coding!
Hey man, i need your help. I’m creating a forum in PHP,JS(Vanilla),MySQL……
Each post has a button called “comments”.When i push the button a modal windows get open and in that windows the comments of that post are displayed. So,my problem is that only the first post get the comments showed in the modal,but no the others.
* LONG PROJECT CODE SNIPPET TRUNCATED *
https://code-boxx.com/faq/#help
Sorry mate, can’t help fix your personal project. I ain’t the one getting paid to do work. 😛 Study how basic AJAX works with POST/GET first – Good luck!
thax u very much, keep make great tutorial
Sometimes simple things help.
Thanks mate