Welcome to a quick tutorial and example of how to perform a cross-origin fetch request in Javascript. Are you trying to do a fetch request to a different domain? Only to be denied with a “no Access-Control-Allow-Origin header is present” error?
To perform a cross-origin fetch call:
- On the first site, do a fetch call to the second site –
fetch("http://second.com/page.php", { mode : "cors" }); - Allow cross-origin on the second site.
header("Access-Control-Allow-Origin: http://first.com");// SCRIPT AS USUAL
Yes, it’s that simple. But let us walk through more details on CORS and how to set up virtual hosts on localhost (with XAMPP) for testing – Read on!
TLDR – QUICK SLIDES
[web_stories_embed url=”https://code-boxx.com/web-stories/javascript-cors-fetch/” title=”Javascript CORS Fetch With XAMPP” poster=”https://code-boxx.com/wp-content/uploads/2021/11/STORY-JS-20230518.webp” width=”360″ height=”600″ align=”center”]
Fullscreen Mode – Click Here
TABLE OF CONTENTS
WHAT IS CORS?

Before we get into the code example, let us answer the million-dollar question – What the heck is “CORS”?
CROSS-ORIGIN RESOURCE SHARING
Cross-Origin Resource Sharing (CORS) is an HTTP-header based mechanism that allows a server to indicate any origins (domain, scheme, or port) other than its own from which a browser should permit loading resources. MDN
In simple terms, making a request from your website http://first.com to another website http://second.com.
WHY IS CROSS-ORIGIN NOT ALLOWED BY DEFAULT!?
One word – Security. Imagine a world with no restrictions.
- Anyone can submit forms to whatever site they please. Send data to whoever they like. There is no control, no verification.
- Anyone can masquerade a request to delete accounts on other websites. Or even process transactions on another website.
Yep, it’s pure chaos. So the “default rule” is that http://second.com will only accept and process requests from http://second.com; All requests from http://first.com to http://second.com will be ignored.
ALLOW ORIGIN & CREDENTIALS
- When we fire
fetch("http://second.com")onhttp://first.com, this will send a HTTP header ofOrigin: http://first.com. - To accept the cross-origin call,
http://second.comneeds to respond with the HTTP header –Access-Control-Allow-Origin: http://first.com. - That pretty much seals the deal. If you want to also send cookies and credentials from
first.comtosecond.com–Access-Control-Allow-Credentials: true.
P.S. For the “exact mechanics”, this post on Javascript.info gives a good breakdown of the exchange.
CORS FETCH WITH XAMPP

With that, let us now get into the example of setting up virtual hosts and running a CORS fetch. All on a local machine.
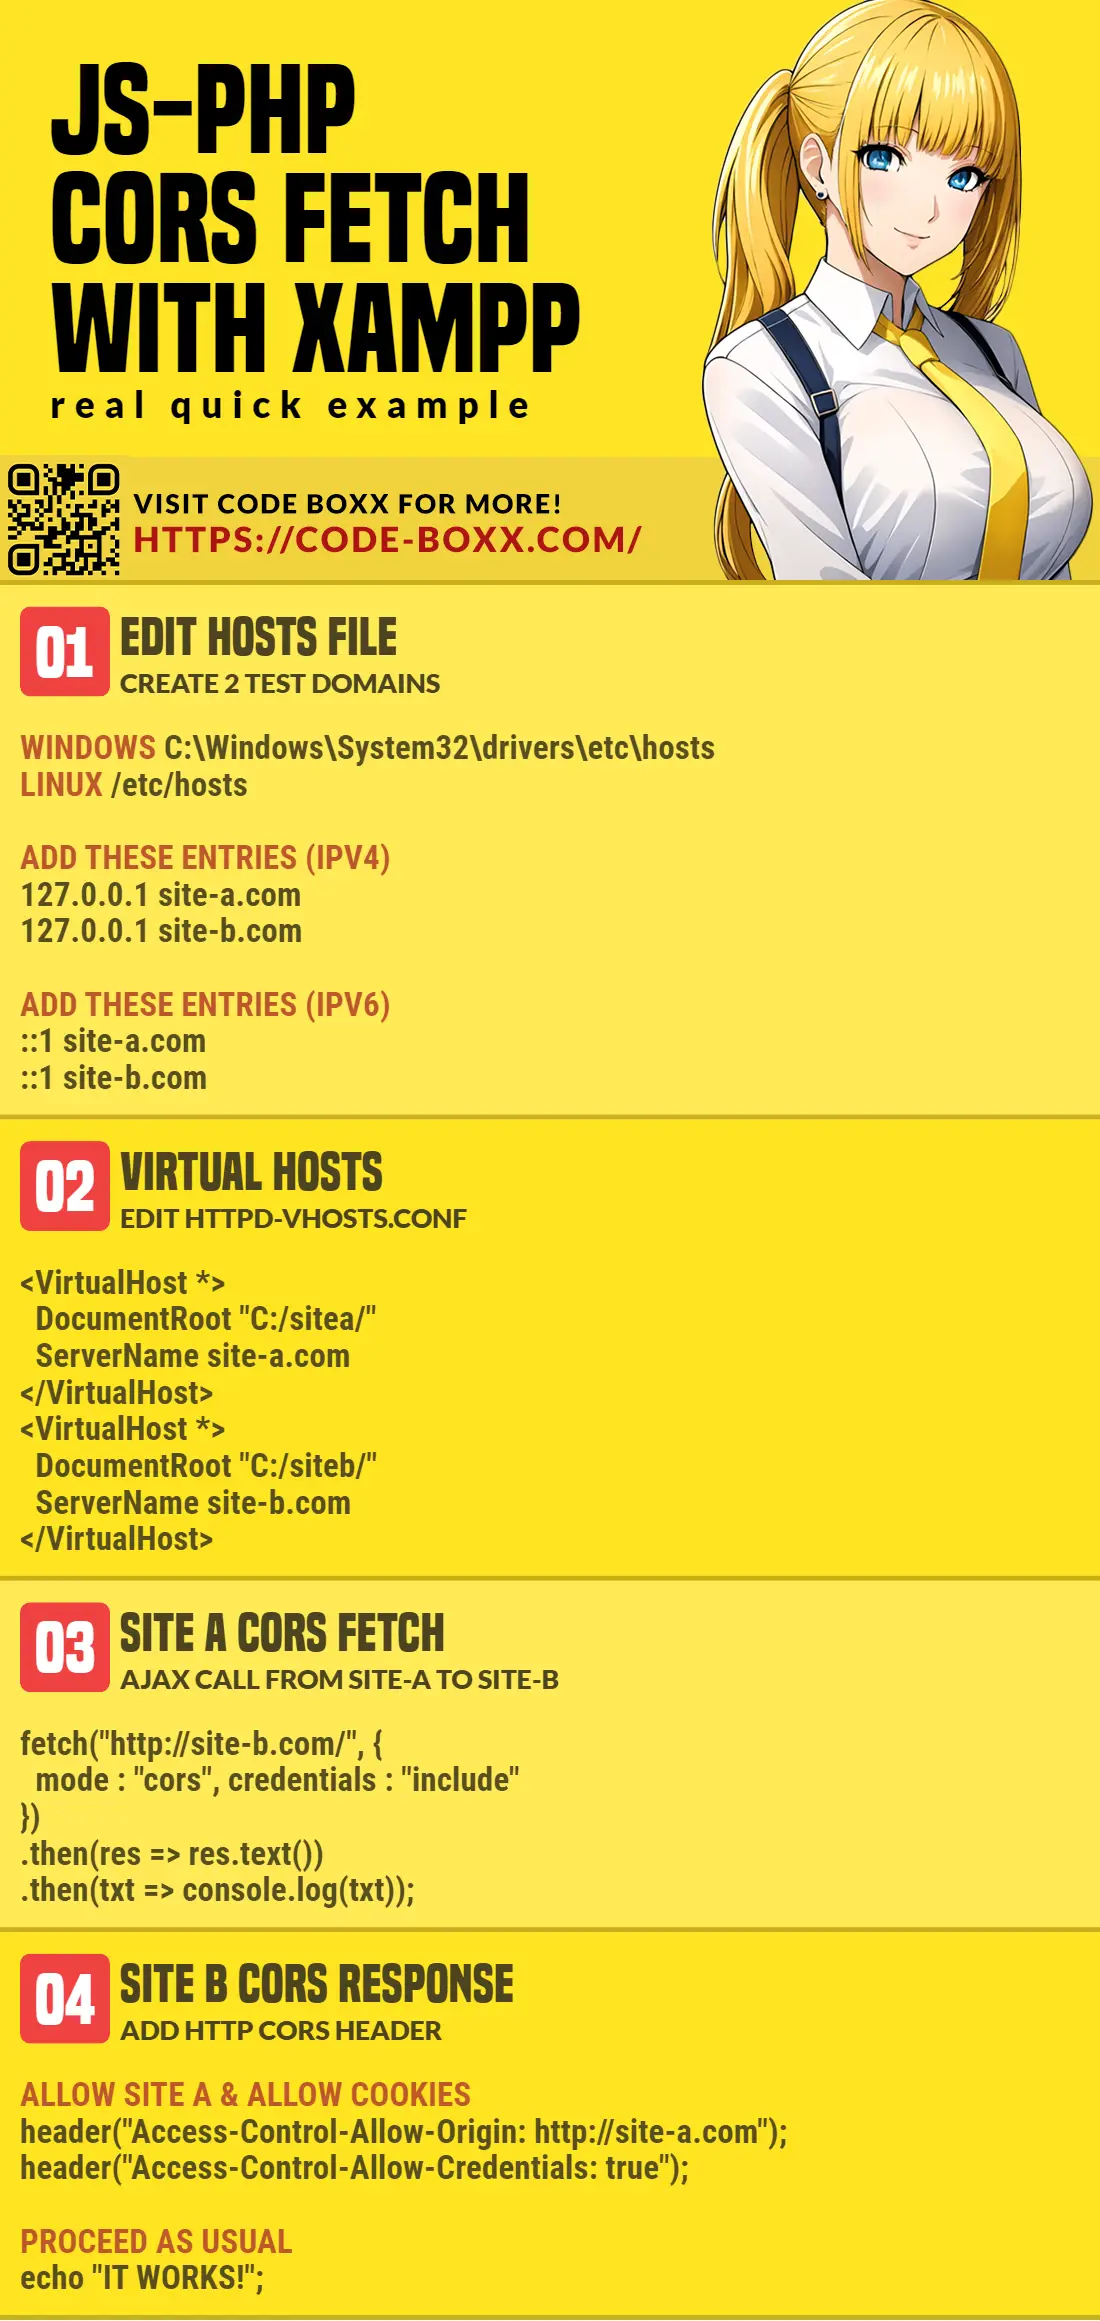
STEP 1) UPDATE THE HOSTS FILE
127.0.0.1 site-a.com
127.0.0.1 site-b.com
For the uninitiated – Don’t need to panic, all that is happening here is a manual DNS override. That is, http://site-a.com and http://site-b.com will now resolve to localhost 127.0.0.1. If you are using IPV6, change it to ::1 instead.
P.S. Mac and Linux users, your hosts file is probably located at /etc/hosts. Although that may differ for different builds and versions.
STEP 2) APACHE VIRTUAL HOST
# SITE-A.COM
<VirtualHost *>
  DocumentRoot "C:/sitea/"
  ServerName site-a.com
  <Directory "C:/sitea/">
    Options Indexes FollowSymLinks Includes ExecCGI
    AllowOverride All
    Require all granted
  </Directory>
</VirtualHost>

# SITE-B.COM
<VirtualHost *>
  DocumentRoot "C:/siteb/"
  ServerName site-b.com
  <Directory "C:/siteb/">
    Options Indexes FollowSymLinks Includes ExecCGI
    AllowOverride All
    Require all granted
  </Directory>
</VirtualHost>- Next, we need to create 2 folders –
sitea/andsiteb/. - Edit
httpd-vhosts.conf, create two virtual hosts forsite-a.comandsite-b.com– Map them to the respectivesitea/andsiteb/folder.
STEP 3) CROSS-ORIGIN FETCH REQUEST
<script>
function fetchCORS () {
  fetch("http://site-b.com/4-cors.php", {
    mode : "cors",
    credentials : "include"
  })
  .then(res => res.text())
  .then(txt => console.log(txt))
  .catch(err => console.error(err));
}
</script>
<input type="button" value="Fetch Request" onclick="fetchCORS()">
Now that the virtual hosts are ready, let us create a simple HTML page to fire a cross-origin fetch request.
P.S. It is already mode : "cors" by default in modern browsers. This is probably “extra”, but we still define it as “to be safe”.
P.P.S. With credentials : "include", the fetch request will also send cookies and credentials. If you don’t want this to happen, set credentials : "omit" instead.
STEP 4) CROSS-ORIGIN ALLOW
4A) LAZY CROSS-ORIGIN ALLOW
<?php
// (A) THE LAZY WAY
header("Access-Control-Allow-Origin: *");
echo "It works!";
The lazy way to respond to cross-origin calls is to reply with Access-Control-Allow-Origin: *. Yes, this works, but take note:
- Any website can call this script, it is more vulnerable to attacks.
- With
Allow-Origin: *, we cannot setAllow-Credentials: true; We cannot send cookies and credentials this way.
4B) BETTER CROSS-ORIGIN ALLOW
<?php
// (B) SMARTER WAY
// (B1) GET REQUEST ORIGIN
if (array_key_exists("HTTP_ORIGIN", $_SERVER)) {
  $origin = $_SERVER["HTTP_ORIGIN"];
} else if (array_key_exists("HTTP_REFERER", $_SERVER)) {
  $origin = $_SERVER["HTTP_REFERER"];
} else {
  $origin = $_SERVER["REMOTE_ADDR"];
}

// (B2) ALLOWED DOMAINS
if (!in_array(
  parse_url($origin, PHP_URL_HOST),
  ["localhost", "site-a.com", "site-b.com"]
)) {
  http_response_code(403);
  exit("$origin not allowed");
}

// (B3) PROCEED
header("Access-Control-Allow-Origin: $origin");
header("Access-Control-Allow-Credentials: true");
echo "It works!";
This is a slightly smarter and safer way to deal with cross-domain calls. We counter-check the origin of the request, and respond only if it is an “allowed domain”. While this is not 100% foolproof, it will not respond to everyone at the very least.
DOWNLOAD & NOTES

Here is the download link to the example code, so you don’t have to copy-paste everything.
SORRY FOR THE ADS...
But someone has to pay the bills, and sponsors are paying for it. I insist on not turning Code Boxx into a "paid scripts" business, and I don't "block people with Adblock". Every little bit of support helps.
Buy Me A Coffee Code Boxx eBooks
EXAMPLE CODE DOWNLOAD
Click here for the source code on GitHub gist, just click on “download zip” or do a git clone. I have released it under the MIT license, so feel free to build on top of it or use it in your own project.
EXTRA BITS & LINKS

That’s all for the tutorial, and here is a small section on some extras and links that may be useful to you.
COMPATIBILITY CHECKS
Fetch is already well-supported across all modern browsers at the time of writing. But if you have to support legacy browsers – It is also possible to set CORS in XMLHttpRequest.
LINKS & REFERENCES
- How to Edit Your Hosts File on Linux, Windows, and macOS – Linuxize
- Fetch API – MDN
INFOGRAPHIC CHEATSHEET
THE END

Thank you for reading, and we have come to the end. I hope that it has helped you to better understand, and if you want to share anything with this guide, please feel free to comment below. Good luck and happy coding!