Welcome to a tutorial on how to support cross-domain sessions in PHP. Yes, it is technically possible to share a single session across multiple domains, but it is quite a challenging task.
To support cross-domain sessions in PHP, we need to:
- Save the sessions into a shared common database.
- Set one of your websites to facilitate the shared session.
That covers the basic idea, read on for the details!
TABLE OF CONTENTS
DOWNLOAD & NOTES
Here is the download link to the example code, so you don’t have to copy-paste everything.
EXAMPLE CODE DOWNLOAD
Just click on “download zip” or do a git clone. I have released it under the MIT license, so feel free to build on top of it or use it in your own project.
SORRY FOR THE ADS...
But someone has to pay the bills, and sponsors are paying for it. I insist on not turning Code Boxx into a "paid scripts" business, and I don't "block people with Adblock". Every little bit of support helps.
Buy Me A Coffee Code Boxx eBooks
TEST SERVER SETUP
Before we get into the code, here is a quick walkthrough and overview of the server setup – If you don’t have multiple domains for testing, no sweat. Here is how we can simulate multiple domains in localhost.
SETUP OVERVIEW
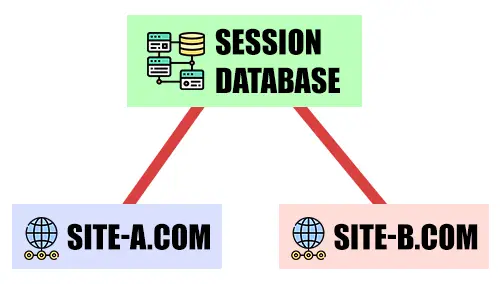 For this example, we are going to have 2 websites –
 site-a.com and site-b.com. Both websites have access to a shared database.
OS HOSTS
127.0.0.1 site-a.com
127.0.0.1 site-b.com
::1 site-a.com
::1 site-b.com
First, open the hosts file and add in the above. For the uninitiated, there’s no need to panic. This is just a manual DNS override to point site-a.com and site-b.com to your local server.
P.S. Linux and Mac users, your host file should be located in /etc/hosts.
VIRTUAL HOSTS
<VirtualHost site-a.com:443>
  DocumentRoot "D:\http\a"
  ServerName site-a.com
  SSLEngine On
  SSLCertificateFile "C:/xampp/apache/conf/ssl.crt/server.crt"
  SSLCertificateKeyFile "C:/xampp/apache/conf/ssl.key/server.key"
  <Directory "D:\http\a">
    Options Indexes FollowSymLinks Includes ExecCGI
    AllowOverride All
    Require all granted
  </Directory>
</VirtualHost>

<VirtualHost site-b.com:443>
  DocumentRoot "D:\http\b"
  ServerName site-b.com
  SSLEngine On
  SSLCertificateFile "C:/xampp/apache/conf/ssl.crt/server.crt"
  SSLCertificateKeyFile "C:/xampp/apache/conf/ssl.key/server.key"
  <Directory "D:\http\b">
    Options Indexes FollowSymLinks Includes ExecCGI
    AllowOverride All
    Require all granted
  </Directory>
</VirtualHost>
Next, we add the virtual hosts to “map” https://site-a.com to HTTP/a/ and https://site-b.com to HTTP/b/.
P.S. This is for the Apache webserver. IIS and NGINX users, please do some of your own research.
SSL CERTIFICATE
Using https:// is a critical part to make this entire example work. If you have not already set this up, self-sign and generate your own SSL cert. It is quite a hassle to do it, but there are many good guides online – Do your own research.
ACCESS & VERIFY
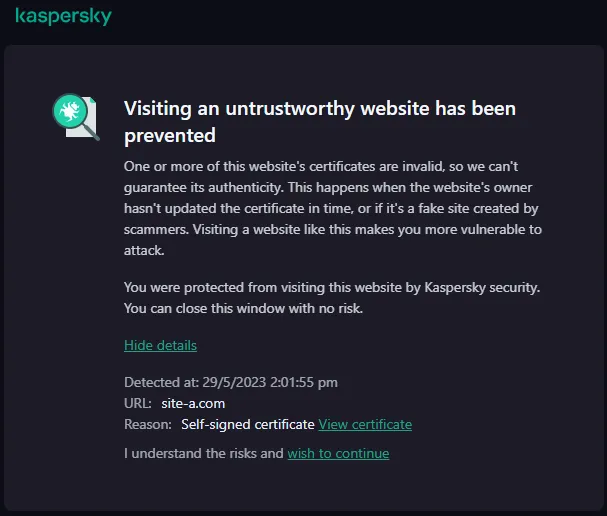
Once everything is set up, access https://site-a.com and https://site-b.com in the browser for verification. Yes, that is HTTPS. If you have a self-signed SSL cert, the browser or anti-virus will complain “not a secure website”. No sh1t Sherlock, I signed the certificate myself. So, just click on continue.
PART 1) DATABASE SESSIONS TABLE
CREATE TABLE `sessions` (
  `id` varchar(64) NOT NULL,
  `access` bigint(20) UNSIGNED DEFAULT NULL,
  `data` text DEFAULT NULL
) ENGINE=InnoDB DEFAULT CHARSET=utf8mb4;

ALTER TABLE `sessions`
  ADD PRIMARY KEY (`id`);
Yes, PHP sessions are file-based by default. That will not work for a distributed setup, so the first step is to create a shared database to store the sessions instead. This should be pretty self-explanatory:
idThe session ID, primary key.accessLast accessed timestamp.dataSession data.
PART 2) DATABASE SESSIONS CLASS
<?php
// (A) DATABASE SESSION CLASS
class MySess implements SessionHandlerInterface {
  // (A1) PROPERTIES
  public $pdo = null;
  public $stmt = null;
  public $error = "";
  public $lastID = null;

  // (A2) INIT - CONNECT TO DATABASE
  public function __construct() {
    $this->pdo = new PDO(
      "mysql:host=".SDB_HOST.";charset=".SDB_CHAR.";dbname=".SDB_NAME,
      SDB_USER, SDB_PASS, [
      PDO::ATTR_ERRMODE => PDO::ERRMODE_EXCEPTION,
      PDO::ATTR_DEFAULT_FETCH_MODE => PDO::FETCH_ASSOC
    ]);
  }

  // (A3) HELPER - EXECUTE SQL QUERY
  function exec ($sql, $data=null) : void {
    $this->stmt = $this->pdo->prepare($sql);
    $this->stmt->execute($data);
    $this->lastID = $this->pdo->lastInsertId();
  }

  // (A4) SESSION OPEN - NOTHING IN PARTICULAR...
  function open ($path, $name) { return true; }

  // (A5) SESSION CLOSE - CLOSE DATABASE CONNECTION
  function close () {
    if ($this->stmt !== null) { $this->stmt = null; }
    if ($this->pdo !== null) { $this->pdo = null; }
    return true;
  }

  // (A6) SESSION READ - FETCH FROM DATABASE
  function read ($id) {
    $this->exec("SELECT `data` FROM `sessions` WHERE `id`=?", [$id]);
    $data = $this->stmt->fetchColumn();
    return $data===false ? "" : $data ;
  }

  // (A7) SESSION WRITE - WRITE INTO DATABASE
  function write ($id, $data) {
    $this->exec("REPLACE INTO `sessions` VALUES (?, ?, ?)", [$id, time(), $data]);
    return true;
  }

  // (A8) SESSION DESTROY - DELETE FROM DATABASE
  function destroy ($id) {
    $this->exec("DELETE FROM `sessions` WHERE `id`=?", [$id]);
    return true;
  }

  // (A9) GARBAGE COLLECT - DELETE OLD ENTRIES
  function gc ($max) {
    $this->exec("DELETE FROM `sessions` WHERE `access` < ?", [(time() - $max)]);
    return true;
  }
}

// (B) DATABASE SETTINGS - CHANGE TO YOUR OWN!
define("SDB_HOST", "localhost");
define("SDB_CHAR", "utf8mb4");
define("SDB_NAME", "test");
define("SDB_USER", "root");
define("SDB_PASS", "");

// (C) START!
session_set_save_handler(new MySess(), true);
session_start();
Not going to explain this library line-by-line, but we basically use session_set_save_handler() to set our own custom PDO database session handlers. Remember to change the database settings to your own.
PART 3) SITE A – SESSION START & SYNC
<!-- (A) START PHP SESSION -->
<?php
require "../2-lib-sess.php";
$_SESSION = ["Start" => date("Y-m-d H:i:s")];
?>

<!-- (B) "INFORMATION DISPLAY" -->
<h2>THIS IS SITE A</h2>
<form>
  <label>SESSION ID</label>
  <input type="text" value="<?=session_id()?>" readonly>
  <label>SESSION VAR</label>
  <textarea readonly><?php print_r($_SESSION); ?></textarea>
  <label>SESSION SYNC</label>
  <div id="sync"></div>
</form>

<!-- (C) SESSION SYNC -->
<script>
// (C1) SITES TO SYNC
var sites = ["site-b.com"];

// (C2) HELPER - SHOW SYNC STATUS IN HTML
var rower = txt => {
  let row = document.createElement("div");
  row.innerHTML = txt;
  document.getElementById("sync").appendChild(row);
};

// (C3) FORM DATA - PHP SESSION ID
var data = new FormData();
data.append("sid", "<?=session_id()?>");

// (C4) START SYNC
for (let site of sites) {
  fetch(`https://${site}/4-sync.php`, {
    mode : "cors", credentials : "include",
    method : "post", body : data
  })
  .then(res => res.text())
  .then(txt => rower(`https://${site}/sync.php - ${txt}`))
  .catch(err => rower(`https://${site}/sync.php - ${err.message}`));
}
</script>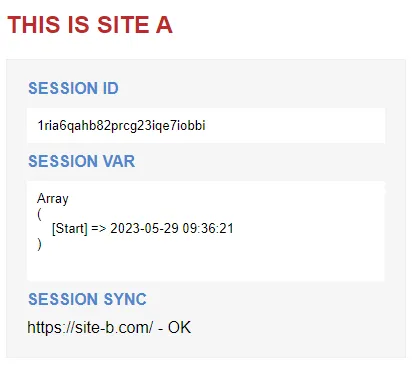
There is a fair bit going on here.
- Remember the database session library we created earlier on? Loading this library will automatically start the session, and we set a timestamp into the session for testing.
- Just some “nice HTML” to display information on the current
$_SESSION. - Getting the rest of the domains to sync is tricky. We have to do a cross-origin AJAX fetch call with the session ID to set the
PHPSESSIDcookie.
PART 4) SITE B – SESSION SYNC
<?php
// (A) ALLOW CORS FROM SITE-A
header("Access-Control-Allow-Origin: https://site-a.com");
header("Access-Control-Allow-Credentials: true");

// (B) CHECK - PHP SESSION ID MUST BE SENT
if (!isset($_POST["sid"])) { exit("PHPSESSID not provided"); }

// (C) SET CROSS ORIGIN SESSION COOKIE
setcookie("PHPSESSID", $_POST["sid"], [
  "path" => "/",
  "domain" => "site-b.com",
  "secure" => true,
  "samesite" => "None"
]);

// (D) DONE
echo "OK";
This is the “session sync handler” on site-b.com. Basically, just setting the PHPSESSID cookie. Yep, if you don’t know what that is, roll back and follow up with your own studies on the basics. Links below.
PART 5) SITE B – VERIFICATION
<?php
// (A) DUMMY PROOFING - PHP SESSION MUST BE STARTED FROM SITE A
if (!isset($_COOKIE["PHPSESSID"])) {
  exit("Please sync from site A first.");
} ?>

<!-- (B) START PHP SESSION -->
<?php
require "../2-lib-sess.php";
?>

<!-- (C) "INFORMATION DISPLAY" -->
<h2>THIS IS SITE B</h2>
<form>
  <label>SESSION ID</label>
  <input type="text" value="<?=session_id()?>" readonly>
  <label>SESSION VAR</label>
  <textarea readonly><?php print_r($_SESSION); ?></textarea>
</form>
Once a “synchronized” PHPSESSID cookie is set across all the domains, everything is good to go.
EXTRAS
That’s all for the tutorial, and here is a small section on some extras and links that may be useful to you.
SECURITY CHECKS
Right, the above “fetch and sync” cycle is not secure at all. You will want to beef up your own for better security. For example:
- Create a “sync request” table with 3 fields –
id,hashandexpiry. - On accessing
https://site-a.com, create a randomhashand set theexpiryto 1 minute from now. - The fetch call should also include the random
hash. - The PHP sync will cross-check the
hashagainst the database to verify and make sure it has not expired.
Basically, a CSRF token.
I WANT TO “SYNCHRONIZE” MORE SITES
- Just deploy the same PHP sync handler on all your other domains.
- Add your other sites to the fetch call.
COMPATIBILITY CHECKS
- Same Site Headers & Cookies – CanIUse
- CORS – CanIUse
- Arrow Functions – CanIUse
- Fetch – CanIUse
This example requires a “Grade A” modern browser that is capable of handling cross-origin calls and cookies.
LINKS & REFERENCES
- Cookies In PHP – Code Boxx
- Sessions In PHP – Code Boxx
- Setting CORS Cookie In PHP – Code Boxx
- Save PHP Session In Database – Code Boxx
- Edit Windows, Mac, Linux Host File – HowToGeek
- Virtual Hosts Example – Apache
- Set Session Handler – PHP
THE END
Thank you for reading, and we have come to the end. I hope that it has helped you to better understand, and if you want to share anything with this guide, please feel free to comment below. Good luck and happy coding!
Could you add a comment from a cyber defence viewpoint?
i.e. to what extent can somebody with access to site-b but not site-a use this to access site-a (or the other way round) ?
I *think* the answer is “Not, because Steps 3 and 5 require write access to both backends” but are there any defensive steps which this should prompt one to take?
I am not a security expert. But heard of Linus Tech Tips? Corridor Crew? Their Youtube channels got hacked when someone got a copy of all their session cookies and possibly passwords. If security is a huge concern, implement your own IP checks, 2FA, and rate limiting.
https://www.youtube.com/watch?v=nYdS3FIu3rI
Hi! I’m attempting to implement this in its basic form shown here, but I’m getting two errors and it’s likely a rookie mistake..
“Warning: session_start(): Session callback expects true/false return value in C:\wamp64\www\lib\2-lib-sess.php on line 16”
Trace:
# Time Memory Function Location
1 0.0009 364376 {main}( ) …\sesstest.php:0
2 0.0016 364960 require( ‘C:\wamp64\www\lib\2-lib-sess.php ) …\sesstest.php:3
3 0.0016 365192 Session->__construct( ) …\2-lib-sess.php:74
4 0.0017 367480 session_start( ) …\2-lib-sess.php:16
Error 2:
Warning: session_start(): Failed to initialize storage module: user (path: c:/wamp64/tmp) in C:\wamp64\www\lib\2-lib-sess.php on line 16
Trace:
1 0.0009 364376 {main}( ) …\sesstest.php:0
2 0.0016 364960 require( ‘C:\wamp64\www\lib\2-lib-sess.php ) …\sesstest.php:3
3 0.0016 365192 Session->__construct( ) …\2-lib-sess.php:74
4 0.0017 367480 session_start( ) …\2-lib-sess.php:16
I’m on Wampserver with Apache, PHP and MySQL. Sesstest.php is the sitea.php file on this document.
Any ideas what it could be?
– Chris
Thanks for reporting – Download and try again, the library has been fixed.
Sweet, That’s made progress on my end.
One other thing (Likely due to lack of experience on my end) – I’m receiving an Ok from SiteB on SiteA, But when I look at Sync.php on SiteB it’s throwing a “Notice: Undefined index: sid in C:\wamp64\www\{SITEB}\sync.php on line 7”
Trace :
# Time Memory Function Location
1 0.0001 378584 {main}( ) …\sync.php:0
And the Session token isn’t the same between the two sites, so something is deffo off.
Thanks for getting back to me so quick last time!
– Chris
Small “safety features” added to the tutorial – Download, clear the cookies on both test sites, and try again.
Unfortunately this doesn’t work on Safari browsers
Hi! Please see the above “compatibility checks” and also share more details on “doesn’t work”. “Doesn’t work” can be “anything”, “whatever”, and “whatnot”… It “doesn’t help”. 😆
https://code-boxx.com/faq/#notwork