Welcome to a tutorial on how to set a CORS cookie in PHP. Need to set a cookie in a cross-origin call? Annoyingly got rejected multiple times? Yep, that is security, and it took me hours to figure things out too. So here it is, a quick sharing of my working example – Read on!
TABLE OF CONTENTS
DOWNLOAD & NOTES
Here is the download link to the example code, so you don’t have to copy-paste everything.
EXAMPLE CODE DOWNLOAD
Just click on “download zip” or do a git clone. I have released it under the MIT license, so feel free to build on top of it or use it in your own project.
SORRY FOR THE ADS...
But someone has to pay the bills, and sponsors are paying for it. I insist on not turning Code Boxx into a "paid scripts" business, and I don't "block people with Adblock". Every little bit of support helps.
Buy Me A Coffee Code Boxx eBooks
TEST SERVER SETUP
For you guys who don’t have multiple domains to do testing, no sweat. Here is how I set up my localhost to emulate multiple domains.
OS HOSTS FILE
127.0.0.1 site-a.com
127.0.0.1 site-b.com
::1 site-a.com
::1 site-b.com
First, open the hosts file and add the following entries. For the uninitiated, this is just a manual DNS override – Point site-a.com and site-b.com to localhost.
P.S. Mac/Linux users, yours should be in etc/hosts, but it may differ for different distros.
SSL CERT
Next, using https:// is a vital part to make CORS cookies work. If you don’t already have your own SSL certs, self-sign and create your own. Not going to walk through that here, but there are plenty of good guides all over the Internet – Do some of your own research.
VIRTUAL HOSTS
<VirtualHost *:443>
  DocumentRoot "D:/http/site-a/"
  ServerName site-a.com
  SSLEngine On
  SSLCertificateFile "C:/xampp/apache/conf/ssl.crt/server.crt"
  SSLCertificateKeyFile "C:/xampp/apache/conf/ssl.key/server.key"
</VirtualHost>
<VirtualHost *:443>
  DocumentRoot "D:/http/site-b/"
  ServerName site-b.com
  SSLEngine On
  SSLCertificateFile "C:/xampp/apache/conf/ssl.crt/server.crt"
  SSLCertificateKeyFile "C:/xampp/apache/conf/ssl.key/server.key"
</VirtualHost>
Lastly, create the project folders and map the virtual hosts accordingly. That is, https://site-a.com will point to D:/http/site-a/ and https://site-b.com will point to D:/http/site-b/.
P.S. This is for Apache. IIS and NGINX users – Do your own research.
ACCESS SITE A & SITE B WITH HTTPS
- Open your browser and access
https://site-a.com/. Yes,HTTPS. - Your browser or anti-virus is going to complain something about an “unsafe website”. Sure thing Sherlock, I signed that cert myself. Go ahead and click on “show details (or advanced)” > “continue”.
- Open a new tab and access
https://site-b.com/. Do the same and access the “unsafe site”.
PHP CORS COOKIE
All right, let us now get into the step-by-step example of setting cookies in a CORS AJAX fetch call.
STEP 1) FETCH CALL FROM SITE A
<!-- (A) DEMO BUTTON -->
<input type="button" value="CORS Cookie" onclick="demo()">

<script>
function demo () {
  // (B) CORS FETCH TO SITE B
  fetch("https://site-b.com/2-handler.php", {
    mode : "cors",
    credentials : "include"
  })

  // (C) FOR DEBUGGING, CONSOLE LOG ALL RESPONSES.
  .then(res => {
    console.log(res);
    return res.text();
  })
  .then(res => console.log(res))
  .catch(err => console.log(err));
}
</script>
On site-a.com, we will do a fetch() call to site-b.com. Take note of the settings:
mode : "cors"Updated browsers should automatically detect and set this… But let’s just put this here for backward compatibility.credentials : "include"That is, include the use of cookies.- Lastly, the use of
https://– Very important, usinghttp://will not allow cross-domain cookies to be set.
STEP 2) SITE B CALL HANDLER
<?php
// (A) GET REQUEST ORIGIN
if (array_key_exists("HTTP_ORIGIN", $_SERVER)) {
  $origin = $_SERVER["HTTP_ORIGIN"];
} else if (array_key_exists("HTTP_REFERER", $_SERVER)) {
  $origin = $_SERVER["HTTP_REFERER"];
} else {
  $origin = $_SERVER["REMOTE_ADDR"];
}

// (B) CHECK ALLOWED DOMAINS
if (!in_array(
  parse_url($origin, PHP_URL_HOST),
  ["site-a.com", "site-b.com"]
)) {
  http_response_code(403);
  exit("$origin not allowed");
}

// (C) PROCEED
header("Access-Control-Allow-Origin: $origin");
header("Access-Control-Allow-Credentials: true");
setcookie("It", "Works", [
  "expires" => time()+3600,
  "path" => "/",
  "domain" => ".site-b.com",
  "secure" => true,
  "samesite" => "None"
]);
echo "OK";
On site-b.com:
Access-Control-Allow-Origincannot be set as the wildcard*. Thus, the extra bits of code to restrict cross-domain calls from specific domains only.Access-Control-Allow-Credentialsmust be set totrue.- For the cookie itself:
- Take note of the
domain– We are making a call fromsite-a.com, but this cookie is meant forsite-b.com. - The
samesiterule is set tonone, sosecuremust be set totrue.
- Take note of the
STEP 3) VERIFICATION
DEVELOPER’S CONSOLE
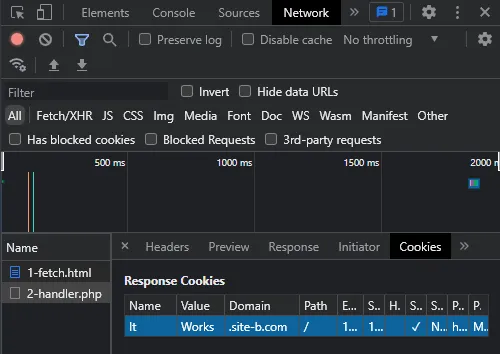
Go ahead and click on the test button. To verify the exchange in Chromium-based browsers, open the developer’s console > Network > 2-handler.php > Cookies.
SITE B ITSELF
<div id="demo"></div>
<script>
document.getElementById("demo").innerHTML = document.cookie;
</script>
Reload https://site-b.com/3-show.html, the cookie It=Works should also show up in the <div>.
EXTRAS
That’s all for the tutorial, and here is a small section on some extras and links that may be useful to you.
HOW ABOUT XMLHTTPREQUEST?
Yes, we can set a cross-domain cookie with XMLHttpRequest too.
var xhr = new XMLHttpRequest();xhr.withCredentials = true;
COMPATIBILITY CHECKS
- Arrow Functions – CanIUse
- Fetch – CanIUse
Works on all modern “Grade A” browsers.
LINKS & REFERENCES
THE END
Thank you for reading, and we have come to the end. I hope that it has helped you to better understand, and if you want to share anything with this guide, please feel free to comment below. Good luck and happy coding!