Welcome to a tutorial on how to create a courier management system with PHP and MySQL. Need to add “shipment management” to your existing system or start from scratch? Here is a simple streamlined version that does not rely on third-party frameworks – Read On!
TABLE OF CONTENTS
DOWNLOAD & NOTES
Here is the download link to the example code, so you don’t have to copy-paste everything.
EXAMPLE CODE DOWNLOAD
Just click on “download zip” or do a git clone. I have released it under the MIT license, so feel free to build on top of it or use it in your own project.
SORRY FOR THE ADS...
But someone has to pay the bills, and sponsors are paying for it. I insist on not turning Code Boxx into a "paid scripts" business, and I don't "block people with Adblock". Every little bit of support helps.
Buy Me A Coffee Code Boxx eBooks
PHP MYSQL COURIER MANAGEMENT
All right, let us now get into more details on how the PHP MySQL Courier management system works.
PART 1) THE DATABASE
1A) SHIPMENT TABLE
-- (A) SHIPMENT
CREATE TABLE `shipment` (
  `ship_id` bigint(20) NOT NULL,
  `send_name` varchar(255) NOT NULL,
  `send_address` text NOT NULL,
  `recv_name` varchar(255) NOT NULL,
  `recv_address` text NOT NULL,
  `ship_status` tinyint(1) NOT NULL
) ENGINE=InnoDB DEFAULT CHARSET=utf8mb4;

ALTER TABLE `shipment`
  ADD PRIMARY KEY (`ship_id`),
  ADD KEY `send_name` (`send_name`),
  ADD KEY `recv_name` (`recv_name`),
  ADD KEY `ship_status` (`ship_status`);

ALTER TABLE `shipment`
  MODIFY `ship_id` bigint(20) NOT NULL AUTO_INCREMENT;
First, we have a table to track all the shipments.
ship_idShipment ID. Primary key and auto-increment.send_nameSender’s name.send_addressSender’s address.recv_nameReceiver’s name.recv_addressReceiver’s address.ship_statusCurrent shipment status.
Feel free to add more fields as required – Shipment weight, size, mode of transport, etc… Some of you guys should have also noticed the tracking number is “missing”. This is up to you to decide.
- Change
ship_idtoVARCHAR, use it as the primary key and tracking code. - Add a unique
ship_trackfield. - Invent your own “secure tracking code”. That must be decoded to get the shipping ID, and it expires in N days.
Yep, the possibilities are endless, so I am just going to keep it to “simple shipping ID” in this tutorial.
1B) SHIPMENT HISTORY TABLE
-- (B) SHIPMENT HISTORY
CREATE TABLE `shipment_history` (
  `ship_id` bigint(20) NOT NULL,
  `ship_date` datetime NOT NULL DEFAULT current_timestamp(),
  `ship_status` tinyint(1) NOT NULL,
  `ship_notes` text NULL
) ENGINE=InnoDB DEFAULT CHARSET=utf8mb4;

ALTER TABLE `shipment_history`
  ADD PRIMARY KEY (`ship_id`,`ship_date`),
  ADD KEY `ship_status` (`ship_status`);
Next, we have a table to store the “movement history”. Once again, add more security details as required – Which staff handled the package, which staff delivered, which vehicle, etc…
PART 2) PHP SHIPMENT LIBRARY
<?php
class Ship {
  // (A) CONSTRUCTOR - CONNECT TO DATABASE
  private $pdo = null;
  private $stmt = null;
  public $error = "";
  function __construct () {
    $this->pdo = new PDO(
      "mysql:host=".DB_HOST.";dbname=".DB_NAME.";charset=".DB_CHARSET,
      DB_USER, DB_PASSWORD, [
      PDO::ATTR_ERRMODE => PDO::ERRMODE_EXCEPTION,
      PDO::ATTR_DEFAULT_FETCH_MODE => PDO::FETCH_ASSOC
    ]);
  }

  // (B) DESTRUCTOR - CLOSE DATABASE CONNECTION
  function __destruct () {
    if ($this->stmt!==null) { $this->stmt = null; }
    if ($this->pdo!==null) { $this->pdo = null; }
  }

  // (C) HELPER FUNCTION - EXECUTE SQL QUERY
  function query ($sql, $data=null) : void {
    $this->stmt = $this->pdo->prepare($sql);
    $this->stmt->execute($data);
  }

  // (D) ADD SHIPMENT
  function add ($sname, $saddr, $rname, $raddr) {
    // (D1) ADD SHIPMENT ENTRY
    $this->query(
      "INSERT INTO `shipment` (`send_name`, `send_address`, `recv_name`, `recv_address`, `ship_status`) VALUES (?,?,?,?,?)",
      [$sname, $saddr, $rname, $raddr, 1]
    );

    // (D2) ADD HISTORY
    $this->history($this->pdo->lastInsertId(), 1);

    // (D3) DONE
    return true;
  }

  // (E) UPDATE SHIPMENT STATUS
  function stat ($id, $stat, $notes=null) {
    // (E1) UPDATE SHIPMENT ENTRY
    $this->query(
      "UPDATE `shipment` SET `ship_status`=? WHERE `ship_id`=?",
      [$stat, $id]
    );

    // (E2) ADD HISTORY
    $this->history($id, $stat, $notes);

    // (E3) DONE
    return true;
  }

  // (F) ADD SHIPMENT HISTORY
  function history ($id, $stat, $notes=null) {
    $this->query(
      "INSERT INTO `shipment_history` (`ship_id`, `ship_status`, `ship_notes`) VALUES (?,?,?)",
      [$id, $stat, $notes]
    );
    return true;
  }

  // (G) GET ALL SHIPMENTS
  function getAll () {
    $this->query("SELECT * FROM `shipment`");
    return $this->stmt->fetchAll();
  }

  // (H) GET SHIPMENT
  function get ($id) {
    $this->query("SELECT * FROM `shipment` WHERE `ship_id`=?", [$id]);
    return $this->stmt->fetch();
  }

  // (I) GET SHIPMENT HISTORY
  function getHistory ($id) {
    $this->query("SELECT * FROM `shipment_history` WHERE `ship_id`=? ORDER BY `ship_date` DESC", [$id]);
    return $this->stmt->fetchAll();
  }
}

// (J) SHIPMENT STATUS CODES - CHANGE TO YOUR OWN!
define("SHIP_STATUS", [
  1 => "Accepted",
  2 => "Transit",
  3 => "Delivered",
  0 => "Canceled"
]);

// (K) DATABASE SETTINGS - CHANGE TO YOUR OWN!
define("DB_HOST", "localhost");
define("DB_NAME", "test");
define("DB_CHARSET", "utf8mb4");
define("DB_USER", "root");
define("DB_PASSWORD", "");

// (L) NEW SHIPMENT OBJECT
$_SHIP = new Ship();
The PHP library may look complicated at first, but keep calm and look carefully.
- (A, B, L) When
$_SHIP = new Ship()is created, the constructor connects to the database automatically. The destructor will close the connection. - (C)
query()A helper function to run an SQL statement. - (D to I) The “actual” shipment functions.
add()Add a new shipment.stat()Update the shipment status.history()A helper foradd()andstat(), adds a history entry to the given shipment.getAll()Get all shipments.get()Get the specified shipment.getHistory()Get shipment history.
- (J) The shipping status codes – Change these to your own if necessary. E.g. Failed, lost, etc…
- (K) Change the database settings to your own.
P.S. Do your own sorting and pagination for the “get” functions.
PART 3) AJAX HANDLER
<?php
if (isset($_POST["req"])) {
  require "2-lib-ship.php";
  switch ($_POST["req"]) {
  // (A) ADD SHIPMENT
  case "add":
    echo $_SHIP->add($_POST["sname"], $_POST["saddr"], $_POST["rname"], $_POST["raddr"])
      ? "OK" : "ERROR";
    break;

  // (B) UPDATE SHIPMENT STATUS
  case "stat":
    echo $_SHIP->stat($_POST["id"], $_POST["stat"], isset($_POST["notes"])?$_POST["notes"]:null)
      ? "OK" : "ERROR";
    break;

  // (C) GET ALL SHIPMENTS
  case "getAll":
    echo json_encode($_SHIP->getAll());
    break;

  // (D) GET SHIPMENT
  case "get":
    echo json_encode($_SHIP->get($_POST["id"]));
    break;

  // (E) GET SHIPMENT HISTORY
  case "getHistory":
    echo json_encode($_SHIP->getHistory($_POST["id"]));
    break;
}}
Believe it or not, we already have a complete system with this AJAX handler.
- Just send
$_POST["req"] = "REQUEST"to this script, along with the required parameters. - For example, send
$_POST["req"] = "get"and$_POST["id"] = 999to get information on shipment ID 999.
Yep, we can literally add shipments, update the status, and get shipment information. This is a complete system without a user interface.
P.S. Protect this script, only admin and staff should be able to access this script. See the links section below if you do not have an existing user system.
PART 4) DUMMY ADMIN PAGE
4A) THE HTML
<script>
// (A) OUTPUT SHIPMENT STATUS CODES IN JS
var stat = JSON.parse('<?php
require "2-lib-ship.php";
echo json_encode(SHIP_STATUS);
?>');
</script>
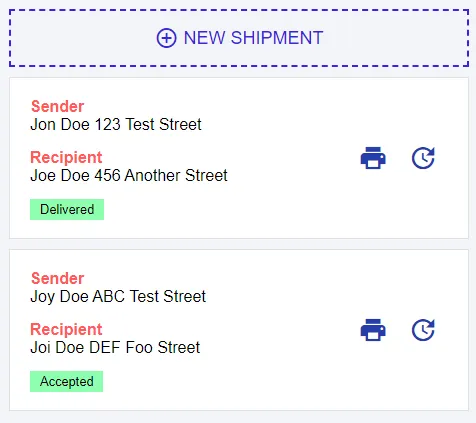
<!-- (B) SHIPMENT LIST -->
<div id="listWrap">
<div id="listAdd" class="flex" onclick="ship.toggle(1)">
<i class="mi">add_circle_outline</i>
<span>NEW SHIPMENT</span>
</div>
<div id="listShip"></div>
</div>
<!-- (C) ADD SHIPMENT -->
<form id="formAdd" class="form hide" onsubmit="return ship.add()">
<div class="fClose" onclick="ship.toggle(0)">
<i class="mi">close</i>
</div>
<h2>ADD SHIPMENT</h2>
<label>Sender Name</label>
<input type="text" required name="sname">
<label>Sender Address</label>
<input type="text" required name="saddr">
<label>Receiver Name</label>
<input type="text" required name="rname">
<label>Receiver Address</label>
<input type="text" required name="raddr">
<input type="submit" value="Save">
</form>
<!-- (D) UPDATE SHIPMENT STATUS -->
<form id="formStat" class="form hide" onsubmit="return ship.stat()">
<div class="fClose" onclick="ship.toggle(0)">
<i class="mi">close</i>
</div>
<h2>SHIPMENT HISTORY</h2>
<input type="hidden" id="statID" name="id" required>
<label>Status</label>
<select id="statCode" name="stat" required><?php
foreach (SHIP_STATUS as $i=>$s) {
echo "<option value='$i'>$s</option>";
}
?></select>
<label>Notes (if any)</label>
<input type="text" name="notes">
<input type="submit" value="Save">
</form>This is a demo admin page, no third-party frameworks are used. Maybe except for Google Material Icons… Which is not a framework either way.
- We “export” the shipping status codes from PHP into Javascript.
<div id="listShip">An empty container to draw the shipment list.<div id="formAdd">Add a new shipment form.<form id="formStat">Update shipment status form.
Well, feel free to change this page however you wish. Or create a new page using whatever library of your choice.
4B) THE JAVASCRIPT
var ship = {
  // (A) HELPER - AJAX FETCH
  fetch : (req, data, after) => {
    // (A1) FORM DATA
    let form = new FormData(data instanceof HTMLElement ? data : undefined);
    form.append("req", req);
    if (data!=null && !(data instanceof HTMLElement)) {
      for (let [k,v] of Object.entries(data)) { form.append(k, v); }
    }

    // (A2) DO FETCH
    fetch("3-ajax-ship.php", { method : "POST", body : form })
    .then(res => res.text())
    .then(txt => after(txt))
    .catch(err => console.error(err));
  },

  // (B) INITIALIZE
  hListW : null, // html shipment list wrapper
  hList : null, // html shipment list
  hAdd : null, // html add shipment form
  hStat : null, // html shipment status form
  hsID : null, // html update status id
  hsCode : null, // html update status code
  init : () => {
    // (B1) GET HTML ELEMENTS
    ship.hListW = document.getElementById("listWrap");
    ship.hList = document.getElementById("listShip");
    ship.hAdd = document.getElementById("formAdd");
    ship.hStat = document.getElementById("formStat");
    ship.hsID = document.getElementById("statID");
    ship.hsCode = document.getElementById("statCode");

    // (B2) DRAW SHIPMENT LIST
    ship.draw();
  },

  // (C) DRAW SHIPMENT LIST
  draw : () => {
    ship.hList.innerHTML = "";
    ship.fetch("getAll", null, data => {
      JSON.parse(data).forEach(s => {
        let row = document.createElement("div");
        row.className = "row flex";
        row.innerHTML =
        `<div class="rowInfo flexGrow">
          <div class="rFrom">
            <strong>Sender</strong><br>
            <div>${s.send_name} ${s.send_address}</div>
          </div>
          <div class="rTo">
            <strong>Recipient</strong><br>
            <div>${s.recv_name} ${s.recv_address}</div>
          </div>
          <span class="rStat${s.ship_status==0?" red":""}">
            ${stat[s.ship_status]}
          </span>
        </div>
        <a class="mi" target="_blank" href="5a-print.php?id=${s.ship_id}">print</a>
        <button class="mi" onclick="ship.toggle(2, ${s.ship_id})">update</button>`;
        ship.hList.appendChild(row);
      });
    });
  },

  // (D) TOGGLE SHIPMENT SCREENS
  toggle : (show, id) => {
    // (D1) SHOW SHIPMENT LIST
    if (show==0) {
      ship.hListW.classList.remove("hide");
      ship.hAdd.classList.add("hide");
      ship.hStat.classList.add("hide");
    }

    // (D2) SHOW ADD SHIPMENT
    else if (show==1) {
      ship.hAdd.reset();
      ship.hListW.classList.add("hide");
      ship.hAdd.classList.remove("hide");
      ship.hStat.classList.add("hide");
    }

    // (D3) SHOW UPDATE SHIPMENT STATUS
    else {
      ship.fetch("get", { id : id }, data => {
        data = JSON.parse(data);
        ship.hStat.reset();
        ship.hsID.value = id;
        ship.hsCode.value = data["ship_status"];
        ship.hListW.classList.add("hide");
        ship.hAdd.classList.add("hide");
        ship.hStat.classList.remove("hide");
      });
    }
  },

  // (E) SAVE NEW SHIPMENT
  add : () => {
    ship.fetch("add", ship.hAdd, res => {
      if (res == "OK") {
        ship.draw();
        ship.toggle(0);
      } else { alert(res); }
    });
    return false;
  },

  // (F) UPDATE SHIPMENT STATUS
  stat : () => {
    ship.fetch("stat", ship.hStat, res => {
      if (res == "OK") {
        ship.draw();
        ship.toggle(0);
      } else { alert(res); }
    });
    return false;
  }
};
window.onload = ship.init;
Not going to explain line-by-line as some people are likely to rebuild their own admin page. If you want to use this, here is a quick walkthrough:
ship.fetch()A helper function to do an AJAX call to3-ajax-ship.php.- On window load,
ship.init()will run. Nothing much happening here, just grabbing the necessary HTML elements. ship.draw()Fetch shipments from the server, and draw the HTML list.ship.toggle()Show/hide the HTML shipment screens.show==0Show the list of shipments.show==1Show add shipment.show==2Show update shipment status.
ship.add()Add a new shipment.ship.stat()Update shipment status.
PART 5) DUMMY PRINT & TRACK PAGES
5A) PRINT SHIPPING LABEL
<?php
// (A) GET SHIPMENT
require "2-lib-ship.php";
$shipment = $_SHIP->get($_GET["id"]);
?>

<div id="shipWrap">
  <!-- (B) SHIP TO -->
  <div class="section">
    <strong>Ship To</strong>
    <div>
      <div><?=$shipment["recv_name"]?></div>
      <div><?=$shipment["recv_address"]?></div>
    </div>
  </div>

  <!-- (C) SHIP FROM -->
  <div class="section">
    <strong>Ship From</strong>
    <div>
      <div><?=$shipment["send_name"]?></div>
      <div><?=$shipment["send_address"]?></div>
    </div>
  </div>

  <!-- (D) QR CODE -->
  <!-- https://davidshimjs.github.io/qrcodejs/ -->
  <div class="section">
    <strong>Tracking</strong>
    <div id="qrcode"></div>
    <script src="assets/qrcode.min.js"></script>
    <script>
    new QRCode(document.getElementById("qrcode"), {
      text: "http://localhost/5b-track.php?id=<?=$_GET["id"]?>",
      width: 128, height: 128
    });
    </script>
  </div>

  <!-- (E) COMANY INFO -->
  <div id="company">
    <div>blah blah company</div>
    <div>blah blah slogan</div>
    <div>blah blah address</div>
    <div>whatever else contact security codes</div>
    <a href="http://localhost/5b-track.php?id=<?=$_GET["id"]?>">http://localhost/5b-track.php?id=<?=$_GET["id"]?></a>
  </div>
</div>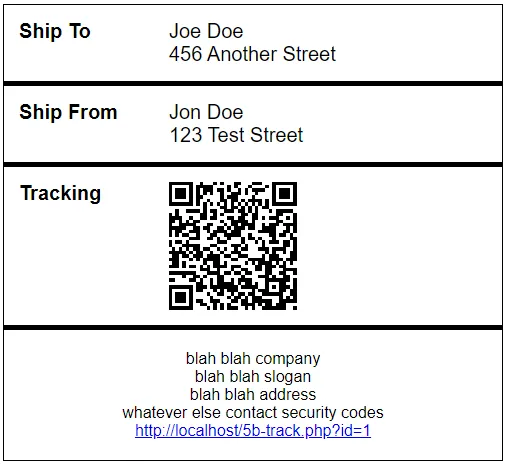
Just a dummy shipping label. Do your own design.
5B) TRACKING PAGE
<?php
// (A) GET SHIPMENT HISTORY
require "2-lib-ship.php";
$history = $_SHIP->getHistory($_GET["id"]);

// (B) SHOW HISTORY
foreach ($history as $h) {
  printf("<div>[%s] %s</div>",
    $h["ship_date"], SHIP_STATUS[$h["ship_status"]]
  );
}
?>
Well, just a page to show the shipment history.
P.S. It will be a good idea to “upgrade” this page. If the user is signed in as a staff member, show the update status form – This will help to speed up the logistic process. Just scan the shipping label and update the status.
EXTRAS
That’s all for the tutorial, and here is a small section on some extras and links that may be useful to you.
IT’S INCOMPLETE!
My developer senses are tingling, I can hear the trolls screaming “this is an incomplete system”. Of course, this is only a simple tutorial. A lot needs to be done before this is a “complete system”, everyone has a different starting point and requirements.
- Tie this example into your existing system, and protect the admin functions. If you don’t already have a user login system or admin panel, see the links below.
- You decide how user management is done.
- Some people prefer “complex” – Admin, courier, and users all have different accounts and access levels.
- Some people prefer “simple” – No role management, staff just login into the system and have access to everything.
- Complete your own “logistics process”. Some may have more steps like “custom clearance”, “arrival at local distributor”, “sorting”, etc…
- Add more “packaging stuff” where necessary – Weight, size, fragile, flammable, etc…
- Come up with a better unique tracking ID, so people don’t just enter
http://site.com/5b-track.php?id=Nto see other people’s packages. - Decide if you allow changes to addresses and cancelations – What if the item is already sent out?
- How to deal with damaged items – Refund? Insurance?
Yep. It is impossible to create a “one size fits all system”, and I cannot give free consultations to everyone. It is up to you to complete your own system now.
LINKS & REFERENCES
- Simple PHP MySQL Admin Panel – Code Boxx
- PHP User Role Management – Code Boxx
- GPS Tracking With PHP MySQL – Code Boxx
THE END
Thank you for reading, and we have come to the end. I hope that it has helped you to better understand, and if you want to share anything with this guide, please feel free to comment below. Good luck and happy coding!
Such a great guideline conceptual design. I am interested in the full option. Please contact me by e-mail submitted.
This is a tutorial, hire your own developers and create your own “full option”!?
https://code-boxx.com/faq/#hire