Welcome to a tutorial on how to create a simple PHP admin panel. Since you are reading this, I will assume that you are interested in “powering up” your existing project and want to build an administrative component to it. So here is a sharing of my own – All done in pure HTML, CSS, Javascript, and PHP. No third-party frameworks. Read on!
TABLE OF CONTENTS
DOWNLOAD & NOTES
Here is the download link to the example code, so you don’t have to copy-paste everything.
EXAMPLE CODE DOWNLOAD
Just click on “download zip” or do a git clone. I have released it under the MIT license, so feel free to build on top of it or use it in your own project.
SORRY FOR THE ADS...
But someone has to pay the bills, and sponsors are paying for it. I insist on not turning Code Boxx into a "paid scripts" business, and I don't "block people with Adblock". Every little bit of support helps.
Buy Me A Coffee Code Boxx eBooks
PHP MYSQL ADMIN PANEL
All right, let us now get into the details of how to create a simple admin panel with PHP and MySQL.
TUTORIAL VIDEO
PART 1) USER DATABASE
-- (A) USERS TABLE
CREATE TABLE `users` (
  `user_id` bigint(20) NOT NULL,
  `user_email` varchar(255) NOT NULL,
  `user_name` varchar(255) NOT NULL,
  `user_password` varchar(255) NOT NULL
) ENGINE=InnoDB DEFAULT CHARSET=utf8mb4;

ALTER TABLE `users`
  ADD PRIMARY KEY (`user_id`),
  ADD UNIQUE KEY `user_email` (`user_email`),
  ADD KEY `user_name` (`user_name`);

ALTER TABLE `users`
  MODIFY `user_id` bigint(20) NOT NULL AUTO_INCREMENT, AUTO_INCREMENT=1;

-- (B) DEFAULT USER
-- EMAIL: JOY@DOE.COM | PASSWORD: 123456
INSERT INTO `users` (`user_id`, `user_email`, `user_name`, `user_password`) VALUES
(1, 'joy@doe.com', 'Joy Doe', '$2y$10$vZJy7y4uqQQTRN3zdi2RE.5ZJJzGEEPnzEjFXm4nEOx023XQ2Qe..');
First, let us begin by dealing with the obvious – A database to hold the admin users.
user_idPrimary key and auto-increment.user_emailUser email, unique to prevent duplicates.user_nameUser name.user_passwordThe user’s password.
PART 2) PHP ADMIN LIBRARY
<?php
class Admin {
  // (A) CONSTRUCTOR - CONNECT TO DATABASE
  private $pdo = null;
  private $stmt = null;
  public $error = "";
  function __construct () {
    $this->pdo = new PDO(
      "mysql:host=".DB_HOST.";dbname=".DB_NAME.";charset=".DB_CHARSET,
      DB_USER, DB_PASSWORD, [
      PDO::ATTR_ERRMODE => PDO::ERRMODE_EXCEPTION,
      PDO::ATTR_DEFAULT_FETCH_MODE => PDO::FETCH_ASSOC
    ]);
  }

  // (B) DESTRUCTOR - CLOSE CONNECTION
  function __destruct () {
    if ($this->stmt !== null) { $this->stmt = null; }
    if ($this->pdo !== null) { $this->pdo = null; }
  }

  // (C) HELPER FUNCTION - RUN SQL QUERY
  function query ($sql, $data=null) : void {
    $this->stmt = $this->pdo->prepare($sql);
    $this->stmt->execute($data);
  }

  // (D) GET USER BY ID OR EMAIL
  function get ($id) {
    $this->query(sprintf("SELECT * FROM `users` WHERE `%s`=?",
      is_numeric($id) ? "user_id" : "user_email"
    ), [$id]);
    return $this->stmt->fetch();
  }

  // (E) SAVE USER
  function save ($name, $email, $password, $id=null) {
    // (E1) SQL & DATA
    $sql = $id==null
      ? "INSERT INTO `users` (`user_name`, `user_email`, `user_password`) VALUES (?,?,?)"
      : "UPDATE `users` SET `user_name`=?, `user_email`=?, `user_password`=? WHERE `user_id`=?" ;
    $data = [$name, $email, password_hash($password, PASSWORD_DEFAULT)];
    if ($id!=null) { $data[] = $id; }

    // (E2) RUN SQL
    $this->query($sql, $data);
    return true;
  }

  // (F) VERIFICATION
  function verify ($email, $password) {
    // (F1) GET USER
    $user = $this->get($email);
    $pass = is_array($user);

    // (F2) CHECK PASSWORD
    if ($pass) { $pass = password_verify($password, $user["user_password"]); }

    // (F3) REGISTER MEMBER INTO SESSION
    if ($pass) {
      foreach ($user as $k=>$v) { $_SESSION["admin"][$k] = $v; }
      unset($_SESSION["admin"]["user_password"]);
    }

    // (F4) RESULT
    if (!$pass) { $this->error = "Invalid email/password"; }
    return $pass;
  }
}

// (G) DATABASE SETTINGS - CHANGE TO YOUR OWN
define("DB_HOST", "localhost");
define("DB_NAME", "test");
define("DB_CHARSET", "utf8mb4");
define("DB_USER", "root");
define("DB_PASSWORD", "");

// (H) START!
session_start();
$_ADM = new Admin();
This PHP core and database library is here to help you guys develop a little faster. It may look confusing at first, but keep calm and look closely.
- (A, B, H) When
$_ADM = new Admin()is created, the constructor will connect to the database. The destructor closes the connection. - (C)
query()A helper function to execute an SQL query. - (D to F) The actual admin functions.
get()Get user by ID or email.save()Add or update a user.verify()Verify the given email and password. Register the user into$_SESSION["admin"].
- (G) The database settings, remember to change them to your own.
- (H) Start the “engine”.
PART 3) LOGIN PAGE
<?php
// (A) LOAD LIBRARY
require "2-lib-admin.php";

// (B) CHECK LOGIN CREDENTIALS
if (count($_POST)!=0) {
  $_ADM->verify($_POST["email"], $_POST["password"]);
}

// (C) REDIRECT IF SIGNED IN
if (isset($_SESSION["admin"])) {
  header("Location: 5-protected.php");
  exit();
} ?>

<!-- (D) LOGIN FORM -->
<?php
if ($_ADM->error!="") { echo "<div class='error'>".$_ADM->error."</div>"; }
?>
<form method="post">
  <h1>ADMIN LOGIN</h1>
  <label>Email</label>
  <input type="email" name="email" required>
  <label>Password</label>
  <input type="password" name="password" required>
  <input type="submit" value="Login">
</form>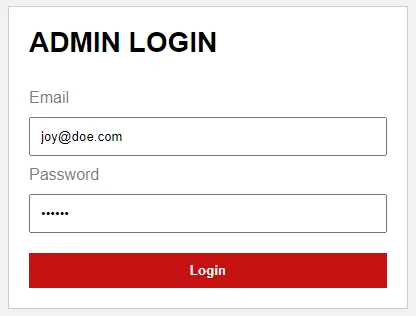
It will be easier to study this login page from the bottom up.
- (D) A good old HTML login form.
- (A & B) On submission, we use the library to process the login request.
- (C) On successful login, we redirect the user to the “main admin page”; Any users who are already signed in will also be redirected.
PART 4) ADMIN HTML TEMPLATE
4A) TOP HALF
<?php
// (A) LOAD LIBRARY
require "2-lib-admin.php";
// (B) LOGOUT
if (isset($_POST["logout"])) { unset($_SESSION["admin"]); }
// (C) REDIRECT IF NOT SIGNED IN
if (!isset($_SESSION["admin"])) {
header("Location: 3a-login.php");
exit();
} ?>
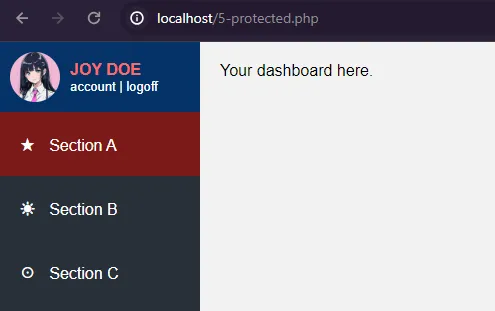
<!-- (D) SIDEBAR -->
<div id="pgside">
<!-- (D1) BRANDING OR USER -->
<form id="pguser" method="post" onclick="if(confirm('Sign Off?')){this.submit();}">
<input type="hidden" name="logout" value="1">
<img src="potato.png" id="pguserimg">
<div class="txt">
<div id="pgusername"><?=$_SESSION["admin"]["user_name"]?></div>
<div id="pguseracct">account | logoff</div>
</div>
</form>
<!-- (D2) MENU ITEMS -->
<a href="#" class="current">
<i class="ico">★</i>
<i class="txt">Section A</i>
</a>
<a href="#">
<i class="ico">☀</i>
<i class="txt">Section B</i>
</a>
<a href="#">
<i class="ico">☉</i>
<i class="txt">Section C</i>
</a>
</div>
<!-- (E) MAIN -->
<main id="pgmain">
4B) BOTTOM HALF
</main>
4C) A QUICK WALKTHROUGH
Once again, this looks complicated. But look closely, there are only 2 main sections:
- (D)
<div id="pgside">The sidebar.- (D1)
<form id="pguser">The current user and hidden form for logout. - (D2) Insert your menu items here.
- (D1)
- (E)
<main id="pgmain">Main content area.
As for how the logout works, it is very similar to the login page:
- (B) When
<form id="pguser">is submitted, this will clear out$_SESSION["admin"]. - (C) The user will be redirected back to the login page; All users that are not signed in will be redirected to the login page.
PART 5) PROTECTED ADMIN PAGES
<?php require "4a-top.php"; ?>
Your dashboard here.
<?php require "4b-bottom.php"; ?>
That’s about it for everything, to create a protected admin page:
- Simply
require "4a-top.php"at the top, andrequire "4b-bottom.php"at the bottom. - Sandwich your contents in between.
EXTRAS
That’s all for the tutorial, and here are a few small extras and links that may be useful to you.
SLIGHTLY BETTER SECURITY
This admin panel is made for simplicity and does not have the best security… I will recommend doing the following at the very least:
- Create a new
libfolder. - For Apache users, create a
lib/.htaccessfile with one line –Deny from all. Users can no longer access the files inlib/throughhttp://, but PHP can still read them. - IIS and NGINX users – Create your own “translated
.htaccess“. - Move
2-lib-admin.php,4a-top.php,4b-bottom.phpintolib. - Of course, update the file paths in your scripts accordingly.
- Remember to delete
1-users.sql.
LINKS & REFERENCES
- CSRF Token Protection – Code Boxx
- PHP User Role Management – Code Boxx
- PHP Encrypt Decrypt Verify Password – Code Boxx
- Very Simple Pure HTML CSS Admin Panel – Code Boxx
THE END
Thank you for reading, and we have come to the end of this tutorial. I hope that it has helped speed up your project development, and if you have anything to share with this guide, please feel free to comment below. Good luck and happy coding!
just wanted to know how to change the default user email and password ? i tried to Change it though mysql database but it don’t log in anymore
$_ADM->save("name", "email", "password", 1)?Could you possibly help.
What should I change in line10?
Struggling. Very grateful for all your hard work.
login.php line10
https://code-boxx.com/how-to-debug-javascript/
https://code-boxx.com/how-to-debug-php-code/
https://code-boxx.com/simple-ajax-php/
https://code-boxx.com/relative-absolute-url-base-tag/
https://code-boxx.com/faq/#help