Welcome to a tutorial on how to create a GPS tracking system with PHP and Javascript. Need to track where a vehicle is at? Where an order is, or just making sure that it has been delivered to the right place?
A basic GPS tracking system with PHP and Javascript requires the following components:
- A database table to record the last known locations.
- PHP library and endpoint to accept and manage the location updates.
- A webpage or application to send the rider’s current GPS location to the server.
- Lastly, an admin page to track all the riders.
Let us walk through a simple example in this guide – Read on!
TABLE OF CONTENTS
DOWNLOAD & NOTES
Here is the download link to the example code, so you don’t have to copy-paste everything.
EXAMPLE CODE DOWNLOAD
Just click on “download zip” or do a git clone. I have released it under the MIT license, so feel free to build on top of it or use it in your own project.
SORRY FOR THE ADS...
But someone has to pay the bills, and sponsors are paying for it. I insist on not turning Code Boxx into a "paid scripts" business, and I don't "block people with Adblock". Every little bit of support helps.
Buy Me A Coffee Code Boxx eBooks
PHP MYSQL GPS TRACKING
All right, let us now get into the details of a GPS tracking system with PHP and MYSQL.
TUTORIAL VIDEO
PART 1) DATABASE – LAST KNOWN LOCATION
CREATE TABLE `gps_track` (
  `rider_id` bigint(20) NOT NULL,
  `track_time` datetime NOT NULL DEFAULT CURRENT_TIMESTAMP,
  `track_lng` decimal(11,7) NOT NULL,
  `track_lat` decimal(11,7) NOT NULL
) ENGINE=InnoDB DEFAULT CHARSET=utf8mb4;

ALTER TABLE `gps_track`
  ADD PRIMARY KEY (`rider_id`),
ADD KEY `track_time` (`track_time`);| Field | Description |
rider_id |
Primary key, the rider ID… Or the ID of whatever you want to track. |
track_time |
Time the rider last “checked in”. |
track_lng |
Longitude. |
track_lat |
Latitude. |
Yep, that is all we need. Just a table to store the last-known locations of the riders.
PART 2) GPS TRACKING PHP LIBRARY
<?php
class Track {
  // (A) CONSTRUCTOR - CONNECT TO DATABASE
  public $pdo = null;
  public $stmt = null;
  public $error = "";
  function __construct () {
    $this->pdo = new PDO(
      "mysql:host=".DB_HOST.";dbname=".DB_NAME.";charset=".DB_CHARSET,
      DB_USER, DB_PASSWORD, [
      PDO::ATTR_ERRMODE => PDO::ERRMODE_EXCEPTION,
      PDO::ATTR_DEFAULT_FETCH_MODE => PDO::FETCH_ASSOC
    ]);
  }

  // (B) DESTRUCTOR - CLOSE CONNECTION
  function __destruct () {
    if ($this->stmt !== null) { $this->stmt = null; }
    if ($this->pdo !== null) { $this->pdo = null; }
  }

  // (C) HELPER FUNCTION - EXECUTE SQL QUERY
  function query ($sql, $data=null) : void {
    $this->stmt = $this->pdo->prepare($sql);
    $this->stmt->execute($data);
  }

  // (D) UPDATE RIDER COORDINATES
  function update ($id, $lng, $lat) {
    $this->query(
      "REPLACE INTO `gps_track` (`rider_id`, `track_time`, `track_lng`, `track_lat`) VALUES (?, ?, ?, ?)",
      [$id, date("Y-m-d H:i:s"), $lng, $lat]
    );
    return true;
  }

  // (E) GET RIDER(S) COORDINATES
  function get ($id=null) {
    $this->query(
      "SELECT * FROM `gps_track`" . ($id==null ? "" : " WHERE `rider_id`=?"),
      $id==null ? null : [$id]
    );
    return $this->stmt->fetchAll();
  }
}

// (F) DATABASE SETTINGS - CHANGE THESE TO YOUR OWN!
define("DB_HOST", "localhost");
define("DB_NAME", "test");
define("DB_CHARSET", "utf8mb4");
define("DB_USER", "root");
define("DB_PASSWORD", "");

// (G) START!
$_TRACK = new Track();
This one looks intimidating at first, but keep calm and analyze slowly.
- (A, B, G) When
$_TRACK = new Track()is created, the constructor will automatically connect to the database. The destructor closes the connection. - (C)
query()is a simple helper function that runs an SQL query. - (D & E) There are only 2 “actual GPS tracking” functions.
update()records a rider’s GPS coordinates.get()returns the rider’s last known coordinates.
- (F) Self-explanatory. Remember to change the database settings to your own.
PART 3) AJAX ENDPOINT
<?php
if (isset($_POST["req"])) {
  require "2-lib-track.php";
  switch ($_POST["req"]) {
    // (A) UPDATE RIDER LOCATION
    case "update":
      echo $_TRACK->update($_POST["id"], $_POST["lng"], $_POST["lat"])
        ? "OK" : $_TRACK->error ;
      break;

    // (B) GET RIDER(S) LAST KNOWN LOCATION
    case "get":
      echo json_encode($_TRACK->get(isset($_POST["id"]) ? $_POST["id"] : null));
      break;
  }
}
The core library is not going to work by itself, so here is the AJAX endpoint. How it works is very simple – Just pass in a $_POST["req"] to specify the request, followed by the required parameters.
| Request | Description |
update |
Update the location of the given rider. Parameters:
|
get |
Get the last known location of a given rider. Parameters:
|
PART 4) HTML TRACKING PAGES
4A) RIDER TRACKING PAGE
<div class="row">
  <div class="title">Updated</div>
  <div class="data" id="date"></div>
</div>
<div class="row">
  <div class="title">Latitude, Longitude</div>
  <div class="data">
    <span id="lat"></span>, <span id="lng"></span>
  </div>
</div>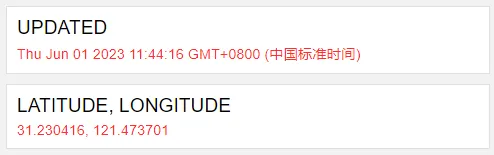
This dummy tracker page is for the delivery staff. Pretty straightforward, it just displays the current GPS coordinates.
var track = {
  // (A) INIT
  rider : 999,   // rider id - fixed to 999 for demo
  delay : 10000, // delay between gps update (ms)
  timer : null,  // interval timer
  hDate : null,  // html date
  hLat : null,   // html latitude
  hLng : null,   // html longitude
  init : () => {
    // (A1) GET HTML
    track.hDate = document.getElementById("date");
    track.hLat = document.getElementById("lat");
    track.hLng = document.getElementById("lng");

    // (A2) START TRACKING
    track.update();
    track.timer = setInterval(track.update, track.delay);
  },

  // (B) SEND CURRENT LOCATION TO SERVER
  update : () => navigator.geolocation.getCurrentPosition(
    pos => {
      // (B1) LOCATION DATA
      var data = new FormData();
      data.append("req", "update");
      data.append("id", track.rider);
      data.append("lat", pos.coords.latitude);
      data.append("lng", pos.coords.longitude);

      // (B2) AJAX SEND TO SERVER
      fetch("3-ajax-track.php", { method:"POST", body:data })
      .then(res => res.text())
      .then(txt => { if (txt=="OK") {
        let now = new Date();
        track.hDate.innerHTML = now.toString();
        track.hLat.innerHTML = pos.coords.latitude;
        track.hLng.innerHTML = pos.coords.longitude;
      } else { track.error(txt); }})
      .catch(err => track.error(err));
    },
    err => track.error(err)
  ),

  // (C) HELPER - ERROR HANDLER
  error : err => {
    console.error(err);
    alert("An error has occured, open the developer's console.");
    clearInterval(track.timer);
  }
};
window.onload = track.init;
The Javascript seems massive once again, but do a quick trace and it should explain itself:
track.init()Runs on page load. Get the HTML elements, create a timer and start tracking on intervals.track.update()Get the GPS coordinates. Upload them to the server, and update the HTML interface.track.error()A helper function to deal with errors.
4B) ADMIN TRACKING PAGE
<div id="wrapper"></div>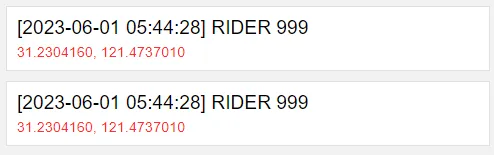
This dummy admin page fetches the locations of all riders and shows them. In your own project, you may want to display a “nice map” and show where the riders are at.
var track = {
  // (A) INIT
  delay : 10000, // delay between location refresh
  timer : null, // interval timer
  hWrap : null, // html <div> wrapper
  init : () => {
    track.hMap = document.getElementById("wrapper");
    track.show();
    track.timer = setInterval(track.show, track.delay);
  },

  // (B) GET DATA FROM SERVER AND UPDATE MAP
  show : () => {
    // (B1) DATA
    var data = new FormData();
    data.append("req", "get");

    // (B2) AJAX FETCH
    fetch("3-ajax-track.php", { method:"POST", body:data })
    .then(res => res.json())
    .then(data => { for (let r of data) {
      let row = document.createElement("div");
      row.className = "row";
      row.innerHTML =
        `<div class="title">[${r.track_time}] Rider ${r.rider_id}</div>
         <div class="data">${r.track_lat}, ${r.track_lng}</div>`;
      track.hWrap.appendChild(row);
    }})
    .catch(err => track.error(err));
  },

  // (C) HELPER - ERROR HANDLER
  error : err => {
    console.error(err);
    alert("An error has occured, open the developer's console.");
    clearInterval(track.timer);
  }
};
window.onload = track.init;track.init()Runs on page load. Get the HTML elements, starts updating the page in intervals.track.show()Get data from the server and update the HTML.track.error()Helper function to deal with errors.
EXTRAS
That’s all for the tutorial, and here are a few small extras and links that may be useful to you.
IMPROVEMENT IDEAS
- Map Integration – There are over a dozen map services at the time of writing. See the links below, and pick your poison. I also have a tutorial on using Mapbox, follow the “Get GPS & Generate Map” link below.
- User/Admin/Rider Login – Secure the AJAX endpoint and pages. See the links below if you don’t have a login system.
- Tracking History – If you want to keep the travel history.
- Change the database, set
rider_idandtrack_timeas composite primary keys. Better to add atrip_idtoo. - Change the PHP library
function update(), simplyINSERTa new entry instead ofREPLACE. - Of course,
function get()needs to be updated as well. - Be sure to disclose that you are keeping the travel history in the company policy/agreement. Privacy laws can be a pain in some regions.
- Change the database, set
NOT REAL-TIME TRACKING?
Of course, this is not a real-time system. While it is possible to do so, we have to consider the technical limitations and if it is worth doing.
- Firstly, real-time will drain out the smartphone batteries fast.
- Secondly, you will need a powerful network infrastructure to support a lot of “always-on” socket connections.
- Lastly, a very robust server system that is capable of crunching real-time data.
So aye… If someone is willing to shell out that kind of money and thinks that it is beneficial for their business – Then why not?
COMPATIBILITY CHECKS
- Arrow Functions – CanIUse
- Geolocation – CanIUse
- Fetch – CanIUse
This example works with most modern browsers.
LINKS & REFERENCES
- Javascript Geolocation API – MDN
- Simple User Login System With PHP MySQL – Code Boxx
- Simple User Role Management System With PHP MySQL – Code Boxx
- Get GPS Coordinates & Generate Map In Javascript – Code Boxx
- Need Maps?
THE END
Thank you for reading, and we have come to the end of this guide. I hope that it has helped you with your project, and if you want to share anything with this guide, please feel free to comment below. Good luck and happy coding!
How can I change the rider id?
Don’t skip the basics. Start from a simple sessions based user login system, or JWT based sessions.
https://code-boxx.com/simple-login-php-mysql/
https://code-boxx.com/jwt-login-authentication-php-mysql/
can you do a tutorial on how to put that on google map?
https://code-boxx.com/gps-coordinates-map-javascript/
For Google Maps, you will have to do your own research. There are plenty of good tutorials on the Internet. Good luck!
Not working at all.
https://code-boxx.com/faq/#notwork
thank you so much