Welcome to a tutorial on how to convert text to image in PHP. Need to output some text as an image? Maybe to stop some nasty users from copying sensitive text?
An easy way to convert text to image in PHP is to use the GD library, and the steps are:
- Create an empty canvas –
$img = imagecreate(500, 300); - Define the colors.
$white = imagecolorallocate($img, 255, 255, 255);$black = imagecolorallocate($img, 0, 0, 0);
- Fill a solid rectangle background –
imagefilledrectangle($img, 0, 0, 500, 300, $white); - Draw the text –
imagestring($img, 5, 0, 0, "TEXT", $black); - Save the image to a file –
imagepng($img, "IMAGE.png");
This covers the basics, but let us walk through a few more examples – Read on!
TABLE OF CONTENTS
DOWNLOAD & NOTES
Here is the download link to the example code, so you don’t have to copy-paste everything.
EXAMPLE CODE DOWNLOAD
Just click on “download zip” or do a git clone. I have released it under the MIT license, so feel free to build on top of it or use it in your own project.
SORRY FOR THE ADS...
But someone has to pay the bills, and sponsors are paying for it. I insist on not turning Code Boxx into a "paid scripts" business, and I don't "block people with Adblock". Every little bit of support helps.
Buy Me A Coffee Code Boxx eBooks
TEXT TO IMAGE WITH PHP GD
All right, let us now go into more examples of writing text using the GD extension in this section.
TUTORIAL VIDEO
EXAMPLE 1) BASIC TEXT TO IMAGE
<?php
// (A) IMAGE OBJECT
$width = 150; $height = 80;
$img = imagecreate($width, $height);

// (B) SETTINGS
$txt = "FOO BAR!";
$txtSize = 5;
$txtX = 10; $txtY = 10;
$red = imagecolorallocate($img, 255, 0, 0);
$white = imagecolorallocate($img, 255, 255, 255);

// (C) DRAW BACKGROUND (RED RECTANGLE)
imagefilledrectangle($img, 0, 0, $width, $height, $red);

// (D) WRITE TEXT
imagestring($img, $txtSize, $txtX, $txtY, $txt, $white);

// (E) SAVE TO FILE
imagepng($img, "demo.png");
imagedestroy($img); // optional
imagecreate()Creates an empty transparent image.- A bunch of “drawing settings”. In particular, we need to predefine the colors with
imagecolorallocate()before drawing. imagefilledrectangle()Fill the background with a solid rectangle.imagestring()Write the text.imagepng()Save the image into a file. It is optional to useimagedestroy()to clear the image, but good to do so anyway.
EXAMPLE 2) VERTICAL TEXT & OUTPUT TO SCREEN
<?php
// (A) IMAGE OBJECT
$width = 80; $height = 150;
$img = imagecreate($width, $height);

// (B) SETTINGS
$txt = "FOO BAR!";
$txtSize = 5;
$txtX = 10; $txtY = 100;
$green = imagecolorallocate($img, 0, 255, 0);
$black = imagecolorallocate($img, 0, 0, 0);

// (C) DRAW BACKGROUND (GREEEN RECTANGLE)
imagefilledrectangle($img, 0, 0, $width, $height, $green);

// (D) WRITE TEXT
imagestringup($img, $txtSize, $txtX, $txtY, $txt, $black);

// (E) OUTPUT
header("Content-type: image/png");
imagepng($img);
imagedestroy($img);
This is pretty much the same as the above example, but with 2 differences:
- (D) We are using
imagestringup()to write the text in a vertical manner now. - (E) Instead of saving to a file, we directly output an image HTTP header
header("Content-type: image/png")and useimagepng($img)to serve the image data.
EXAMPLE 3) DEFINING FONT TO USE
<?php
// (A) IMAGE OBJECT
$width = 150; $height = 80;
$img = imagecreate($width, $height);

// (B) SETTINGS
$txt = "FOO BAR!";
$txtSize = 22;
$txtAngle = 5;
$txtX = 10; $txtY = 60;
$txtFont = "C:/Windows/Fonts/arial.ttf"; // CHANGE TO YOUR OWN!
$blue = imagecolorallocate($img, 0, 0, 255);
$white = imagecolorallocate($img, 255, 255, 255);

// (C) DRAW BACKGROUND (BLUE RECTANGLE)
imagefilledrectangle($img, 0, 0, $width, $height, $blue);

// (D) WRITE TEXT
imagettftext($img, $txtSize, $txtAngle, $txtX, $txtY, $white, $txtFont, $txt);

// (E) OUTPUT
header("Content-type: image/png");
imagepng($img);
imagedestroy($img);

To specify the font, use imagettftext() instead – Please make sure that PHP has read access to the specified font file, or this will draw “nothing”.
P.S. If you want to draw “vertical text” with imagettftext(), just specify a 90 degrees angle (or 270 degrees).
EXAMPLE 4) CENTERING TEXT ON IMAGE
<?php
// (A) IMAGE OBJECT
$width = 300; $height = 150;
$img = imagecreate($width, $height);

// (B) SETTINGS
$txt = "FOO BAR!";
$txtSize = 22;
$txtAngle = 0;
$txtX = 10; $txtY = 60;
$txtFont = "C:/Windows/Fonts/arial.ttf"; // CHANGE TO YOUR OWN!
$grey = imagecolorallocate($img, 200, 200, 200);
$black = imagecolorallocate($img, 0, 0, 0);

// (C) DRAW BACKGROUND (GREY RECTANGLE)
imagefilledrectangle($img, 0, 0, $width, $height, $grey);

// (D) TEXT BOX DIMENSIONS
$txtBox = imagettfbbox($txtSize, $txtAngle, $txtFont, $txt);
$txtW = max([$txtBox[2], $txtBox[4]]) - min([$txtBox[0], $txtBox[6]]);
$txtH = max([$txtBox[5], $txtBox[7]]) - min([$txtBox[1], $txtBox[3]]);

// (E) CENTERING THE TEXT BLOCK
$txtX = CEIL(($width - $txtW) / 2);
$txtX = $txtX<0 ? 0 : $txtX;
$txtY = CEIL(($height - $txtH) / 2);
$txtY = $txtY<0 ? 0 : $txtY;
imagettftext($img, $txtSize, $txtAngle, $txtX, $txtY, $black, $txtFont, $txt);

// (F) OUTPUT
header("Content-type: image/png");
imagepng($img);
imagedestroy($img);

Sadly, centering a block of text is very Mathematical… But in essence, we have to use imagettfbbox() to get the bounding box around the text. This will return an array of 8 numbers, each corresponding to a coordinate of the text box.
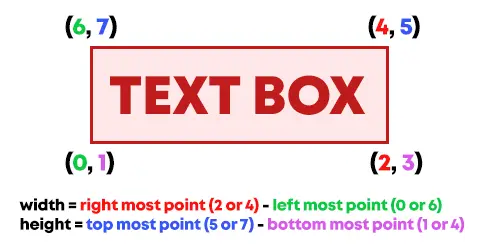
Then, we can determine the width and height of the text box using the coordinates:
TEXT WIDTH = (2 OR 4, WHICHEVER IS FURTHER RIGHT) - (0 OR 6, WHICHEVER IS FURTHER LEFT).TEXT HEIGHT = (5 OR 7, WHICHEVER IS FURTHER UP) - (1 OR 3, WHICHEVER IS FURTHER DOWN).
Finally, use this to calculate the center placement on the image:
X = (IMAGE WIDTH - TEXT WIDTH) / 2.Y = (IMAGE HEIGHT - TEXT HEIGHT) / 2.
EXTRAS
That’s it for the simple script, and here are some small extras and links that may be useful to you.
WRITING MULTIPLE LINES?
There is no straightforward way, the only possibility is to use multiple imagestring() and/or imagettftext() to write multiple lines. As you can guess, this will involve a lot of “X/Y coordinates calculation”. I will not touch on that in this simple guide, follow up with my other “write multi-line” tutorial, link below.
FONT COPYRIGHT WARNING
Yes, we can specify which font to use, but please do not go on a download frenzy and use whatever fonts on the Internet. That is because some fonts are still subjected to copyright, and they cannot be used for commercial purposes… Always remember to check the usage license before you use it in your own projects.
THE SUMMARY
| Function | Description | Reference Link |
imagecreate(WIDTH, HEIGHT) |
Create a new empty canvas. | Click Here |
imagecolorallocate(IMAGE, RED, GREEN, BLUE) |
Specify a color code to use on the canvas. | Click Here |
imagefilledrectangle(IAMGE, X1, Y1, X2, Y2, COLOR) |
Fill a solid rectangle. | Click Here |
imagestring(IMAGE, SIZE - 1 to 5, X, Y, TEXT, COLOR) |
Write text to the image using the built-in font. | Click Here |
imagecreateup(IMAGE, SIZE - 1 to 5, X, Y, TEXT, COLOR) |
Write vertical text to the image using the built-in font. | Click Here |
imagettftext(IMAGE, SIZE, ANGLE, X, Y, FONT, TEXT) |
Write text to the image (with more controls). | Click Here |
imagettfbbox(SIZE, ANGLE, FONT, TEXT) |
Get the size of the text box. | Click Here |
imagepng(IMAGE, FILE) |
Save the given image – If FILE is not present, will directly output the data. |
Click Here |
imagejpeg(IMAGE, FILE, QUALITY 1-100) |
Save the given image. | Click Here |
imagedestroy(IMAGE) |
Destroy the given image. | Click Here |
LINKS & REFERENCES
- PHP How To Add Text To Image – Code Boxx
- PHP Write Multi-line Text On Image – Code Boxx
THE END
Thank you for reading, and we have come to the end of this short tutorial. I hope that it has helped you with your project, and do you have more creative uses for turning text into images? Please do share them in the comments below. Good luck and happy coding!
How to add line breaker ?
Unfortunately, the only way to add a “line break” is to “manually write 2 lines of text”.
and the reverse? what it would be like to extract text from an image for inputs, for example upload an image mseja from the web cam or library and the system extract numbers and place in various inputs
PHP OCR (or Javascript OCR) – Do your own research.
Thank you so much. I really needed this type of resolution. It is simple, easy to understand, and straight to the point. Your a life saver!