Welcome to a quick tutorial on how to write multiple lines of text with PHP GD. So you have probably messed with GD to write some text, only to realize there is no way to “automatically break into multiple lines”.
imagettftext() many times to write text at different positions.Yes, it’s a real pain. So here’s a quick example of how I “automated” the line breaks – Read on!
TABLE OF CONTENTS
DOWNLOAD & NOTES
Here is the download link to the example code, so you don’t have to copy-paste everything.
EXAMPLE CODE DOWNLOAD
The example code is released under the MIT license, so feel free to build on top of it or use it in your own project.
SORRY FOR THE ADS...
But someone has to pay the bills, and sponsors are paying for it. I insist on not turning Code Boxx into a "paid scripts" business, and I don't "block people with Adblock". Every little bit of support helps.
Buy Me A Coffee Code Boxx eBooks
PHP GD WRITE MULTIPLE LINES
All right, let us now get into the example of writing multiple lines text with PHP GD.
TUTORIAL VIDEO
PART 1) IMAGE & TEXT SETTINGS
// (A) LOAD IMAGE
$img = imagecreatefrompng("demo.png");

// (B) TEXT SETTINGS
$txtSize = 28;
$txtAngle = 0;
$txtX = 30;
$txtY = 280;
$txtColor = imagecolorallocate($img, 0, 0, 0);
$txtFont = "C:/Windows/Fonts/impact.ttf";
$txt = "TAKE A BREAK. DRINK A BUBBLE TEA!";

We begin by loading the source image and defining a whole bunch of settings. Let’s run through these quickly:
$txtSizeFont size.$txtAngleLeave this as 0, unless you want slanted text.$txtX $txtYWhere to write the text on the image.$txtColorFont color.$txtFontFont to use, remember to change this to your own.$txtText to write.
PART 2) BREAK TEXT INTO LINES
// (C) SPLIT TEXT INTO LINES
$maxChar = 13;
$lines = [];
$temp = "";
foreach (explode(" ", $txt) as $word) {
  if ($temp=="") { $temp .= $word; }
  else if (strlen("$temp $word") <= $maxChar) { $temp = "$temp $word"; }
  else { $lines[] = $temp; $temp = $word; }
}
$lines[] = $temp;
This little section can be a little confusing, so here’s a quick trace:
- The idea is to break
$txtinto many lines, into the array$lines. $maxCharis the allowed number of characters per line.for (explode(" ", $txt) as $word)will loop through word by word.if (strlen("$temp $word") <= $maxChar) { $temp = "$temp $word" }We “collect” each word into$temp.- When
$tempis over$maxChar, we “push” it into the array and start the next line –$lines[] = $temp; $temp = $word.
P.S. In this example, $txt will break down into $lines = ["TAKE A BREAK.", "DRINK A", "BUBBLE TEA!"]
PART 3) DRAW LINES ONTO IMAGE
// (D) DRAW LINES ONTO IMAGE
$offsetY = 10;
foreach ($lines as $i=>$line) {
  $y = $txtY + ($i * $txtSize) + ($i==0 ? 0 : $i * $offsetY);
  imagettftext ($img, $txtSize, $txtAngle, $txtX, $y, $txtColor, $txtFont, $line);
}
Now that we have broken $txt into $lines, we do the very obvious thing – Loop through $lines and draw it line-by-line.
- We use the “usual”
imagettftext()function to write text onto the image. - But take note of how we shift the Y position for each new line –
Y POSITION = ORIGINAL Y POSITION + (LINE X FONT SIZE) + (LINE X OFFSET). - The
OFFSETis optional, but the text will be very compact if you leave it out.
PART 4) SAVE PROCESSED IMAGE
// (E) SAVE COMPLETE IMAGE
imagepng($img, "written.png");
echo "OK";
Lastly, just save the processed image. The end. Thankfully.
EXTRAS
That’s all for the tutorial, and here is a small section on some extras and links that may be useful to you.
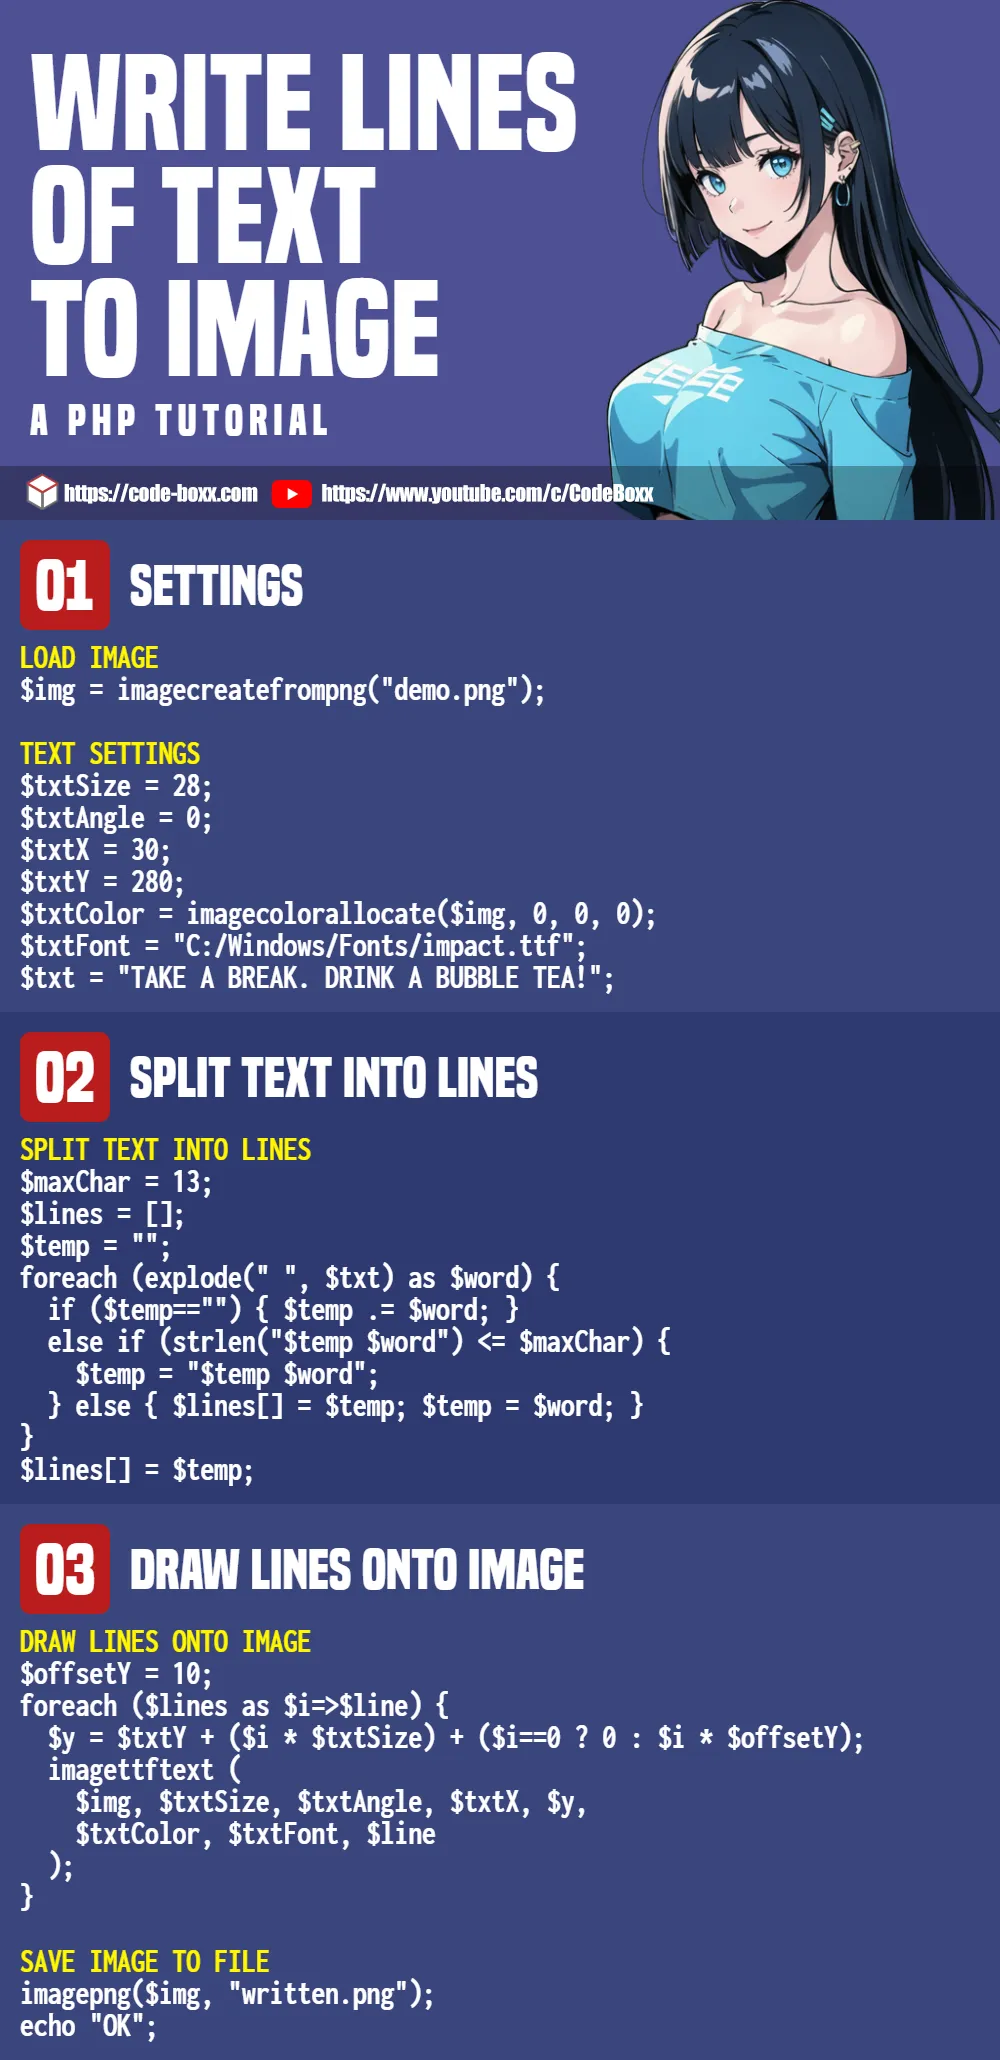
INFOGRAPHIC CHEAT SHEET
LINKS & REFERENCES
- GD – Official PHP Manual
- PHP Add Text To Image – Code Boxx
THE END
Thank you for reading, and we have come to the end. I hope that it has helped you to better understand, and if you want to share anything with this guide, please feel free to comment below. Good luck and happy coding!