So you have heard of this AI thing, and wonder how people generated anime images with it for free? Well, to keep the long story short:
- Easy way – Just use a free online AI image generator.
- Ninja way – Install on your computer, and generate as many images as you like.
Either way, you will be surprised that generative AI is not as easy as some people claim. Read on for more!
TABLE OF CONTENTS
EASY – ONLINE AI IMAGE GENERATOR
If you just want to generate images without installing anything, here are some free online AI image generators you can sign up for.
ONLINE AI IMAGE GENERATORS
- seaart.ai
- tensor.art
- Yodayo
- PixAI
- For the complete list, check out my post on free online Stable Diffusion AI Art Generators.
A COUPLE OF NOTES
- Take it with a pinch of salt – The above “free” AI image generators are not entirely free. There are restrictions and limitations in one way or another.
- Business models change over time, “forever free” may eventually turn into “free trial”.
- Every online image generator is slightly different from another. The results and styles will vary.
NINJA – INSTALL YOUR OWN
If you want full controls and zero limitations, the AI engine behind most online image generators is called Stable Diffusion. The good news, it’s free and open source.
REQUIREMENTS
Be warned that Stable Diffusion is pretty heavy.
- Recommended Nvidia 20XX series graphics card with 6GB GDDR.
- Recommended 16GB of RAM.
- The full installation with all the requirements can bloat to over 30GB++.
STEP 1) INSTALL PYTHON
First, you are going to need to install a programming language called Python. Nope, no need to know any programming. It’s just required to run Stable Diffusion. Head over to the Python download page, and install the 3.10.13 version. Not sure if Stable Diffusion will run on later 3.11.X and 3.12.X versions, you can try it for yourself though.
STEP 2) INSTALL GIT
Next, download and install git. Once again, some “programming stuff but you don’t actually have to know”. Quite a long-winded installer, just click on next and use the “default installer settings”.
STEP 3) DOWNLOAD AUTOMATIC1111
This part may be a little confusing. Let’s just put it this way – AUTOMATIC111 is a popular web-based graphic user interface (GUI) for Stable Diffusion. Simply open the command line (or terminal) and run git clone https://github.com/AUTOMATIC1111/stable-diffusion-webui.git at where you want to install it. Example:
D:\>git clone https://github.com/AUTOMATIC1111/stable-diffusion-webui.git
Cloning into 'stable-diffusion-webui'...
remote: Enumerating objects: 21229, done.
remote: Counting objects: 100% (778/778), done.
remote: Compressing objects: 100% (408/408), done.
remote: Total 21229 (delta 477), reused 579 (delta 360), pack-reused 20451
Receiving objects: 100% (21229/21229), 29.91 MiB | 12.40 MiB/s, done.

Resolving deltas: 100% (14836/14836), done.
Yep, git will automatically create and download everything into the D:\stable-diffusion-webui folder.
STEP 4) STABLE DIFFUSION CHECKPOINTS/MODELS
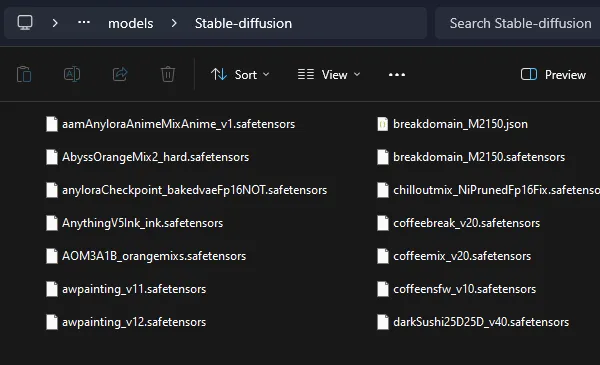
Now that you have installed the GUI, it’s time to download some “checkpoints” or “AI models”. There are 2 popular places to get them:
There are quite a lot of “specialized anime checkpoints”, download these into your stable-diffusion-webui/models/Stable-diffusion folder if you want.
STEP 5) RUN
After you are done, just run webui-user.bat (Windows) or webui-user.sh (Linux/Mac). The rest is automatic, AUTOMATIC1111 will download the rest of “whatever is required” and launch when ready. Be warned though, the initial setup is pretty rough with GIGABYTES worth of download.
D:\stable-diffusion-webui\>webui-user.bat
BLAH BLAH INSTALL PYTORCH UPSCALER WHATEVER

Running on local URL: http://127.0.0.1:7860
To create a public link, set `share=True` in `launch()`.
Startup time: 10.5s (import torch: 0.8s, import gradio: 0.7s, import ldm: 0.6s, other imports: 1.2s, setup codeformer: 0.2s, load scripts: 0.8s, load SD checkpoint: 5.4s, create ui: 0.7s).
STEP 6) OPEN THE BROWSER

Congrats if you got to the Running on local URL: http://127.0.0.1:7860 part. The installation is successful, open your browser and access http://127.0.0.1:7860.
P.S. Images will be generated in stable-diffusion-webui/outputs folder. There is a shortcut to the folder in the web UI, just click on the folder icon under the generated image.
EXTRA) XFORMERS & VRAM MANAGEMENT
set COMMANDLINE_ARGS=--xformersA small recommendation if you have an Nvidia video card, edit webui-user.bat (or webui-user.sh) and add --xformers to the command arguments. While optional, xformers reduces the memory requirements and turns Stable Diffusion into a “lesser memory hog”.
If you have less than 12GB of VRAM, add --medvram to the arguments as well (--lowvram if you have less than 8GB). This will slow down the image generation a little, but you will face fewer “out of memory” errors.
HOW TO USE
Free online generator or installed, this is the part that surprises most beginners. AI is not as easy as some people think, and we will run through some of the basics.
PROMPTS
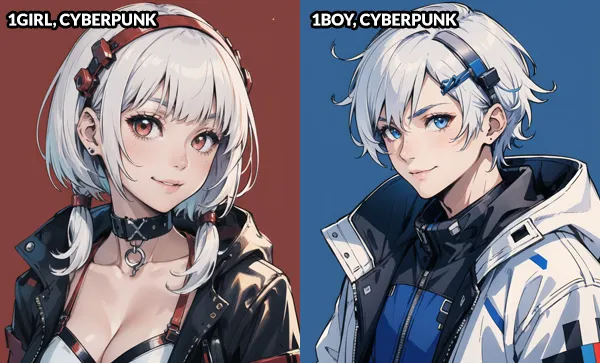
Stable Diffusion is what we call “text-to-image generative AI”, it mainly revolves around “entering prompts” to generate images:
- Prompt – A description of what you want.
- Negative Prompt – What you don’t want.
The best way to learn prompts is to see how others write their prompts, I will leave a link below to my other guide on anime prompts.
CHECKPOINT MODEL
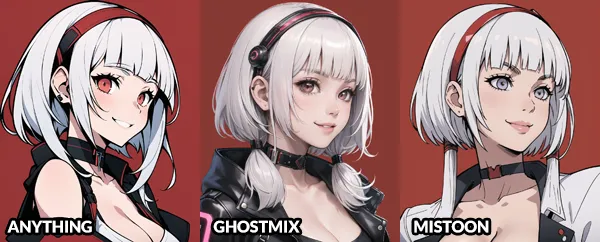
As you can guess, a checkpoint is something like a “blueprint model”. Some checkpoints are trained to produce better realistic photos, some to produce paintings, and some are specialized for anime.
- If you have installed AUTOMATIC1111 – The “select Stable Diffusion checkpoint” is on the top-left. You can download more checkpoints and put them into the
models/StableDiffusionfolder at any time. - For you guys who are using free online generators, you are stuck with whatever is available for free.
SAMPLING & BASICS
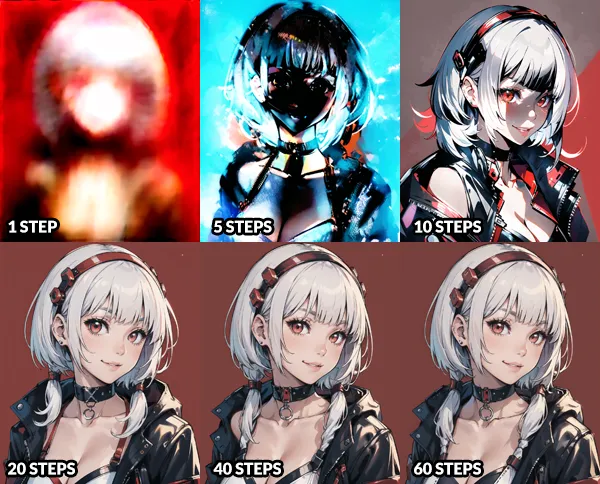
How Stable Diffusion works – Start with a blurry mess and slowly refine to the prompts that you have specified.
- Sampling Method – How Stable Diffusion interprets your prompts and adds the details. For most anime checkpoints, I usually stick with “DPM++ 2M” or “Euler” (pronounced “OYler”, as in “OYSTER”).
- Sampling Steps – The number of “refine cycles” to run. Technically, more steps will result in better quality and details. But that is not always the case as you can see, some sampling methods only need 20~30 steps to produce a decent image.
- CFG Scale (Guidance Scale) – Your prompt is pretty much a “suggestion” to what needs to be generated in the picture.
- A higher CFG will try to produce your prompts faithfully, but it collapses when you push it too much.
- A lower CFG will give AI freedom to “fill in the blanks”, but it becomes a random mess if you give AI too much space.
- I usually keep between 5~9 for anime checkpoints.
- Seed – The “blurry mess” is not really random, every “blurry mess” has a seed number; If you enter the same prompt and use the same seed number, you can reproduce the same picture.
- Width & Height – Captain Obvious, the base image dimensions. Take note that if you generate larger images, it will consume more memory.
UPSCALE
If you are happy with the base image, just leave it as it is. Otherwise, there are 2 ways to upscale an image:
- Upscale – For AUTOMATIC1111 users, it’s under the “Extras” tab. Upscale will mostly retain the original image, just “upsize” the dimensions.
- Drop the image into the “Drop Image Here” box.
- I usually use “R-ESRGAN” or “R-ESRGAN Anime” for “Upscaler 1”.
- Then hit “generate”.
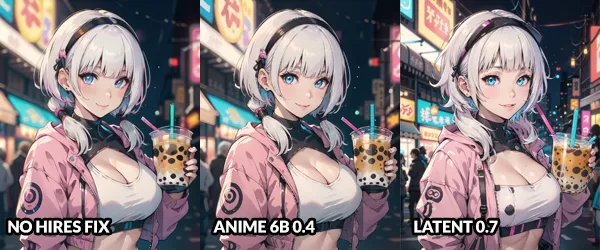
- Hi-Res Fix – For AUTOMATIC1111 users, this checkbox is right below the sampling steps. As you can see from the above example, “hi res fix” doesn’t just upsize. It is also possible to add more details to the original image.
- Upscaler – The “algorithm” to use for upscaling/adding details. Use “Latent” if you want to add more details, otherwise, the “R-ESRGAN” and “R-ESRGAN Anime” are good.
- Denoising Strength – I usually leave this between 0.3 to 0.5. Setting more will change the original image.
- Upscale By – Straightforward. How much do you want to upscale the base image.
EXTRAS
That’s all for the guide, and here is a small section on some extras and links that may be useful to you.
WARNING – “FREE” IS SUBJECTIVE
Before you get too happy with “free AI-generated images”, here are a few things to take note of before you decide to use it for commercial projects:
- The gray area in many regions – AI-generated images cannot be copyright protected. That is, you cannot claim AI-generated images as “your work”, even if you have edited the generated image.
- Sure thing, most AI-generated content can be used in commercial works. But take note of the license, not all of the models can be used for commercial purposes.
- You are still liable for breaching copyrights in AI-generated images. For example, if you sell an AI-generated Hello Kitty (or something that is similar) – Good luck, be prepared to hear from Sanrio.
MORE LEARNING
We have just scratched the surface and basics in this guide. There is a lot more to learn about AI image generation, do a search on the Internet and YouTube if you are interested in learning more.
- Stable Diffusion VAE
- Stable Diffusion LORA
- Stable Diffusion CKPT vs Safetensors
- Stable Diffusion ControlNet
- Stable Diffusion Inpaint/Outpaint
- Stable Diffusion textual inversion
LINKS & REFERENCES
- Stable Diffusion Anime Prompts – Code Boxx
- Stable Diffusion – GitHub
- AUTOMATIC1111 – GitHub
- InvokeAI – GitHub
THE END
Thank you for reading, and we have come to the end. I hope that it has helped you to better understand, and if you want to share anything with this guide, please feel free to comment below. Good luck and happy generating!