Welcome to a tutorial on how to create a simple Javascript drawing app. Want to create your own “painting app”? Or want to learn more about the HTML canvas? Here’s a simple example – Read on!
TABLE OF CONTENTS
JAVASCRIPT DRAWING APP

All right, let us now get into more details on how the Javascript drawing app works.
PART 1) THE HTML
<div id="wrapper">
<!-- (A) CANVAS -->
<canvas id="canvas"></canvas>
<!-- (B) DRAW CONTROLS -->
<div id="controls">
<input type="button" value="Clear" id="cClear">
<input type="color" id="cColor">
<input type="number" min="1" max="9" value="1" id="cSize">
<a id="cSave" download="draw.jpg">Save</a>
</div>
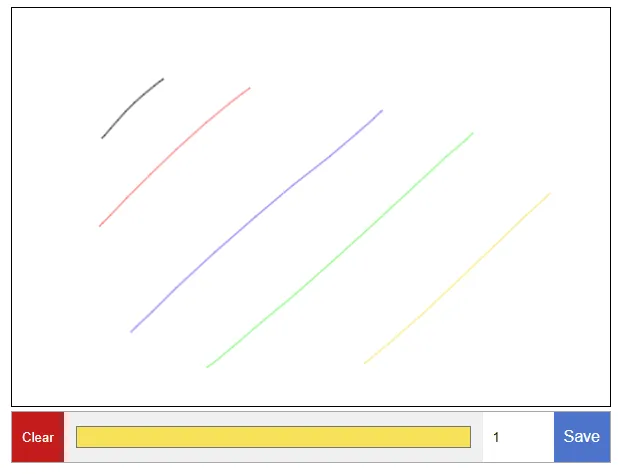
</div>The HTML interface is pretty simple.
- The canvas to draw on.
- Canvas controls – Clear button, color picker, paint size, save canvas to file.
PART 2) THE JAVASCRIPT
// CREDITS
// https://dev.to/0shuvo0/lets-create-a-drawing-app-with-js-4ej3
// https://riptutorial.com/html5-canvas/example/11659/detecting-mouse-position-on-the-canvas

var draw = {
  // (A) PROPERTIES
  canvas : null, // html canvas
  ctx : null, // html canvas context
  px: null, py : null, // previous mouse coordinates
  cx: null, cy : null, // current mouse coordinates
  go : false, // flag to control paint

  // (B) INIT
  init : () => {
    // (B1) GET HTML ELEMENTS
    draw.canvas = document.getElementById("canvas");
    draw.ctx = draw.canvas.getContext("2d");

    // (B2) SET CANVAS WIDTH & HEIGHT
    draw.canvas.width = draw.canvas.offsetWidth;
    draw.canvas.height = draw.canvas.offsetHeight;

    // (B3) DEFAULT DRAW SETTINGS
    draw.ctx.fillStyle = "#ffffff";
    draw.ctx.strokeStyle = "#000000";
    draw.ctx.lineWidth = 1;
    draw.ctx.fillRect(0, 0, draw.canvas.width, draw.canvas.height);

    // (B4) ATTACH DRAW CONTROLS
    // (B4-1) CLEAR CANVAS
    document.getElementById("cClear").onclick = () => draw.ctx.fillRect(0, 0, draw.canvas.width, draw.canvas.height);

    // (B4-2) DRAW COLOR
    document.getElementById("cColor").onchange = e => draw.ctx.strokeStyle = e.target.value;

    // (B4-3) DRAW SIZE
    document.getElementById("cSize").onchange = e => draw.ctx.lineWidth = e.target.value;

    // (B4-4) SAVE CANVAS
    document.getElementById("cSave").onclick = e => e.target.href = draw.canvas.toDataURL("image/jpg");

    // (B5) ENGAGE/DISENGAGE PAINT
    let disengage = () => { draw.px = null; draw.py = null; draw.go = false; };
    draw.canvas.addEventListener("mousedown", e => draw.go = true);
    draw.canvas.addEventListener("mouseup", disengage);
    draw.canvas.addEventListener("mouseout", disengage);
    draw.canvas.addEventListener("mousemove", draw.paint);
  },

  // (C) PAINT
  paint : e => { if (draw.go) {
    // (C1) GET CANVAS MOUSE COORDINATES
    let cRect = draw.canvas.getBoundingClientRect();
    draw.cx = Math.round(e.clientX - cRect.left);
    draw.cy = Math.round(e.clientY - cRect.top);

    // (C2) SET INITIAL COORDINATES
    if (draw.px == null || draw.py == null) {
      draw.px = draw.cx;
      draw.py = draw.cy;
    }

    // (C3) DRAW
    draw.ctx.beginPath();
    draw.ctx.moveTo(draw.px, draw.py);
    draw.ctx.lineTo(draw.cx, draw.cy);
    draw.ctx.stroke();

    // (C4) UPDATE COORDINATES
    draw.px = draw.cx;
    draw.py = draw.cy;
  }}
};
window.onload = draw.init;
Not going to explain things line-by-line here… It will take forever. Study the basic Canvas API on your own, links below. Here’s a quick walkthrough instead.
- The
drawobject contains all the drawing mechanics. - (B) On window load,
draw.init()will run. What it does is actually very straightforward once you study it –- (B1 to B3) Get the HTML canvas and initialize it.
- (B4) Attach the drawing controls – Clear the canvas, set the draw color, draw size, and save the canvas as a JPG file.
- (B5 & C) The bulk of the “draw action” happens here.
- (B5) On mouse down, we engage
draw.go = true. - (C)
draw.paint()will now track the mouse movement within the canvas. - (C1) Get the current coordinates of the mouse within the canvas.
- (C2 To C4) As the mouse moves, we track the coordinates “on the fly” and draw on the canvas.
- (B5) We stop tracking and drawing on mouse up, or as the mouse leaves the canvas –
draw.go = false; draw.px = null; draw.py = null.
- (B5) On mouse down, we engage
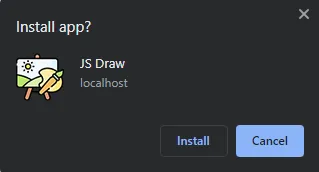
PART 3) PROGRESSIVE WEB APP
3A) HTML HEADER
<!-- ANDROID + CHROME + APPLE + WINDOWS APP -->
<meta name="mobile-web-app-capable" content="yes">
<meta name="theme-color" content="white">
<link rel="apple-touch-icon" href="icon-512.png">
<meta name="apple-mobile-web-app-capable" content="yes">
<meta name="apple-mobile-web-app-status-bar-style" content="black">
<meta name="apple-mobile-web-app-title" content="JS Draw">
<meta name="msapplication-TileImage" content="icon-512.png">
<meta name="msapplication-TileColor" content="#ffffff">

<!-- WEB APP MANIFEST -->
<!-- https://web.dev/add-manifest/ -->
<link rel="manifest" href="3a-manifest.json">

<!-- SERVICE WORKER -->
<script>
if ("serviceWorker" in navigator) {
  navigator.serviceWorker.register("3b-worker.js");
}
</script>
The above is already a fully functional basic drawing app. But to turn this into a “legit web app”, we need to add 3 sections in the head section of the HTML.
- Define icons and app metadata.
- Define a web manifest.
- Register a service worker.
3B) WEB MANIFEST
{
  "short_name": "Draw",
  "name": "JS Draw",
  "icons": [{
    "src": "favicon.png",
    "sizes": "64x64",
    "type": "image/png"
  }, {
    "src": "icon-512.png",
    "sizes": "512x512",
    "type": "image/png"
  }],
  "start_url": "1-draw.html",
  "scope": "/",
  "background_color": "white",
  "theme_color": "white",
  "display": "standalone"
}
The web manifest file is as it is. Information on the app, icons, themes, settings, etc…
3C) SERVICE WORKER
// (A) CREATE/INSTALL CACHE
self.addEventListener("install", evt => {
  self.skipWaiting();
  evt.waitUntil(
    caches.open("JSDraw")
    .then(cache => cache.addAll([
      "1-draw.html",
      "2-draw.css",
      "2-draw.js",
      "favicon.png",
      "icon-512.png"
    ]))
    .catch(err => console.error(err))
  );
});

// (B) CLAIM CONTROL INSTANTLY
self.addEventListener("activate", evt => self.clients.claim());

// (C) LOAD FROM CACHE FIRST, FALLBACK TO NETWORK IF NOT FOUND
self.addEventListener("fetch", evt => evt.respondWith(
  caches.match(evt.request).then(res => res || fetch(evt.request))
));
Lastly, a service worker is simply a Javascript that runs in the background. In this one:
- (A) We create a browser cache and save all the Javascript Drawing App files inside.
- (C) Listen to fetch requests. If the requested file is found in the cache, serve that cached copy. If not, fall back to load from the network.
In other words, offline support. This app will load from the browser cache and not from the server anymore.
DOWNLOAD & NOTES

Firstly, here is the download link to the example code as promised.
SORRY FOR THE ADS...
But someone has to pay the bills, and sponsors are paying for it. I insist on not turning Code Boxx into a "paid scripts" business, and I don't "block people with Adblock". Every little bit of support helps.
Buy Me A Coffee Code Boxx eBooks
EXAMPLE CODE DOWNLOAD
Click here for the source code on GitHub gist, just click on “download zip” or do a git clone. I have released it under the MIT license, so feel free to build on top of it or use it in your own project.
EXTRA BITS & LINKS

That’s all for the tutorial, and here is a small section on some extras and links that may be useful to you.
COMPATIBILITY CHECKS
- Arrow Functions – CanIUse
- Canvas – CanIUse
- Service Worker – CanIUse
- Add To Home Screen – CanIUse
The basic “draw” should be supported even on older browsers. But for “offline” and “installable” to work, it has to be a “Grade A” modern browser.
LINKS & REFERENCES
- Let’s create a Drawing APP with JS – dev.to
- Detecting mouse position on the canvas – RIP Tutorial
- Canvas API – MDN
- Example on CodePen – Simple Javascript Draw
THE END

Thank you for reading, and we have come to the end. I hope that it has helped you to better understand, and if you want to share anything with this guide, please feel free to comment below. Good luck and happy coding!