There sure are a lot of date pickers on the Internet for jQuery, Bootstrap, React, and whatever else. But I understand, it really does not make any sense to load an entire library, just for the sake of a simple plugin. So here it is, a sharing of my simple lightweight date picker, all done in pure CSS Javascript – Read on!
TABLE OF CONTENTS
DEMO & HOW TO USE

For you guys who just want to use this as a “plugin” – Download the “package” from GitHub (links below), and here are a few “usage examples”.
DEMO 1) POPUP DATE PICKER
<!-- (A) LOAD DATE PICKER -->
<link href="dp-light.css" rel="stylesheet">
<script defer src="datepicker.js"></script>

<!-- (B) THE HTML -->
<input type="text" id="demoA" placeholder="Popup">

<!-- (C) ATTACH DATE PICKER ON LOAD -->
<script>
window.addEventListener("load", () => {
  picker.attach({ target: document.getElementById("demoA") });
});
</script>
This is the simplest way to use the date picker.
- Load the date picker CSS and Javascript. Captain Obvious at your service.
- Define an HTML
<input>field. - Use
picker.attach()to attach the date picker – Just specify thetargetHTML field.
DEMO 2) INLINE DATE PICKER
<!-- (B) THE HTML -->
<input type="text" id="demoB1" placeholder="Inline">
<div id="demoB2"></div>

<!-- (C) ATTACH DATE PICKER ON LOAD -->
<script>
window.addEventListener("load", () => {
  picker.attach({
    target: document.getElementById("demoB1"),
    container: document.getElementById("demoB2")
  });
});
</script>
Pretty much the same, but we now also define a container to spawn the date picker.
DEMO 3) ALL DATE PICKER OPTIONS
<!-- (B) THE HTML -->
<input type="text" id="demoC1" placeholder="Options">
<div id="demoC2"></div>

<!-- (C) ATTACH DATE PICKER ON LOAD -->
<script>
window.addEventListener("load", () => {
  picker.attach({
    target: document.getElementById("demoC1"),
    container: document.getElementById("demoC2"),
    disableday : [2, 7], // disable tue, sun (default none)
    startmon: true, // week start on mon (default false)
    yrange: 5, // allow +/- 5 years from now (default 10)
    onpick: date => alert("PICKED " + date) // do your stuff after pick
  });
});
</script>
The date picker also takes in a couple of options:
disabledayAn array to disable certain days. For example,[2, 7]will disable Tuesdays and Sundays.startmonTo set if the week starts on a Monday. By default, this is false and the week starts on Sunday.yrangeThe selectable year range. This defaults to +/- 10 years.onpickFunction to run upon picking a date.
JAVASCRIPT DATE PICKER

In this section, we will walk through the mechanics of how the date picker works – This script is open-source, so feel free to modify it as you like.
PART A) ATTACH DATE PICKER
// (A) COMMON MONTH NAMES
months : ["Jan", "Feb", "Mar", "Apr", "May", "Jun",
"Jul", "Aug", "Sep", "Oct", "Nov", "Dec"],
// (B) ATTACH DATEPICKER TO TARGET
// target: field to populate
// container: generate datepicker in here (for inline datepicker)
// startmon: start on mon? (optional, default false)
// yrange: year select range (optional, default 10)
// disableday: days to disable, e.g. [2,7] to disable tue and sun (optional)
// onpick : function to call on select date (optional)
attach : instance => {
// (B1) SET DEFAULT OPTIONS
instance.target.readOnly = true; // prevent onscreen keyboard
instance.startmon = instance.startmon ? true : false;
instance.yrange = instance.yrange ? instance.yrange : 10;
// (B2) CURRENT MONTH YEAR (UTC+0)
var today = new Date(),
thisMonth = today.getUTCMonth(), // jan is 0
thisYear = today.getUTCFullYear(); // yyyy
// (B3) GENERATE HTML
// (B3-1) DATEPICKER WRAPPER + BASIC STRUCTURE
instance.hWrap = document.createElement("div");
instance.hWrap.classList.add("picker-wrap");
instance.hWrap.innerHTML =
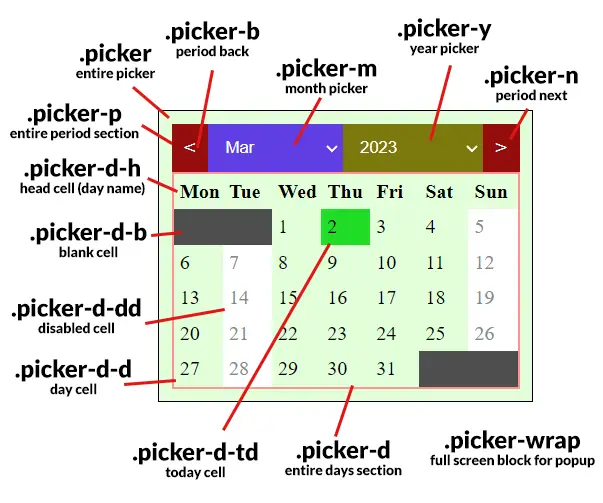
`<div class="picker">
<div class="picker-p">
<div class="picker-b"><</div>
<select class="picker-m"></select>
<select class="picker-y"></select>
<div class="picker-n">></div>
</div>
<div class="picker-d"></div>
</div>`;
instance.hMonth = instance.hWrap.querySelector(".picker-m");
instance.hYear = instance.hWrap.querySelector(".picker-y");
instance.hDays = instance.hWrap.querySelector(".picker-d");
// (B3-2) SHIFT PERIOD
instance.hWrap.querySelector(".picker-b").onclick = () => picker.shift(instance);
instance.hWrap.querySelector(".picker-n").onclick = () => picker.shift(instance, 1);
// (B3-3) MONTH SELECTOR
for (let m in picker.months) {
let o = document.createElement("option");
o.value = +m + 1;
o.text = picker.months[m];
instance.hMonth.appendChild(o);
}
instance.hMonth.selectedIndex = thisMonth;
instance.hMonth.onchange = () => picker.draw(instance);
// (B3-4) YEAR SELECTOR
for (let y = thisYear-instance.yrange; y < thisYear+instance.yrange; y++) {
let o = document.createElement("option");
o.value = y;
o.text = y;
instance.hYear.appendChild(o);
}
instance.hYear.selectedIndex = instance.yrange;
instance.hYear.onchange = () => picker.draw(instance);
// (B4) INLINE DATEPICKER - ATTACH INTO CONTAINER
if (instance.container) { instance.container.appendChild(instance.hWrap); }
// (B5) POPUP DATEPICKER - ATTACH INTO HTML BODY
else {
instance.hWrap.classList.add("popup");
instance.target.onfocus = () => instance.hWrap.classList.add("show");
instance.hWrap.onclick = e => { if (e.target == instance.hWrap) { instance.hWrap.classList.remove("show"); }};
document.body.appendChild(instance.hWrap);
}
// (B6) INIT DRAW
picker.draw(instance);
}You have already seen this one – picker.attach() is used to attach the date picker to your specified container. It’s long-winded but straightforward:
- Generate the HTML of the date picker – We will go through that below.
- Register the respective “do something on click”.
PART B) PERIOD SHIFT
// (C) SHIFT PERIOD (BY 1 MONTH)
shift : (instance, next) => {
  var m = +instance.hMonth.value, y = +instance.hYear.value;
  if (next) {
    m++;
    if (m>12) { m = 1; y++; }
    let max = instance.hYear.querySelector("option:last-child").value;
    if (y>max) { m = 12; y = max; }
  } else {
    m--;
    if (m<1) { m = 12; y--; }
    let min = instance.hYear.querySelector("option:first-child").value;
    if (y<min) { m = 1; y = min; }
  }
  instance.hMonth.value = m;
  instance.hYear.value = y;
  picker.draw(instance);
},
Just a “helper function” to shift the current period by one month when the user clicks on “last/next” on the period selector.
PART C) DRAW DAYS IN MONTH
// (D) DRAW DAYS IN MONTH
draw : instance => {
  // (D1) A LOT OF CALCULATIONS
  // (D1-1) SELECTED MONTH YEAR
  var month = instance.hMonth.value,
      year = instance.hYear.value;

  // (D1-2) DATE RANGE CALCULATION (UTC+0)
  var daysInMonth = new Date(Date.UTC(year, month, 0)).getUTCDate(),
      startDay = new Date(Date.UTC(year, month-1, 1)).getUTCDay(), // sun is 0
      endDay = new Date(Date.UTC(year, month-1, daysInMonth)).getUTCDay();
      startDay = startDay==0 ? 7 : startDay,
      endDay = endDay==0 ? 7 : endDay;

  // (D1-3) TODAY (FOR HIGHLIGHTING "TODAY")
  var today = new Date(), todayDate = null;
  if (today.getUTCMonth()+1 == month && today.getUTCFullYear() == year) {
    todayDate = today.getUTCDate();
  }

  // (D1-4) DAY NAMES
  var daynames = ["Mon", "Tue", "Wed", "Thu", "Fri", "Sat"];
  if (instance.startmon) { daynames.push("Sun"); }
  else { daynames.unshift("Sun"); }

  // (D2) CALCULATE DATE SQUARES
  // (D2-1) EMPTY SQUARES BEFORE FIRST DAY OF MONTH
  var squares = [];
  if (instance.startmon && startDay!=1) {
    for (let i=1; i<startDay; i++) { squares.push("B"); }
  }
  if (!instance.startmon && startDay!=7) {
    for (let i=0; i<startDay; i++) { squares.push("B"); }
  }

  // (D2-2) DAYS OF MONTH (SOME DAYS DISABLED)
  if (instance.disableday) {
    let thisDay = startDay;
    for (let i=1; i<=daysInMonth; i++) {
      squares.push([i, instance.disableday.includes(thisDay)]);
      thisDay++;
      if (thisDay==8) { thisDay = 1; }
    }
  }

  // (D2-3) DAYS OF MONTH (ALL DAYS ENABLED)
  else {
    for (let i=1; i<=daysInMonth; i++) { squares.push([i, false]); }
  }

  // (D2-4) EMPTY SQUARES AFTER LAST DAY OF MONTH
  if (instance.startmon && endDay!=7) {
    for (let i=endDay; i<7; i++) { squares.push("B"); }
  }
  if (!instance.startmon && endDay!=6) {
    for (let i=endDay; i<(endDay==7?13:6); i++) { squares.push("B"); }
  }

  // (D3) DRAW HTML FINALLY
  // (D3-1) EMPTY CURRENT
  instance.hDays.innerHTML = "";

  // (D3-2) FIRST ROW - DAY NAMES HEADER
  var cell;
  for (let d of daynames) {
    cell = document.createElement("div");
    cell.innerHTML = d;
    cell.classList.add("picker-d-h");
    instance.hDays.appendChild(cell);
  }

  // (D3-3) FOLLOWING ROWS - DATE CELLS
  for (let i=0; i<squares.length; i++) {
    cell = document.createElement("div");
    if (squares[i] == "B") { cell.classList.add("picker-d-b"); }
    else {
      // (D3-2A) CELL DATE
      cell.innerHTML = squares[i][0];

      // (D3-2B) NOT ALLOWED TO CHOOSE THIS DAY
      if (squares[i][1]) { cell.classList.add("picker-d-dd"); }

      // (D3-2C) ALLOWED TO CHOOSE THIS DAY
      else {
        if (squares[i][0] == todayDate) { cell.classList.add("picker-d-td"); }
        cell.classList.add("picker-d-d");
        cell.onclick = () => picker.pick(instance, squares[i][0]);
      }
    }
    instance.hDays.appendChild(cell);
  }
},
This function deals with the generation of the HTML days in months. It is fired at the end of picker.attach(), and whenever the month/year is changed. There’s a mind-numbing amount of calculations, but essentially:
- (D1) Get the selected month/year. Calculate the days in the month, the start date, end date, etc…
- (D2) Take note, we do not generate the HTML immediately. We calculate the days and keep them in the array
squares.- Basically, every month is not guaranteed to start on a Sunday (or Monday). So there may be a number of “blank squares” before the first day of the month – This is padded by pushing
Bintosquares. - Then the individual days will be populated into
squares, these are arrays with 2 elements. The first element is the day of the month, the second is a boolean to indicate if this day is disabled. - Every month is also not guaranteed to end on a Saturday (or Sunday). So if necessary, we do the same and pad
squareswithBafter the last day of the month.
- Basically, every month is not guaranteed to start on a Sunday (or Monday). So there may be a number of “blank squares” before the first day of the month – This is padded by pushing
- (D3) The actual HTML generation.
PART D) PICK A DATE
// (E) CHOOSE A DATE
pick : (instance, d) => {
  // (E1) GET MONTH YEAR
  let m = instance.hMonth.value,
      y = instance.hYear.value;

  // (E2) FORMAT & SET SELECTED DAY (YYYY-MM-DD)
  if (+m<10) { m = "0" + m; }
  if (+d<10) { d = "0" + d; }
  let formatted = `${y}-${m}-${d}`;
  instance.target.value = formatted;

  // (E3) POPUP ONLY - CLOSE
  if (instance.hWrap.classList.contains("popup")) {
    instance.hWrap.classList.remove("show");
  }

  // (E4) CALL ON PICK IF DEFINED
  if (instance.onpick) { instance.onpick(formatted); }
}
As you can guess, this function simply gets the selected date and returns a nicely formatted string. I have set it to use the ISO 8601 date format of YYYY-MM-DD, but feel free to change it as you see fit.
EXTRA) DATE PICKER HTML & CSS
This is the HTML that the Javascript generates… A little messy, but feel free to change the CSS theme to your own liking.
DOWNLOAD & NOTES

Here is the download link to the example code, so you don’t have to copy-paste everything.
SORRY FOR THE ADS...
But someone has to pay the bills, and sponsors are paying for it. I insist on not turning Code Boxx into a "paid scripts" business, and I don't "block people with Adblock". Every little bit of support helps.
Buy Me A Coffee Code Boxx eBooks
EXAMPLE CODE DOWNLOAD
Click here for the source code on GitHub gist, just click on “download zip” or do a git clone. I have released it under the MIT license, so feel free to build on top of it or use it in your own project.
EXTRA BITS & LINKS

That’s all for this project, and here is a small section on some extras that may be useful to you.
DISABLING CERTAIN DAYS
Everyone has a different requirement –
- Disable specific days.
- Disable past days.
- Allow only past days (disable future days).
- Only enable from tomorrow to N days later.
- Limit to certain min/max days.
- Disable X on the first and third weeks of the month, disable Y on the second and fourth weeks of the month.
Yep, there is no end to these “custom rules”. If I implement all of them, it won’t be a “simple date picker” anymore. So it’s up to you to do your own custom restrictions. Long story short –
- (A) Add your own custom restriction option to
attach(). - (B) Modify
draw()to also include your new restrictions.
CHANGE DATE FORMAT
Update section (E2) of datepicker.js.
DO SERVER-SIDE CHECKS!
Yes, the date picker is based on UTC+0, but “errors” still can happen. For you guys who are lost, the dates are based on the users’ devices. This can be easily changed, and potentially mess things up. So always do checks when the date/time is submitted, based on the server’s current time.
DATE RANGE PICKER
Sadly, this is another one that is “not simple”. Modify draw() and pick() if you wish. But otherwise, the easy way is to just create 2 date pickers – “Starting” and “until”. Upon submission, check that “until” is a later date than “starting”.
COMPATIBILITY CHECKS
- Arrow Functions – CanIUse
- Template Literals – CanIUse
- Viewport Units – CanIUse
- 2D CSS Transform – CanIUse
Works on all modern browsers. Not on the old Internet Exploders.
LINKS & REFERENCES
- Example on Codepen – Pure HTML JS Datepicker
- HTML Date Input – MDN, if you changed your mind and prefer a “native HTML date picker”
THE END

Thank you for reading, and we have come to the end of this guide. I hope that it has helped you with your project, and if you have anything to share with this guide, please feel free to comment below. Good luck and happy coding!
Thanks a lot, your calendar helped a lot. Please write how to do it so that you can choose a date range. For example, I click on one date in the calendar, and then click on the second, and the entire interval between them is highlighted and recorded.
Read “DATE RANGE PICKER” above.
Thanks for creating this–it was ideal for my app. I needed a lightweight API, and this fit the bill perfectly. The functionality is smooth, and the look and feel is nice, too.
One small bug I noted on the pop-up version of the code: the day is off by one. For instance, the picker shows July 1st, 2020 as falling on a Tuesday, but July 1st, 2020 falls on a Wednesday. I incremented startDay by one and that resolved the issue.
let startDay = new Date(year + “-” + month + “-1”).getDay(); // Note: Sun = 0
startDay++; // made the change here
Thanks again for creating this, W.S.! Very nice widget!
Sorry, I am unable to replicate the bug here – Both versions use the same function to calculate the dates, and they are correctly starting on Wed. I can only guess that it has something to do with the local time setting on your PC.
Hello. Just as a quick follow-up: I found that by using getUTCDay (using universal time) instead of getDay, the problem in FireFox went away.
let startDay = new Date(year + “-” + month + “-1”).getUTCDay(); // Note: Sun = 0
let endDay = new Date(year + “-” + month + “-” + daysInMonth).getUTCDay();
Got it. Long story short, the timezone is causing the bug here… Instead of doing “if Firefox, date+1”, I just fixed all calculations to be based on UTC+0 now.
I have run into a problem implementing the dark popup datepicker. The background of the datepicker is white, not dark gray. The blanks cells are the proper color. The day names and numbers are white, giving the appearance that they are empty. When you hover over a day number the background turns red and the day number is visible.
I used picker-dark-pop.css and datepicker-pop.js out of the box, without modification. I believe the background is set in the CSS under .picker.
Can you suggest where i might look for this problem?
Thanks
As above,
.picker { background: COLOR }sets the background color of the date picker. It is probably overridden somewhere in your project, try adding!important, or do some of your own debugging (right click > inspect element > styles).Will this datepicker work when the Content Security Policy is script=’src’?
Sorry, I don’t catch your question nor what you are trying to achieve here. Setting the Content Security Policy (CSP) is totally unnecessary unless you are trying to do cross-site (cross-domain) scripting or preventing XSS – See the tutorial on MDN.
That is an advanced topic, totally unrelated to this datepicker?
thank you man! 😀
i have a question, how can i disable the weekends and past days?