Welcome to a quick tutorial on how to show error messages in HTML forms. This is probably one of the major bugbears for some beginners, how do we handle and show error messages for HTML forms?
There are no fixed ways to show errors in HTML forms, but the common methods to display error messages are:
- Simply add checking attributes to the HTML form fields, and the browser will automatically show the errors. For example,
<input type="text" required> - Use Javascript to show custom error messages as the user types in the fields.
- Collectively show all error messages in a popup box when the user submits an invalid form.
- Show error messages below the invalid fields.
That covers the broad basics, let us walk through detailed examples in this guide – Read on!
ⓘ I have included a zip file with all the source code at the start of this tutorial, so you don’t have to copy-paste everything… Or if you just want to dive straight in.
TABLE OF CONTENTS
DOWNLOAD & NOTES

Firstly, here is the download link to the example code as promised.
QUICK NOTES
If you spot a bug, feel free to comment below. I try to answer short questions too, but it is one person versus the entire world… If you need answers urgently, please check out my list of websites to get help with programming.
EXAMPLE CODE DOWNLOAD
Click here to download all the example source code, I have released it under the MIT license, so feel free to build on top of it or use it in your own project.
DISPLAY ERROR MESSAGES

All right, let us now get into the various examples of displaying error messages in an HTML form.
EXAMPLE 1) DEFAULT ERROR DISPLAY
<form onsubmit="return false;">
<label for="fname">Name</label>
<input type="text" name="fname" id="fname" required minlength="2" maxlength="8">
<label for="fnumber">Number</label>
<input type="number" name="fnumber" id="fnumber" min="1" max="12">
<label for="fyes">Enter "Yes"</label>
<input type="text" name="fyes" id="fyes" required pattern="Yes">
<input type="submit" value="Go!">
</form>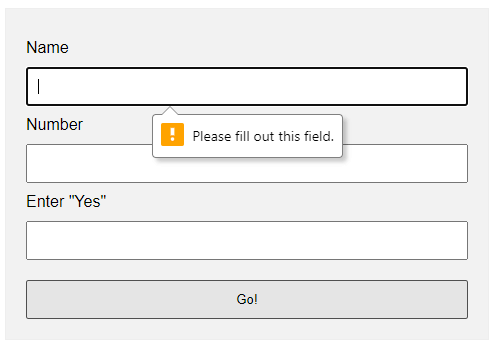 Oh no, displaying error messages is SO DIFFICULT! Not. Just add the form checking attributes to the fields:
requiredSelf-explanatory. A required field that cannot be left blank.min-length max-lengthThe minimum and maximum number of characters allowed.min maxFor number fields only, the minimum and maximum allowed values.patternThis field must match the custom pattern. Will leave a link in the extras section below if you want to learn more.
Yes, that’s all. The browser will do the rest of the magic.
EXAMPLE 2) SHOW ERRORS AS-YOU-TYPE
<!-- (A) HTML FORM -->
<form onsubmit="return false;">
<label for="fname">Name</label>
<input type="text" name="fname" id="fname" required minlength="2" maxlength="8">
<input type="submit" value="Go!">
</form>
<!-- (B) SET CUSTOM ERROR MESSAGE -->
<script>
var fname = document.getElementById("fname");
fname.addEventListener("input", () => {
if (fname.validity.tooLong || fname.validity.tooShort || fname.validity.valueMissing) {
fname.setCustomValidity("Name must be 2-8 characters.");
fname.reportValidity();
} else { fname.setCustomValidity(""); }
});
</script>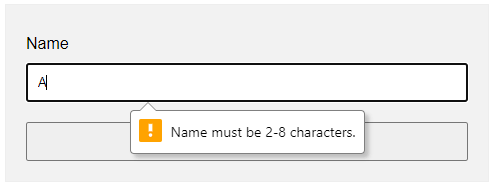 This one is a little naggy and requires some Javascript. A couple of functions and properties to take note of here:
document.getElementById("ID")Get element by ID. Captain Obvious.FIELD.addEventListener("input", FUNCTION)Run this function whenever the user types something in the field.FIELD.validity.tooLong FIELD.validity.tooShort FIELD.validity.valueMissingWe can actually target various invalid statuses and show different messages. Will leave a link in the extras section below to the full list.FIELD.setCustomValidity("MESSAGE")andFIELD.reportValidity()Show custom error message.
EXAMPLE 3) DISPLAY ERROR MESSAGES IN POPUP
<!-- (A) HTML FORM -->
<form onsubmit="return check()" novalidate>
  <label for="fname">Name</label>
  <input type="text" name="fname" id="fname" required minlength="2" maxlength="8">

  <label for="fnumber">Number</label>
  <input type="number" name="fnumber" id="fnumber" required min="1" max="12">

  <input type="submit" value="Go!">
</form>

<!-- (B) FORM CHECK -->
<script>
function check () {
  // (B1) INIT
  var error = "", field = "";

  // (B2) NAME
  field = document.getElementById("fname");
  if (!field.checkValidity()) {
    error += "Name must be 2-4 characters\r\n";
  }

  // (B3) NUMBER
  field = document.getElementById("fnumber");
  if (!field.checkValidity()) {
    error += "Num must be between 1-12\r\n";
  }

  // (B4) RESULT
  if (error=="") { return true; }
  else {
    alert(error);
    return false;
  }
}
</script>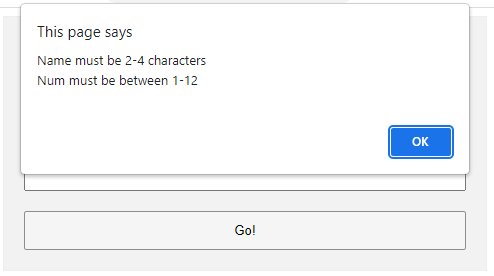
The less naggy method, where all the error messages are compiled into a single popup. Take note:
- A
novalidatehas been added to the<form>tag. This disables the default browser form checking, and we do our own in Javascript usingonsubmit="return check()". - The Javascript is pretty long-winded but straightforward.
- Use
var error = ""to collect all the error messages. - Fetch the field we want to check
field = document.getElementById("ID"). - Add a message if it is invalid
if (!field.checkValidity()) { error += "ERROR"; } - That’s all, repeat the check for all fields.
- Lastly, show the error message if not empty and don’t allow the form submission
if (error !="") { alert(error); return false; }
- Use
EXAMPLE 4) SHOW ERROR MESSAGE UNDER FIELD
<!-- (A) SOME SIMPLE ERROR STYLES -->
<style>
.err { background: #ffe6ee; border: 1px solid #b1395f; }
.emsg { color: #c12020; font-weight: bold; }
</style>
<!-- (B) HTML FORM -->
<form onsubmit="return check()" novalidate>
<label for="fname">Name</label>
<input type="text" name="fname" id="fname" required minlength="2" maxlength="8">
<div id="cname" class="emsg"></div>
<label for="fnumber">Number</label>
<input type="number" name="fnumber" id="fnumber" required min="1" max="12">
<div id="cnumber" class="emsg"></div>
<input type="submit" value="Go!">
</form>
<!-- (C) FORM CHECK -->
<script>
function check () {
// (C1) INIT
var valid = true, error = "", field = "";
// (C2) NAME
field = document.getElementById("fname");
error = document.getElementById("cname");
if (!field.checkValidity()) {
valid = false;
field.classList.add("err");
error.innerHTML = "Name must be 2-4 characters\r\n";
} else {
field.classList.remove("err");
error.innerHTML = "";
}
// (C3) NUMBER
field = document.getElementById("fnumber");
error = document.getElementById("cnumber");
if (!field.checkValidity()) {
valid = false;
field.classList.add("err");
error.innerHTML = "Num must be between 1-12\r\n";
} else {
field.classList.remove("err");
error.innerHTML = "";
}
// (C4) RESULT
return valid;
}
</script>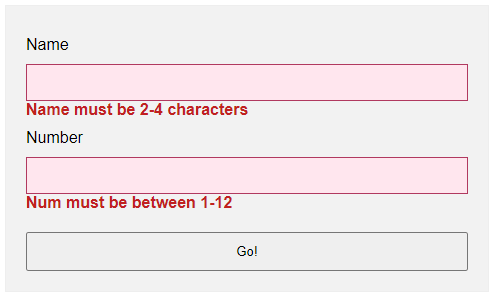 Lastly, this is pretty much similar to the popup example.
- Use
novalidateandonsubmitto do our own customization. - But instead of showing in a popup, we attach a
<div class="emsg">below all fields. - On an invalid input, we show the error message in the
<div>instead.
EXTRA BITS & LINKS

That’s all for the tutorial, and here is a small section on some extras and links that may be useful to you.
LINKS & REFERENCES
- HTML Pattern – MDN
- Validity State – MDN
- Form Validation – MDN
- HTML Form Validation Without Javascript – Code Boxx
THE END

Thank you for reading, and we have come to the end. I hope that it has helped you to better understand, and if you want to share anything with this guide, please feel free to comment below. Good luck and happy coding!