Welcome to a quick tutorial on how to position text over an image in HTML CSS. So you want to add some captions over an image? Let us walk through some simple examples, read on!
TABLE OF CONTENTS
DOWNLOAD & NOTES
Here is the download link to the example code, so you don’t have to copy-paste everything.
EXAMPLE CODE DOWNLOAD
Click here to download. The example code is released under the MIT license, so feel free to build on top of it or use it in your own project.
SORRY FOR THE ADS...
But someone has to pay the bills, and sponsors are paying for it. I insist on not turning Code Boxx into a "paid scripts" business, and I don't "block people with Adblock". Every little bit of support helps.
Buy Me A Coffee Code Boxx eBooks
TEXT OVER IMAGE IN HTML CSS
All right, let us now get into the example of placing a block of text over an image in HTML CSS.
TUTORIAL VIDEO
1) TEXT OVER IMAGE

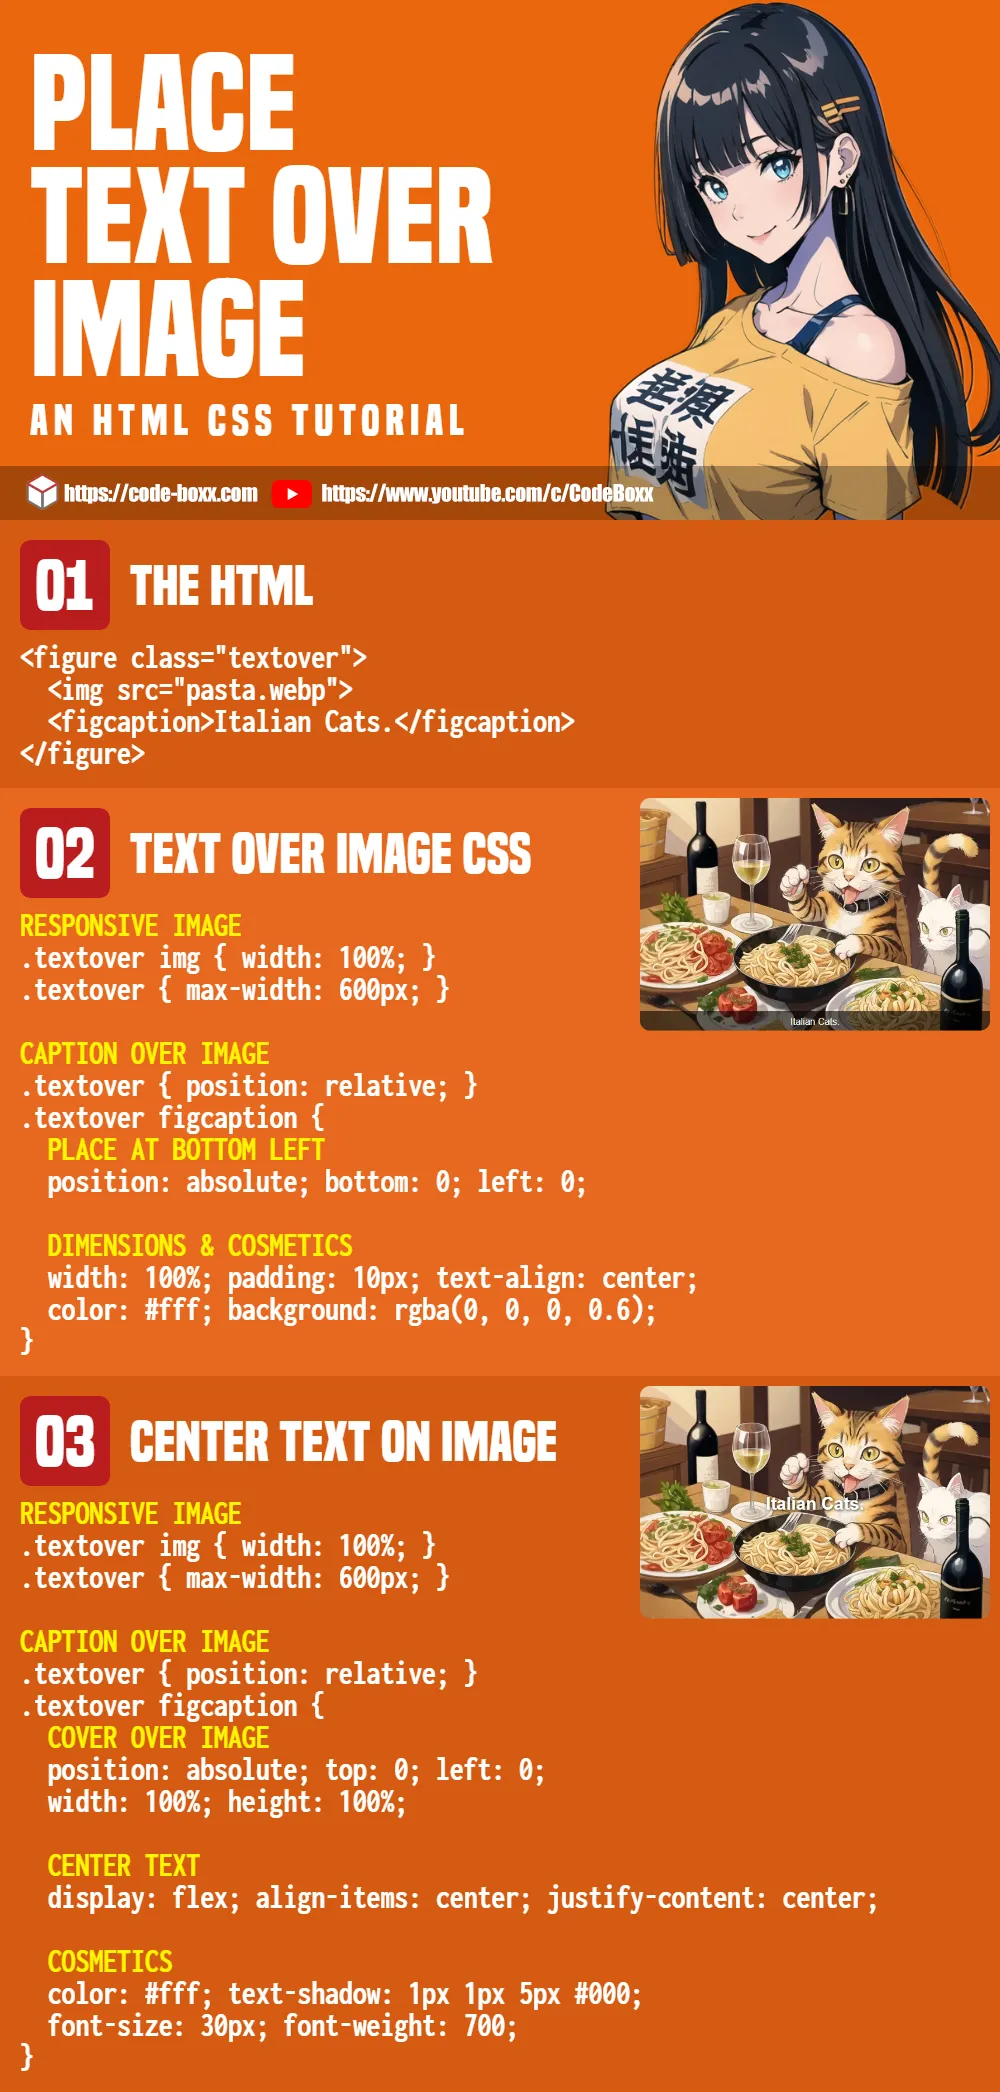
1A) THE HTML
<figure class="textover">
  <img src="pasta.webp">
  <figcaption>Italian Cats.</figcaption>
</figure>
The HTML should be very straightforward:
- Define the image tag
<img>as usual. - Attach the text (or image caption) using
<figcaption>. - Finally, wrap the image and caption in
<figure>.
1B) THE CSS
/* (A) RESPONSIVE IMAGE */
.textover img { width: 100%; }
.textover { max-width: 600px; } /* optional */

/* (B) CAPTION OVER IMAGE */
.textover { position: relative; }
.textover figcaption {
  /* (B1) PLACE AT BOTTOM LEFT */
  position: absolute; bottom: 0; left: 0;

  /* (B2) DIMENSIONS */
  width: 100%; padding: 10px;

  /* (B3) TEXT COSMETICS */
  text-align: center;
  color: #fff;
  background: rgba(0, 0, 0, 0.6);
}
Beginners, don’t need to panic.
- (A) First, setting
width: 100%to the image is all we need to create a “responsive image”. - (B) Next, position the text over the image.
- Set
position: relativeon the<figure>container. - Set
position: absoluteon the<figcaption>. - That’s about it – Place with wherever you like using
top bottom left right.
- Set
- (B2 & B3) Lastly, some cosmetics for the text/caption.
2) CENTER TEXT ON IMAGE
2A) THE HTML
<figure class="textover">
  <img src="pasta.webp">
  <figcaption>Italian Cats.</figcaption>
</figure>
Look no further, it’s the same.
2B) THE CSS
/* (A) RESPONSIVE IMAGE */
.textcenter img { width: 100%; }
.textcenter { max-width: 600px; } /* optional */

/* (B) CAPTION OVER IMAGE */
.textcenter { position: relative; }
.textcenter figcaption {
  /* (B1) COVER OVER IMAGE */
  position: absolute; top: 0; left: 0;
  width: 100%; height: 100%;

  /* (B2) CENTER TEXT */
  display: flex; align-items: center; justify-content: center;

  /* (B3) TEXT COSMETICS */
  color: #fff;
  text-shadow: 1px 1px 5px #000;
  font-size: 30px; font-weight: 700;
}
The “text overlay” is slightly different now.
- (B1) We position the caption at the top left corner and cover the entire image with
width: 100%; height: 100%; - (B2) The magic is done by setting the caption to
display: flex–align-items: centerandjustify-content: centerwill automatically center the text horizontally and vertically.
EXTRAS
That’s all for this guide, and here is a small section on some extras and links that may be useful to you.
BUTTON OVER IMAGE
<figure class="textcenter">
  <img src="pasta.webp">
  <figcaption>
    <button>A BUTTON!</button>
  </figcaption>
</figure>
Quick add on – It is possible to put buttons, other images, forms, and whatever else over the image as well.
LINKS & REFERENCES
- Figure and Figcaption – MDN
- Position – CSS Tricks
- Background – CSS Tricks
INFOGRAPHIC CHEAT SHEET
THE END
Thank you for reading, and we have come to the end of this guide. I hope that it has helped you with your project, and if you want to share anything with this guide, please feel free to comment below. Good luck and happy coding!
Thanks, dude!