Welcome to a tutorial on how to create an online feedback system with Python Flask and SQLite. Need to collect some feedback or suggestions from the users? Do a quick survey? Here’s how we can build a simple feedback system – Read on!
TABLE OF CONTENTS
DOWNLOAD & NOTES
Here is the download link to the example code, so you don’t have to copy-paste everything.
EXAMPLE CODE DOWNLOAD
Just click on “download zip” or do a git clone. I have released it under the MIT license, so feel free to build on top of it or use it in your own project.
SORRY FOR THE ADS...
But someone has to pay the bills, and sponsors are paying for it. I insist on not turning Code Boxx into a "paid scripts" business, and I don't "block people with Adblock". Every little bit of support helps.
Buy Me A Coffee Code Boxx eBooks
PYTHON FLASK ONLINE FEEDBACK
All right, let us now walk through the steps of building an online feedback system with Flask and SQLite.
QUICK SETUP
- Create a virtual environment
virtualenv venvand activate it –venv\Scripts\activate(Windows)venv/bin/activate(Linux/Mac) - Install required libraries –
pip install flask - For those who are new, the default Flask folders are –
staticPublic files (JS/CSS/images/videos/audio)templatesHTML pages
STEP 1) THE DATABASE
1A) FEEDBACK TABLE
-- (A) FEEDBACK
CREATE TABLE `feedback` (
  `feedback_id` INTEGER NOT NULL,
  `feedback_title` TEXT NOT NULL,
  `feedback_desc` TEXT DEFAULT NULL,
  PRIMARY KEY("feedback_id" AUTOINCREMENT)
);
This should be self-explanatory, the “main feedback table”.
feedback_idPrimary key, auto-increment.feedback_titleTitle of the feedback form.feedback_descDescription of the feedback form, optional.
1B) FEEDBACK QUESTIONS
-- (B) FEEDBACK QUESTIONS
CREATE TABLE `feedback_questions` (
  `feedback_id` INTEGER NOT NULL,
  `question_id` INTEGER NOT NULL,
  `question_text` TEXT NOT NULL,
  `question_type` TEXT NOT NULL DEFAULT 'R',
  PRIMARY KEY ("feedback_id","question_id")
);
Next, we have a table to hold the questions of the feedback form.
feedback_idComposite primary and foreign key.question_idComposite primary key.question_textThe question itself.question_typeType of question, for this example:RRating (1 to 5).OOpen text (user can enter anything).
Feel free to invent your own question_type as required. For example, maybe D for a dropdown selector.
1C) USER FEEDBACK
-- (C) FEEDBACK FROM USERS
CREATE TABLE `feedback_users` (
  `user_id` INTEGER NOT NULL,
  `feedback_id` INTEGER NOT NULL,
  `question_id` INTEGER NOT NULL,
  `feedback_value` TEXT NOT NULL,
  PRIMARY KEY ("user_id","feedback_id","question_id")
);
A table to store the feedback from the users.
user_idComposite primary and foreign key. This should tie into your existing user system. If you want to open it for public feedback, check out the extras section below.feedback_idComposite primary and foreign key.question_idComposite primary and foreign key.feedback_valueFeedback as entered by the user.
1D) DUMMY FEEDBACK FORM
-- (D) DUMMY FEEDBACK FORM
INSERT INTO `feedback`
  (`feedback_title`, `feedback_desc`)
VALUES
  ("XYZ Course Feedback", "Optional Description.");

INSERT INTO `feedback_questions`
  (`feedback_id`, `question_id`, `question_text`, `question_type`)
VALUES
  (1, 1, "Are the course materials sufficient?", "R"),
  (1, 2, "How likely are you to recommend this course to friends?", "R"),
  (1, 3, "Any other feedback on the course?", "O");
Lastly, a dummy example to better illustrate how the tables work.
1E) CREATE SQLITE DATABASE
# (A) LOAD PACKAGES
import sqlite3, os
from sqlite3 import Error

# (B) DATABASE + SQL FILE
DBFILE = "feedback.db"
SQLFILE = "S1A_feedback.sql"

# (C) DELETE OLD DATABASE IF EXIST
if os.path.exists(DBFILE):
  os.remove(DBFILE)

# (D) IMPORT SQL
conn = sqlite3.connect(DBFILE)
with open(SQLFILE) as f:
  conn.executescript(f.read())
conn.commit()
conn.close()
print("Database created!")
Well, this should not be a surprise – Just read the above SQL file and create feedback.db.
STEP 2) FEEDBACK LIBRARY
# (A) LOAD SQLITE MODULE
import sqlite3
DBFILE = "feedback.db"

# (B) HELPER - RUN SQL QUERY
def query(sql, data):
  conn = sqlite3.connect(DBFILE)
  cursor = conn.cursor()
  cursor.execute(sql, data)
  conn.commit()
  conn.close()

# (C) HELPER - FETCH ALL
def select(sql, data=[]):
  conn = sqlite3.connect(DBFILE)
  cursor = conn.cursor()
  cursor.execute(sql, data)
  results = cursor.fetchall()
  conn.close()
  return results

# (D) GET QUESTIONS
def get(id):
  return select("SELECT * FROM `feedback_questions` WHERE `feedback_id`=?", [id])

# (E) SAVE USER FEEDBACK
# uid : user id
# fid : feedback id
# feed : array of feedback data
def save(uid, fid, feed):
  sql = "REPLACE INTO `feedback_users` (`user_id`, `feedback_id`, `question_id`, `feedback_value`) VALUES "
  data = []
  for qid, ans in feed.items():
    sql = sql + "(?,?,?,?),"
    data.extend([uid, fid, qid, ans])
  sql = sql[:-1] + ";"
  query(sql, data)
  return True
With the database in place, we now need a library to work with it. This is a simple one to get things started:
- Load the SQLite module, and specify the database file.
query()Helper function to run an SQL query.select()Helper function to run aSELECTquery.get()Get feedback questions for specified feedback ID.save()Save the given user feedback.
STEP 3) FLASK SERVER
3A) INITIALIZE
# (A) INIT
# (A1) LOAD MODULES
from flask import Flask, render_template, request, make_response
import s3_lib as feedback

# (A2) FLASK SETTINGS + INIT
HOST_NAME = "localhost"
HOST_PORT = 80
app = Flask(__name__)
# app.debug = True

# (A3) FIXED USER ID & FEEDBACK ID FOR THIS DEMO
uid = 999
fid = 1
Next, we deal with the Flask HTTP server itself.
- (A1) Self-explanatory. Load all the required Flask modules, and use the library we created in the previous step.
- (A2) Server settings.
- (A3) For this example, we will fix the user ID and feedback ID for simplicity.
3B) HTTP ROUTES
# (B) FEEDBACK HTML PAGE
@app.route("/")
def index():
  # (B1) GET FEEDBACK QUESTIONS
  questions = feedback.get(fid)

  # (B2) RENDER HTML PAGE
  return render_template("S4_feedback.html", qns=questions)

# (C) SAVE FEEDBACK FORM
@app.route("/save/", methods=["POST"])
def save():
  feedback.save(uid, fid, request.form)
  return make_response("Saved - Create your own thank you page...", 200)

# (D) START
if __name__ == "__main__":
app.run(HOST_NAME, HOST_PORT)- (B) Serve the HTML feedback at the base URL
/. - (C) Save the submitted feedback form when it is sent to
/save/. - (D) Captain Obvious. Start the HTTP server.
STEP 4) HTML FEEDBACK PAGE
<form method="post" class="feed-form" action="save/" target="_blank">
{% for q in qns %}
<!-- (A) QUESTION -->
<div class="feed-qn">{{ q[2] }}</div>
<!-- (B) ANSWER -->
{% if q[3] == "R" %}
<div class="feed-r">
{% for i in range(5) %}
<input type="radio" name="{{ q[1] }}" value="{{ i+1 }}"{{ " checked" if i==2 else "" }}>
{% endfor %}
</div>
{% else %}
<input type="text" name="{{ q[1] }}" class="feed-o" required>
{% endif %}
{% endfor %}
<!-- (C) SUBMIT -->
<input type="submit" value="Save" class="feed-go">
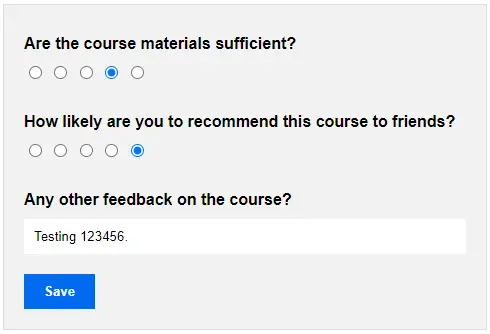
</form>Finally, the HTML page generates feedback forms dynamically.
DONE!
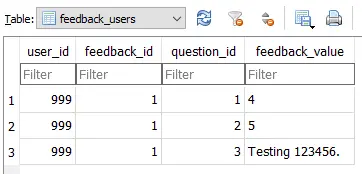
The end – Submit the form and verify the entry inside the database.
EXTRAS
That’s all for the tutorial, and here is a small section on some extras and links that may be useful to you.
OPENING FOR PUBLIC FEEDBACK
Yes, it is possible. But we will have to deal with spam and find alternate ways to track the users.
- Change
user_idto aTEXTfield instead. - Generate a random unique ID, set it in a cookie.
- Use the randomly generated ID as the
user_id. Once the user has submitted before, don’t allow resubmission. - Also, implement reCaptcha to fight off some spam.
This is not perfect, users still can clear their cookies and spam submit the feedback form. But at least it is not as easy with some checks in place.
USER-ONLY FEEDBACK
It is highly recommended that you open the feedback system to registered users only. This will ensure data integrity and stop spam significantly. If you do not have a user system… I only have a “simple no database version” at the time of writing – You will have to build your own otherwise.
BASIC SYSTEM ONLY!
Before the toxic troll things start to vomit mental diarrhea, this is tutorial is only a first step. It is far from a “complete” and “professional” system.
- SQLite is convenient and great for studying. But being file-based makes it very limited – Poor overall performance, will not work on cluster and cloud setup. So please pick up a database in your own free time – MySQL, MongoDB, Postgre, etc…
- No admin panel or user system. I figured some of you guys already have an established system, no point reinventing the wheel.
- Reports – Do your own.
- A “nice thank you” page after submission.
There are endless things that can be done to improve this system, but for this tutorial – It works, and we have covered the necessary basics.
LINKS & REFERENCES
THE END
Thank you for reading, and we have come to the end. I hope that it has helped you to better understand, and if you want to share anything with this guide, please feel free to comment below. Good luck and happy coding!