Welcome to a tutorial on how to send push notifications in Python Flask. It is no mystery that web browsers are capable of displaying notifications. But just how do we send push notifications in Python Flask? Let us walk through an example, step by step. Read on!
TABLE OF CONTENTS
DOWNLOAD & NOTES
Here is the download link to the example code, so you don’t have to copy-paste everything.
EXAMPLE CODE DOWNLOAD
Just click on “download zip” or do a git clone. I have released it under the MIT license, so feel free to build on top of it or use it in your own project.
SORRY FOR THE ADS...
But someone has to pay the bills, and sponsors are paying for it. I insist on not turning Code Boxx into a "paid scripts" business, and I don't "block people with Adblock". Every little bit of support helps.
Buy Me A Coffee Code Boxx eBooks
PYTHON FLASK PUSH NOTIFICATIONS
All right, let us not get into the example of sending a push notification in Python Flask.
QUICK SETUP
- Create a virtual environment
virtualenv venvand Activate it –venv\Scripts\activate(Windows)venv/bin/activate(Linux/Mac) - Install required libraries –
pip install flask ecdsa pywebpush - For those who are new, the default Flask folders are –
staticPublic files (JS/CSS/images/videos/audio)templatesHTML pages
STEP 1) GENERATE VAPID KEYS
# (A) REQUIRED MODULES
import base64
import ecdsa

# (B) GENERATE KEYS
# CREDITS : https://gist.github.com/cjies/cc014d55976db80f610cd94ccb2ab21e
pri = ecdsa.SigningKey.generate(curve=ecdsa.NIST256p)
pub = pri.get_verifying_key()
keys = {
  "private" : base64.urlsafe_b64encode(pri.to_string()).decode("utf-8").strip("="),
  "public" : base64.urlsafe_b64encode(b"\x04" + pub.to_string()).decode("utf-8").strip("=")
}
print(keys)
Now that the environment is ready, we will generate a pair of public/private VAPID keys. This script only needs to run once, although you can always run it again to generate a new pair of keys.
P.S. VAPID stands for “Voluntary Application Server Identification”. In simple terms, to prevent your push notifications from being hijacked.
P.P.S. Keep the private key safe. It should only be used on the server-side, and never be exposed publically.
STEP 2) CLIENT PAGE
2A) GET PERMISSION TO DISPLAY NOTIFICATIONS
// (A) OBTAIN USER PERMISSION TO SHOW NOTIFICATION
window.onload = () => {
  // (A1) ASK FOR PERMISSION
  if (Notification.permission === "default") {
    Notification.requestPermission().then(perm => {
      if (Notification.permission === "granted") {
        regWorker().catch(err => console.error(err));
      } else {
        alert("Please allow notifications.");
      }
    });
  }

  // (A2) GRANTED
  else if (Notification.permission === "granted") {
    regWorker().catch(err => console.error(err));
  }

  // (A3) DENIED
  else { alert("Please allow notifications."); }
}
Now that we have the pair of keys, let us put them aside for a minute. The very first thing we need in the HTML page is to get the user’s permission to show notifications. Yes, we cannot proceed any further if the push notifications cannot show.
2B) REGISTER SERVICE WORKER
// (B) REGISTER SERVICE WORKER
async function regWorker () {
  // (B1) YOUR PUBLIC KEY - CHANGE TO YOUR OWN!
  const publicKey = "YOUR-PUBLIC-KEY";

  // (B2) REGISTER SERVICE WORKER
  navigator.serviceWorker.register("S3_sw.js", { scope: "/" });

  // (B3) SUBSCRIBE TO PUSH SERVER
  navigator.serviceWorker.ready
  .then(reg => {
    reg.pushManager.subscribe({
      userVisibleOnly: true,
      applicationServerKey: publicKey
    }).then(
      // (B3-1) OK - TEST PUSH NOTIFICATION
      sub => {
        var data = new FormData();
        data.append("sub", JSON.stringify(sub));
        fetch("/push", { method:"POST", body:data })
        .then(res => res.text())
        .then(txt => console.log(txt))
        .catch(err => console.error(err));
      },

      // (B3-2) ERROR!
      err => console.error(err)
    );
  });
}
This function regWorker() will only run after the user has granted permission to show notifications.
- (B1) A gentle reminder to change the public key to your own.
- (B2) Proceed to register
S3_sw.jsas a service worker. - (B3) When the service worker is ready.
- (B3)
reg.pushManager.subscribe()We subscribe the service worker to the push service. - (B3-1) On successful registration, we immediately send the subscribed service worker
subto the server and request a push notification demo.
- (B3)
STEP 3) SERVICE WORKER
// (A) INSTANT WORKER ACTIVATION
self.addEventListener("install", evt => self.skipWaiting());

// (B) CLAIM CONTROL INSTANTLY
self.addEventListener("activate", evt => self.clients.claim());

// (C) LISTEN TO PUSH
self.addEventListener("push", evt => {
  const data = evt.data.json();
  self.registration.showNotification(data.title, {
    body: data.body,
    icon: data.icon,
    image: data.image
  });
});
For those who are new, a service worker is a piece of Javascript that will run in the background. Even when the user is not on the website itself. So I don’t think this needs a lot of explanation – It simply shows the notification when a push message is received from the server.
STEP 4) FLASK SERVER
4A) INIT
# (A) INIT
# (A1) LOAD MODULES
from flask import Flask, render_template, request, make_response, send_from_directory
from pywebpush import webpush, WebPushException
import json

# (A2) FLASK SETTINGS + INIT - CHANGE TO YOUR OWN!
HOST_NAME = "localhost"
HOST_PORT = 80
VAPID_SUBJECT = "mailto:your@email.com"
VAPID_PRIVATE = "YOUR-PRIVATE-KEY"
app = Flask(__name__)
# app.debug = True
The first section of the Flask server script needs no explanation… Just loading the required modules, and a whole bunch of settings. Remember to change the private key and email to your own.
4B) VIEWS
# (B) VIEWS
# (B1) "LANDING PAGE"
@app.route("/")
def index():
return render_template("S3_perm_sw.html")
# (B2) SERVICE WORKER
@app.route("/S3_sw.js")
def sw():
response = make_response(send_from_directory(app.static_folder, "S3_sw.js"))
return response
# (B3) PUSH DEMO
@app.route("/push", methods=["POST"])
def push():
# (B3-1) GET SUBSCRIBER
sub = json.loads(request.form["sub"])
# (B3-2) TEST PUSH NOTIFICATION
result = "OK"
try:
webpush(
subscription_info = sub,
data = json.dumps({
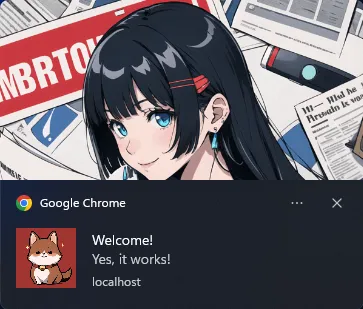
"title" : "Welcome!",
"body" : "Yes, it works!",
"icon" : "static/i-ico.webp",
"image" : "static/i-banner.webp"
}),
vapid_private_key = VAPID_PRIVATE,
vapid_claims = { "sub": VAPID_SUBJECT }
)
except WebPushException as ex:
print(ex)
result = "FAILED"
return resultNext, we have the “service endpoints”.
- (B1)
/will servetemplates/S3_perm_sw.htmlabove. - (B2)
/S4_sw.jswill “map” tostatic/S4_sw.js, the reason for doing this is to set thescopeto/. That is, if we registerstatic/S4_sw.js, the service worker will only apply tohttps://your-site.com/static/*. Not what we want. - (B3)
/pushPost a subscribed worker here to send a push notification.
4C) LAUNCH
# (C) START
if __name__ == "__main__":
  app.run(HOST_NAME, HOST_PORT)
Start the Flask server. Captain Obvious at your service, and that’s it.
EXTRAS
That’s all for the search example, and here are a few extra bits that may be useful to you.
NOT A “COMPLETE” DEMO
Yes, this is only a simple example. This is not how a production server works.
- In
S3_per_sw.html (B3), we should send the subscribed worker to the server first, and save it into a database. - At a later date, call
S5_server.py (B3). This will retrieve all subscribers from the database, and mass sends the push notification to everyone.
I DENIED NOTIFICATIONS
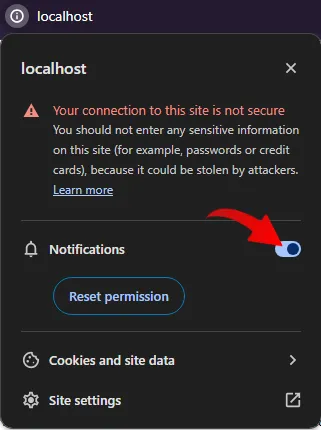
Once denied, the browser will not prompt for permission again. The only way to “fix” this, is to manually click on the icon beside the URL bar. Then, enable the notifications.
LINKS & REFERENCES
- Python Flask
- Push API – MDN
- NodeJS Push Notifications – Code Boxx
- Web Push Protocol – web.dev
THE END
Thank you for reading, and we have come to the end. I hope that it has helped you to better understand, and if you want to share anything with this guide, please feel free to comment below. Good luck and happy coding!
Hi! Thanks for the quick and easy guide.
I’m currently having an issue on firefox: Uncaught (in promise) DOMException: The operation is insecure. service worker
I checked and I don’t seem to have cookies blocked or saved only until closure of the browser.
What could be the issue?
Use HTTPS.