Welcome to a tutorial on how to create a POS system with pure HTML, CSS, and Javascript. Yes, you read that right, there are no server-side scripts involved in this little experiment. If you are curious as to how viable it is to create a “standalone web app” with modern Javascript – Yes, we can, and it is very possible.
But be warned, this is not a “complete POS system”, but a “proof of concept”. There are experimental technologies (as of the time of writing) used in this project, and it is intended for the advanced code ninjas only. Brace yourselves, it is not going to be as easy, but exciting nonetheless. Read on!
TABLE OF CONTENTS
PART 1) PRODUCTS

All right, let us now get started with the simplest of them all – The list of products available for sale.
POS SYSTEM LANDING PAGE
<!-- (A) PRODUCTS LIST -->
<div id="poslist"></div>

<!-- (B) CART -->
<div id="poscart"></div>

<!-- (C) NINJA RECEIPT -->
<div id="posreceipt"></div>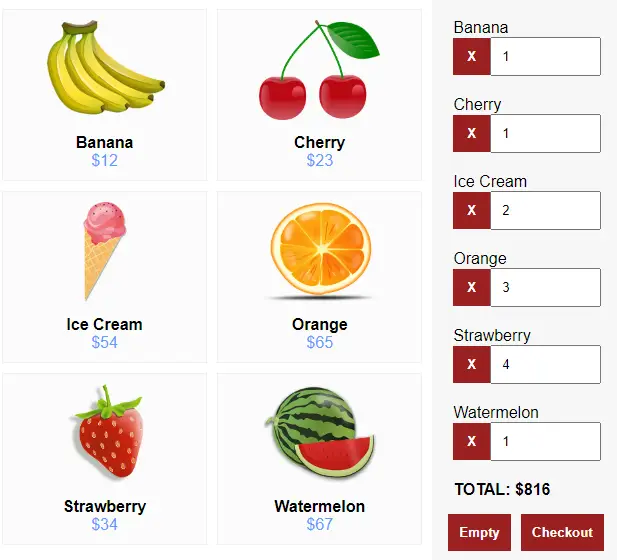
Yep. Not going to go crazy on the interface.
<div id="poslist">The list of products.<div id="poscart">The current “shopping cart”.<div id="posreceipt">A hidden wrapper to generate the receipt for printing.
PRODUCTS JAVASCRIPT
// (A) PRODUCTS LIST
list : {
  1 : { name:"Banana", img:"banana.png", price: 12 },
  2 : { name:"Cherry", img:"cherry.png", price: 23 },
  3 : { name:"Ice Cream", img:"icecream.png", price: 54 },
  4 : { name:"Orange", img:"orange.png", price: 65 },
  5 : { name:"Strawberry", img:"strawberry.png", price: 34 },
  6 : { name:"Watermelon", img:"watermelon.png", price: 67 }
}
Plain and simple – Since we do not have a server-side database, the products have to be stored somewhere else in an array or object. If it is not obvious enough, this one is in the format of PRODUCT ID : { PRODUCT DETAILS }.
P.S. If you have a lot of products, it makes more sense to save them in an indexedDB store. I am just being lazy here.
GENERATE PRODUCTS LIST
// (B) DRAW HTML PRODUCTS LIST
draw : () => {
  // (B1) TARGET WRAPPER
  const wrapper = document.getElementById("poslist");

  // (B2) CREATE PRODUCT HTML
  for (let pid in products.list) {
    // CURRENT PRODUCT
    let p = products.list[pid],
        pdt = document.createElement("div"),
        segment;

    // PRODUCT SEGMENT
    pdt.className = "pwrap";
    pdt.onclick = () => cart.add(pid);
    wrapper.appendChild(pdt);

    // IMAGE
    segment = document.createElement("img");
    segment.className = "pimg";
    segment.src = "images/" + p.img;
    pdt.appendChild(segment);

    // NAME
    segment = document.createElement("div");
    segment.className = "pname";
    segment.innerHTML = p.name;
    pdt.appendChild(segment);

    // PRICE
    segment = document.createElement("div");
    segment.className = "pprice";
    segment.innerHTML = "$" + p.price;
    pdt.appendChild(segment);
  }
}

window.addEventListener("DOMContentLoaded", products.draw);
The products.draw() function gets called on page load. Very straightforward, it simply generates the list of products into <div id="poslist">.
PART 2) SHOPPING CART

Next, let us deal with the “shopping cart”. This one is mostly adapted from my other shopping cart tutorial.
LOCAL STORAGE CART ENGINE
// (A) PROPERTIES
items : {}, // current items in cart

// (B) SAVE CURRENT CART INTO LOCALSTORAGE
save : () => localStorage.setItem("cart", JSON.stringify(cart.items)),

// (C) LOAD CART FROM LOCALSTORAGE
load : () => {
  cart.items = localStorage.getItem("cart");
  if (cart.items == null) { cart.items = {}; }
  else { cart.items = JSON.parse(cart.items); }
},

// (D) NUKE CART!
nuke : () => {
  cart.items = {};
  localStorage.removeItem("cart");
  cart.list();
}- For a start, all selected products will be stored in the
cart.itemsobject in the format ofPRODUCT ID : QUANTITY. - We don’t want the cart to “disappear” on accidental page reloads, so we save them into the
localStorageinstead. - The 3 related functions should be self-explanatory.
cart.save()JSON encodescart.itemsand stores it intolocalStorage.cart.load()JSON decodeslocalStorageand restores it intocart.items.- Lastly,
cart.nuke()clears out the entire cart.
LIST CURRENT CART ITEMS
// (E) INITIALIZE - RESTORE PREVIOUS SESSION
init : () => {
  cart.load();
  cart.list();
},

// (F) LIST CURRENT CART ITEMS (IN HTML)
list : () => {
  // (F1) DRAW CART INIT
  var wrapper = document.getElementById("poscart"),
      item, part, pdt,
      total = 0, subtotal = 0,
      empty = true;
  wrapper.innerHTML = "";
  for (let key in cart.items) {
    if (cart.items.hasOwnProperty(key)) { empty = false; break; }
  }

  // (F2) CART IS EMPTY
  if (empty) {
    item = document.createElement("div");
    item.innerHTML = "Cart is empty";
    wrapper.appendChild(item);
  }

  // (F3) CART IS NOT EMPTY - LIST ITEMS
  else {
    for (let pid in cart.items) {
      // CURRENT ITEM
      pdt = products.list[pid];
      item = document.createElement("div");
      item.className = "citem";
      wrapper.appendChild(item);

      // ITEM NAME
      part = document.createElement("span");
      part.innerHTML = pdt.name;
      part.className = "cname";
      item.appendChild(part);

      // REMOVE
      part = document.createElement("input");
      part.type = "button";
      part.value = "X";
      part.className = "cdel";
      part.onclick = () => cart.remove(pid);
      item.appendChild(part);

      // QUANTITY
      part = document.createElement("input");
      part.type = "number";
      part.min = 0;
      part.value = cart.items[pid];
      part.className = "cqty";
      part.onchange = function () { cart.change(pid, this.value); };
      item.appendChild(part);

      // SUBTOTAL
      subtotal = cart.items[pid] * pdt.price;
      total += subtotal;
    }

    // TOTAL AMOUNT
    item = document.createElement("div");
    item.className = "ctotal";
    item.id = "ctotal";
    item.innerHTML ="TOTAL: $" + total;
    wrapper.appendChild(item);

    // EMPTY BUTTON
    item = document.createElement("input");
    item.type = "button";
    item.value = "Empty";
    item.onclick = cart.nuke;
    item.id = "cempty";
    wrapper.appendChild(item);

    // CHECKOUT BUTTON
    item = document.createElement("input");
    item.type = "button";
    item.value = "Checkout";
    item.onclick = cart.checkout;
    item.id = "ccheckout";
    wrapper.appendChild(item);
  }
}
window.addEventListener("DOMContentLoaded", cart.init);
Right, keep calm and look carefully. This piece of long stinky function is actually plain stupid simple:
cart.init()gets called on page load to restore the previous session, draw the list of cart items.cart.list()just a whole bunch of code to generate the current cart items into<div id="poscart">.
SHOPPING CART ACTIONS
// (G) ADD ITEM TO CART
add : pid => {
  if (cart.items[pid] == undefined) { cart.items[pid] = 1; }
  else { cart.items[pid]++; }
  cart.save(); cart.list();
},

// (H) CHANGE QUANTITY
change : (pid, qty) => {
  // (H1) REMOVE ITEM
  if (qty <= 0) {
    delete cart.items[pid];
    cart.save(); cart.list();
  }

  // (H2) UPDATE TOTAL ONLY
  else {
    cart.items[pid] = qty;
    var total = 0;
    for (let id in cart.items) {
      total += cart.items[pid] * products.list[pid].price;
      document.getElementById("ctotal").innerHTML ="TOTAL: $" + total;
    }
  }
},

// (I) REMOVE ITEM FROM CART
remove : pid => {
  delete cart.items[pid];
  cart.save(); cart.list();
},

// (J) CHECKOUT
checkout : () => {
  orders.print();
  orders.add();
}
Lastly, we have the “common cart actions”. Self-explanatory once again:
cart.add()Adds the chosen item to the cart.cart.change()Change item quantity.cart.remove()Remove item from the cart.cart.checkout()Check out the current cart, print the receipt, and save the order into indexedDB.
PART 3) ORDERS DATABASE

Finally, we save the order into the local indexedDB on “checkout”.
DATABASE INITIALIZATION
// (A) PROPERTIES
iName : "JSPOS",
iDB : null, iOrders : null, iItems : null,

// (B) INIT
init : () => {
  // (B1) REQUIREMENTS CHECK - INDEXED DB
  window.indexedDB = window.indexedDB || window.mozIndexedDB || window.webkitIndexedDB || window.msIndexedDB;
  if (!window.indexedDB) {
    alert("Your browser does not support indexed database.");
    return;
  }

  // (B2) OPEN IDB
  let req = window.indexedDB.open(orders.iName, 1);

  // (B3) IDB OPEN ERROR
  req.onerror = evt => {
    alert("Indexed DB init error - " + evt.message);
    console.error(evt);
  };

  // (B4) IDB UPGRADE NEEDED
  req.onupgradeneeded = evt => {
    orders.iDB = evt.target.result;

    // (B4-1) IDB UPGRADE ERROR
    orders.iDB.onerror = evt => {
      alert("Indexed DB upgrade error - " + evt.message);
      console.error(evt);
    };

    // (B4-2) IDB VERSION 1
    if (evt.oldVersion < 1) {
      // ORDERS STORE
      let store = orders.iDB.createObjectStore("Orders", {
        keyPath: "oid",
        autoIncrement: true
      });
      store.createIndex("time", "time");

      // ORDER ITEMS STORE
      store = orders.iDB.createObjectStore("Items", {
        keyPath: ["oid", "pid"]
      });
      store.createIndex("qty", "qty");
    }
  }
}
window.addEventListener("DOMContentLoaded", orders.init);
Yes, there is something called “IndexedDB”, and it is supported in nearly all modern browsers. The difference between indexedDB and localStorage is that:
indexedDBis a “lightweight database”, whilelocalStorageis meant to store “single variables”.indexedDBdoes not have a storage size limit (technically), whilelocalStoragehas a very small sandbox limit.
So it is the perfect candidate to store all the orders. If you want to learn more about it, I shall leave some links below. But for now, this initialization will create 2 simple stores (or tables):
OrdersThe orders.oidOrder ID. Key and auto-increment.timeTime when the order is made.
ItemsOrder items.oidOrder ID. Composite key.pidProduct ID. Composite key.qtyQuantity ordered.
I have kept this as simple as possible, feel free to add your own touch.
ADD NEW ORDER (ON CART CHECKOUT)
// (C) ADD NEW ORDER
add : () => {
  // (C1) INSERT ORDERS STORE
  let req = orders.iOrders().put({ time: Date.now() });

  // (C2) THE PAINFUL PART - INDEXED DB IS ASYNC
  // HAVE TO WAIT UNTIL ALL IS ADDED TO DB BEFORE CLEAR CART
  // THIS IS TO TRACK THE NUMBER OF ITEMS ADDED TO DATABASE
  var size = 0, entry;
  for (entry in cart.items) {
    if (cart.items.hasOwnProperty(entry)) { size++; }
  }

  // (C3) INSERT ITEMS STORE
  entry = 0;
  req.onsuccess = e => {
    oid = req.result;
    for (let pid in cart.items) {
      req = orders.iItems().put({ oid: oid, pid: pid, qty: cart.items[pid] });
      req.onsuccess = () => {
        entry++;
        if (entry == size) { cart.nuke(); }
      };
    }
  };
}
Not going to explain line-by-line, but this is the equivalent of:
INSERT INTO `orders`- Loop through the cart –
INSERT INTO `items` (OID, PID, QTY)
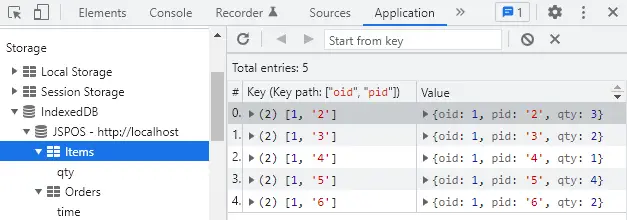
Take extra note of how the cart is emptied only after everything is saved… Yep, the transactions are asynchronous, and you have to be extra careful with it. Also, for you guys who are not sure where to check the database, it is right inside the developer’s console. For Chrome users, Application > IndexedDB.
PRINT THE RECEIPT
// (D) PRINT RECEIPT FOR CURRENT ORDER
print : () => {
  // (D1) GENERATE RECEIPT
  var wrapper = document.getElementById("posreceipt");
  wrapper.innerHTML = "";
  for (let pid in cart.items) {
    let item = document.createElement("div");
    item.innerHTML = `${cart.items[pid]} X ${products.list[pid].name}`;
    wrapper.appendChild(item);
  }

  // (D2) PRINT
  var printwin = window.open();
  printwin.document.write(wrapper.innerHTML);
  printwin.stop();
  printwin.print();
  printwin.close();
}
Just generating the HTML receipt and printing it out.
STEP 4) PROGRESSIVE WEB APP

This is optional, but to further enhance the Javascript POS – Let us turn it into a PWA. It’s not that difficult. Really.
MANIFEST
{
  "short_name": "JS POS",
  "name": "JS POS",
  "icons": [{
    "src": "images/favicon.png",
    "sizes": "64x64",
    "type": "image/png"
  }, {
    "src": "images/icon-512.png",
    "sizes": "512x512",
    "type": "image/png"
  }],
  "start_url": "JS-POS.html",
  "scope": "/",
  "background_color": "white",
  "theme_color": "white",
  "display": "standalone"
}
To “register” the POS as a “web app”, we need to create a manifest file. This should be self-explanatory, we are just specifying the app name, icons, and some settings.
SERVICE WORKER
// (A) CREATE/INSTALL CACHE
self.addEventListener("install", evt => {
  self.skipWaiting();
  evt.waitUntil(
    caches.open("JSPOS")
    .then(cache => cache.addAll([
      "JS-POS.html",
      "JS-POS.css",
      "JS-POS.js",
      "images/banana.png",
      "images/cherry.png",
      "images/favicon.png",
      "images/icecream.png",
      "images/icon-512.png",
      "images/orange.png",
      "images/strawberry.png",
      "images/watermelon.png"
    ]))
    .catch(err => console.error(err))
  );
});

// (B) CLAIM CONTROL INSTANTLY
self.addEventListener("activate", evt => self.clients.claim());

// (C) LOAD FROM CACHE FIRST, FALLBACK TO NETWORK IF NOT FOUND
self.addEventListener("fetch", evt => evt.respondWith(
  caches.match(evt.request).then(res => res || fetch(evt.request))
));
The manifest file itself is not sufficient to turn the POS into a “PWA”. Here, we have a simple service worker that caches all the HTML, CSS, JS, and image files – Yes, this literally turns the POS into an offline-capable app.
HTML META
<!-- MANIFEST + SERVICE WORKER -->
<link rel="manifest" href="JS-POS-manifest.json">
<script>
if ("serviceWorker" in navigator) {
  navigator.serviceWorker.register("JS-POS-worker.js");
}
</script>
Finally, we specify the worker and manifest file in the <head> section. With that, the Javascript POS is now a full-fledged installable PWA.

DOWNLOAD & NOTES

Here is the download link to the example code, so you don’t have to copy-paste everything.
SORRY FOR THE ADS...
But someone has to pay the bills, and sponsors are paying for it. I insist on not turning Code Boxx into a "paid scripts" business, and I don't "block people with Adblock". Every little bit of support helps.
Buy Me A Coffee Code Boxx eBooks
EXAMPLE CODE DOWNLOAD
Click here for the source code on GitHub gist, just click on “download zip” or do a git clone. I have released it under the MIT license, so feel free to build on top of it or use it in your own project.
EXTRA BITS & LINKS

That’s all for the tutorial, and here is a small section on some extras and links that may be useful to you.
PERSISTENT DATA STORAGE
A small word of warning here – The IndexedDB can still be deleted by a “clear cache”. It is best to look into persistent storage and ways to export/backup into an external file.
- Persistent Storage – MDN
- Create & Save File In Javascript – Code Boxx
BARCODE SCANNING
- We can easily attach a USB barcode scanner these days… Should not be much of an issue, just create your own
<input type="text">barcode scan field. - Alternatively, Javascript can also access the camera to scan codes – QuaggaJS
PAYMENT PROCESSING
This is the rather difficult part. Cash payments are not an issue, but card payments are. To process card payments, you will most likely still need a server-side script and Internet access to process it. Also, check out the Payment Request API if you are interested.
PRINTING PAINS
Lastly, we can easily connect a thermal printer to the POS device. But the problem with web-based is that we cannot print directly, a “select printer” popup will show every time due to security restrictions… Although we may be able to overcome this by sending a fetch request to a shared print server.
MORE LINKS & REFERENCES
- Indexed DB API – MDN
- Working with IndexedDB – Google Developers
THE END

Thank you for reading, and we have come to the end. I hope that it has helped you to better understand, and if you want to share anything with this guide, please feel free to comment below. Good luck and happy coding!
hi,
I am grateful for your unselfish sharing of knowledge.
I am just new wishing to learn html and javascript, your tutorial is great and clear.
By the way, i would like to know your email and i want to contact you privately because I need to buy from you a program. I would rather buy from you than anywhere else.
I hope to see your email reply soonest.
Thank you,
roger
Thanks for the “vote of confidence”! But I am not available for hire. Don’t think you will want to pay an insane amount of money to an over-glorified blogger either. 😆
https://code-boxx.com/faq/#hire