Welcome to a tutorial on how to add text to images in PHP. Need to add a watermark or copyright message on uploaded images on a PHP server?
To add text to an image in PHP, we can use the GD extension.
$img = imagecreatefromjpeg("IMG.JPG");$size = 24; $x = 5; $y = 30; $angle = 0; $quality = 100;$color = imagecolorallocate($img, 255, 255, 255);imagettftext($img, $size, $x, $y, $angle, $color, "PATH/FONT.TTF", "TEXT");imagejpeg($img, "SAVE.JPG", $quality);
It’s that simple. But let us walk through more examples, along with a simple tip to center the text on the image – Read on!
TABLE OF CONTENTS
DOWNLOAD & NOTES
Here is the download link to the example code, so you don’t have to copy-paste everything.
EXAMPLE CODE DOWNLOAD
Just click on “download zip” or do a git clone. I have released it under the MIT license, so feel free to build on top of it or use it in your own project.
SORRY FOR THE ADS...
But someone has to pay the bills, and sponsors are paying for it. I insist on not turning Code Boxx into a "paid scripts" business, and I don't "block people with Adblock". Every little bit of support helps.
Buy Me A Coffee Code Boxx eBooks
PHP ADD TEXT TO IMAGE
Let us now get into the examples of adding text to an image, it is actually very straightforward in PHP – We just need to load it as a new image object in PHP, add some text on top of it, then save it.
TUTORIAL VIDEO
EXAMPLE 1) SIMPLE WRITE TEXT ON IMAGE
<?php
// (A) OPEN IMAGE
$img = imagecreatefrompng("demo.png");

// (B) WRITE TEXT
$txt = "BUBBLE TEA";
$fontFile = "C:\Windows\Fonts\arial.ttf"; // CHANGE TO YOUR OWN!
$fontSize = 24;
$fontColor = imagecolorallocate($img, 255, 0, 0);
$posX = 5;
$posY = 24;
$angle = 0;
imagettftext($img, $fontSize, $angle, $posX, $posY, $fontColor, $fontFile, $txt);

// (C) OUTPUT IMAGE
// (C1) DIRECTLY SHOW IMAGE
header("Content-type: image/png");
imagepng($img);
imagedestroy($img);

// (C2) OR SAVE TO A FILE
// $quality = 100; // 0 to 100
// imagejpeg($img, "demo.jpg", $quality);

This is pretty much the “expanded version” of the introduction snippet, as straightforward as can be.
- Load the image into an object with
imagecreatefromjpeg(). - Write text using
imagettftext(). - Output the image – Directly show it in the browser, save it into a file, save into the database, email it as an attachment, do whatever is required.
EXAMPLE 2) CENTER TEXT IN IMAGE
<?php
// (A) OPEN IMAGE
$img = imagecreatefrompng("demo.png");

// (B) TEXT & FONT SETTINGS
$txt = "BUBBLE TEA";
$fontFile = "C:\Windows\Fonts\arial.ttf"; // CHANGE TO YOUR OWN!
$fontSize = 24;
$fontColor = imagecolorallocate($img, 255, 0, 0);
$angle = 0;

// (C) CALCULATE TEXT BOX POSITION
// (C1) GET IMAGE DIMENSIONS
$iWidth = imagesx($img);
$iHeight = imagesy($img);

// (C2) GET TEXT BOX DIMENSIONS
$tSize = imagettfbbox($fontSize, $angle, $fontFile, $txt);
$tWidth = max([$tSize[2], $tSize[4]]) - min([$tSize[0], $tSize[6]]);
$tHeight = max([$tSize[5], $tSize[7]]) - min([$tSize[1], $tSize[3]]);

// (C3) CENTER THE TEXT BLOCK
$centerX = ceil(($iWidth - $tWidth) / 2);
$centerX = $centerX<0 ? 0 : $centerX;
$centerY = ceil(($iHeight - $tHeight) / 2);
$centerY = $centerY<0 ? 0 : $centerY;

// (D) DRAW TEXT ON IMAGE
imagettftext($img, $fontSize, $angle, $centerX, $centerY, $fontColor, $fontFile, $txt);

// (E) OUTPUT IMAGE
header("Content-type: image/png");
imagepng($img);
imagedestroy($img);

Yikes! This looks crazy, but the main bulk of this script is calculating the position of the text box. If you want to be a happy person, just skip and use this as-it-is… If not, here’s how the calculations work:
(C1) Self-explanatory. Get the image width with imagesx() and height with imagesy().
(C2) To calculate the dimensions of the text box, we have to use imagettfbbox(). This returns an array with 8 numbers, which are the coordinates of the text box.
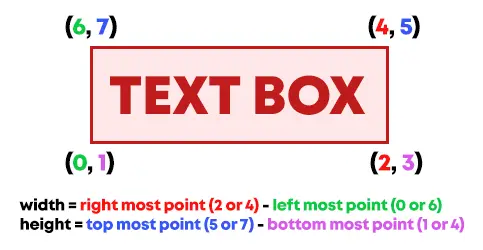
| Key | Position |
| 0 | lower-left corner, X position |
| 1 | lower-left corner, Y position |
| 2 | lower right corner, X position |
| 3 | lower right corner, Y position |
| 4 | upper right corner, X position |
| 5 | upper right corner, Y position |
| 6 | upper left corner, X position |
| 7 | upper left corner, Y position |
- For the width of the text box, we take the right-most point (2 or 4) minus the left-most point (0 or 6).
- For the height of the text box, we take the top-most point (5 or 7) minus the bottom-most point (1 or 3).
(C3) Lastly, we can calculate the center X and Y positions.
- Center X = (width of image – width of text box) / 2.
- Center Y = (height of image – height of text box) / 2.
EXAMPLE 3) NON-ENGLISH UTF-8 ENCODING
<?php
// (B) UTF-8 TEXT
// https://stackoverflow.com/questions/9458317/working-with-gd-imagettftext-and-utf-8-characters
$txt = "珍珠奶茶";
$txt = mb_convert_encoding($txt, "HTML-ENTITIES", "UTF-8");
$txt = preg_replace('~^(&([a-zA-Z0-9]);)~', htmlentities('${1}'), $txt);

If you are working with non-English languages, GD is not exactly the friendliest. But all credits go to this post on StackOverflow – Just use a font for your required language and do a bit of manual UTF-8 encoding.
EXTRAS
That’s it for the scripts. But before we wrap things up, here are a few more nuggets of information that you might be interested in.
ADDING TEXT TO PICTURES IN FOLDER
<?php
$files = glob("FOLDER/*.{jpg,jpeg}", GLOB_BRACE);
foreach ($files as $f) {
  $img = imagecreatefromjpeg($f);
  // SAME AS ABOVE - WRITE TEXT TO IMAGE
}
Just get all the images in the folder and loop through all of them.
FONT COPYRIGHT
You can specify which font to use, but please do not go on a download frenzy and start using every font you find on the Internet. There is a hidden nightmare behind fonts, and it is called copyright. Yes, some fonts are subjected to copyright, and you can get bitten by the law monster if you make money off edited images… Always check the usage license of the “free fonts”.
CENTER PARAGRAPH ON IMAGE & AUTO LINE BREAK
- Calculate the dimensions of the “single line text box” and image.
- Determine how many lines are required to fit the paragraph into the image. That is, break the text into multiple text boxes. Quick pseudo-code:
$numlines = ceil(WIDTH OF TEXTBOX / (WIDTH OF IMAGE * 70%));if (HEIGHT OF LINES > HEIGHT OF IMAGE) { ERROR - CANNOT FIT }$lines = [FIND SOME SMART WAY, TO BREAK TEXT, INTO MULTIPLE LINES];
- Brutal X and Y calculations to position the text boxes.
REFERENCES & LINKS
- GD & Image Functions – PHP
- AJAX Image Upload In PHP – Code Boxx
- Write Multi-Line Text On Image In PHP – Code Boxx
- If you are looking for some fonts to use – Check out Font Squirrel.
THE END
Thank you for reading, and we have come to the end of this short tutorial. I hope it has answered your question on how to add text to an image, and if you have anything to share with this guide, please feel free to comment below. Good luck and happy coding!
Thankyou so muchhhhhhhh
This only works if you have one line of text. For multiple lines of text, the text is not centered well.
Dear Captain Obvious, thank you for the valuable feedback. I shall leave this as a “possible future update”.
Hello!
Thank you for this; I made good use of it. 🙂
I thought I’d save a couple of lines of code though by doing the math this way:
$x = max(CEIL(($w – $text_width) / 2), 0);
// obviates $x = $x < 0 ? 0 : $x;
$y = max(CEIL(($h – $text_height) / 2), 0) +/- $adjustment;
// obviates $y = $y < 0 ? 0 : $y;
Also note that I added an adjustment factor to $y 'cause depending on the font, it might not vertically-center properly.
Cheers!
Thanks for sharing!
Hi
thank you for the code. There is an error on line 12 when I run the code and found “imagedestroy($jpg_image);” .
I have changed it to “imagedestroy($img);” and now is working correctly.
Post updated. Thanks for sharing!
Hi thank you,
jsut a segnalation.
the right code is:
$centerX = CEIL(($width – $text_width) / 2);
$centerX = $centerX<0 ? 0 : $centerX;
$centerY = CEIL($height / 2);
$centerY = $centerY<0 ? 0 : $centerY;
imagettftext($img, 24, 0, $centerX, $centerY, $txtColor, $font, $txt);
Gotcha, corrected.