You have probably heard of JSON web token (JWT), and wonder how to implement it into your project. Coming from the old-school PHP session, I was in the same boat, struggling to glue JWT into PHP projects… So here it is, a sharing of my working JWT experiment, minus all the confusing security stuff – Read on!
TABLE OF CONTENTS
DOWNLOAD & NOTES
Here is the download link to the example code, so you don’t have to copy-paste everything.
EXAMPLE CODE DOWNLOAD
Just click on “download zip” or do a git clone. I have released it under the MIT license, so feel free to build on top of it or use it in your own project.
SORRY FOR THE ADS...
But someone has to pay the bills, and sponsors are paying for it. I insist on not turning Code Boxx into a "paid scripts" business, and I don't "block people with Adblock". Every little bit of support helps.
Buy Me A Coffee Code Boxx eBooks
JWT EXAMPLE WITH PHP MYSQL
All right, let us now get into the step-by-step example of using JWT in PHP and MYSQL.
PART 1) USER DATABASE
CREATE TABLE `users` (
  `id` bigint(20) NOT NULL,
  `name` varchar(255) NOT NULL,
  `email` varchar(255) NOT NULL,
  `password` varchar(255) NOT NULL
) ENGINE=InnoDB DEFAULT CHARSET=utf8mb4;

ALTER TABLE `users`
  ADD PRIMARY KEY (`id`),
  ADD UNIQUE KEY `email` (`email`),
  ADD KEY `name` (`name`);

ALTER TABLE `users`
  MODIFY `id` bigint(20) NOT NULL AUTO_INCREMENT;

INSERT INTO `users` (`id`, `name`, `email`, `password`) VALUES
  (1, 'Jon Doe', 'jon@doe.com', '$2y$10$5S0BORM0dC/pVrddltxbg.Fa5EBa5zZDXxNhL5Jt57bCi1aFZpcee');
First, we are going to need a users database. This is a simple one with only 4 fields:
idUser ID, primary key.nameUser’s name.emailUser’s email, unique to prevent duplicates.passwordUser’s password.
The dummy user above is jon@doe.com, password is 123456.
PART 2) PHP USER LIBRARY
<?php
class User {
  // (A) CONNECT TO DATABASE
  public $error = "";
  private $pdo = null;
  private $stmt = null;
  function __construct () {
    $this->pdo = new PDO(
      "mysql:host=".DB_HOST.";dbname=".DB_NAME.";charset=".DB_CHARSET,
      DB_USER, DB_PASSWORD, [
      PDO::ATTR_ERRMODE => PDO::ERRMODE_EXCEPTION,
      PDO::ATTR_DEFAULT_FETCH_MODE => PDO::FETCH_ASSOC
    ]);
  }

  // (B) CLOSE CONNECTION
  function __destruct () {
    if ($this->stmt!==null) { $this->stmt = null; }
    if ($this->pdo!==null) { $this->pdo = null; }
  }

  // (C) RUN SQL QUERY
  function query ($sql, $data=null) : void {
    $this->stmt = $this->pdo->prepare($sql);
    $this->stmt->execute($data);
  }

  // (D) SAVE USER
  function save ($name, $email, $password, $id=null) {
    $data = [$name, $email, password_hash($password, PASSWORD_DEFAULT)];
    if ($id===null) {
      $sql = "INSERT INTO `users` (`name`, `email`, `password`) VALUES (?,?,?)";
    } else {
      $sql = "UPDATE `users` SET `name`=?, `email`=?, `password`=? WHERE `id`=?";
      $data[] = [$id];
    }
    $this->query($sql, $data);
    return true;
  }

  // (E) GET USER
  function get ($id) {
    $this->query(
      sprintf("SELECT * FROM `users` WHERE `%s`=?", is_numeric($id) ? "id" : "email" ),
      [$id]
    );
    return $this->stmt->fetch();
  }

  // (F) VERIFY USER LOGIN
  // RETURNS FALSE IF INVALID EMAIL/PASSWORD
  // RETURNS JWT IF VALID
  function login ($email, $password) {
    // (F1) GET USER
    $user = $this->get($email);
    $valid = is_array($user);

    // (F2) CHECK PASSWORD
    if ($valid) { $valid = password_verify($password, $user["password"]); }

    // (F3) RETURN JWT IF OK, FALSE IF NOT
    if ($valid) {
      require "vendor/autoload.php";
      $now = strtotime("now");
      return Firebase\JWT\JWT::encode([
        "iat" => $now, // issued at - time when token is generated
        "nbf" => $now, // not before - when this token is considered valid
        "exp" => $now + 3600, // expiry - 1 hr (3600 secs) from now in this example
        "jti" => base64_encode(random_bytes(16)), // json token id
        "iss" => JWT_ISSUER, // issuer
        "aud" => JWT_AUD, // audience
        "data" => ["id" => $user["id"]] // whatever data you want to add
      ], JWT_SECRET, JWT_ALGO);
    } else {
      $this->error = "Invalid user/password";
      return false;
    }
  }

  // (G) VALIDATE JWT
  // RETURN USER IF VALID
  // RETURN FALSE IF INVALID
  function validate ($jwt) {
    // (G1) "UNPACK" ENCODED JWT
    require "vendor/autoload.php";
    try {
      $jwt = Firebase\JWT\JWT::decode($jwt, new Firebase\JWT\Key(JWT_SECRET, JWT_ALGO));
      $valid = is_object($jwt);
    } catch (Exception $e) {
      $this->error = $e->getMessage();
      return false;
    }

    // (G2) GET USER
    if ($valid) {
      $user = $this->get($jwt->data->id);
      $valid = is_array($user);
    }

    // (G3) RETURN RESULT
    if ($valid) {
      unset($user["password"]);
      return $user;
    } else {
      $this->error = "Invalid JWT";
      return false;
    }
  }
}

// (H) DATABASE SETTINGS - CHANGE TO YOUR OWN!
define("DB_HOST", "localhost");
define("DB_NAME", "test");
define("DB_CHARSET", "utf8mb4");
define("DB_USER", "root");
define("DB_PASSWORD", "");

// (I) JWT STUFF - CHANGE TO YOUR OWN!
define("JWT_SECRET", "SECRET-KEY");
define("JWT_ISSUER", "YOUR-NAME");
define("JWT_AUD", "site.com");
define("JWT_ALGO", "HS512");

// (J) NEW USER OBJECT
$_USER = new User();
This library looks complicated at first, but keep calm and look closely.
- (A, B, J) When
$_USER = new User()is created, the constructor connects to the database. The destructor closes the connection. - (C)
query()A helper function to run a SQL query. - (D To G) The “actual library functions”.
save()Add or update a user.get()Get a user by ID or email.login()To process login. Take note of how this works – Returns afalseon invalid email/password, and a JWT with the user ID on success.validate()To validate a JWT. Returnsfalseif the token is invalid, the user data if successful.
- (H & I) Remember to change these settings to your own.
PART 3) LOGIN PAGE
<?php
// (A) PROCESS LOGIN
// (A1) ALREADY SIGNED IN
if (isset($_COOKIE["jwt"])) {
require "2-lib-users.php";
$user = $_USER->validate($_COOKIE["jwt"]);
if ($user===false) { setcookie("jwt", null, -1); }
else { header("Location: 4b-admin.php"); exit(); }
}
// (A2) PROCESS SIGN IN
if (isset($_POST["email"]) && isset($_POST["password"])) {
require "2-lib-users.php";
$jwt = $_USER->login($_POST["email"], $_POST["password"]);
if ($jwt!==false) {
setcookie("jwt", $jwt);
header("Location: 4b-admin.php");
exit();
}
} ?>
<!-- (B) MESSAGE -->
<?php if (isset($jwt)) { ?>
<div class="note"><?=$_USER->error?></div>
<?php } ?>
<!-- (C) LOGIN FORM -->
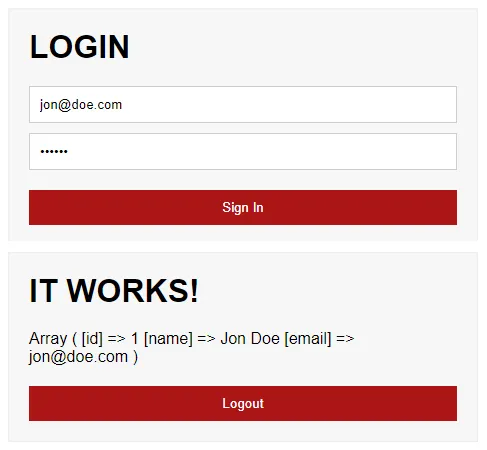
<form method="post">
<h1>LOGIN</h1>
<input type="email" placeholder="Email" name="email" required value="jon@doe.com">
<input type="password" placeholder="Password" name="password" required value="123456">
<input type="submit" value="Sign In">
</form>This page is easier to understand in the following order:
- (C) Just a good old HTML login form.
- (A2) When the form is submitted, we use
2-lib-users.phpto process the login. If successful, set the JWT into$_COOKIE["jwt"]and redirect the user to the home page. - (B) Show error messages if the login fails.
- (A1) Users who are already signed in will be redirected to the home page.
PART 4) PROTECTED PAGES
4A) JWT VERIFICATION
<?php
// (A) JWT COOKIE NOT SET!
if (!isset($_COOKIE["jwt"])) { header("Location: 3-login.php"); exit(); }

// (B) VERIFY JWT
require "2-lib-users.php";
$user = $_USER->validate($_COOKIE["jwt"]);
if ($user===false || isset($_POST["logout"])) {
  setcookie("jwt", null, -1);
  header("Location: 3-login.php");
  exit();
}
This snippet should be pretty self-explanatory, we check against $_COOKIE["jwt"] and allow access only if it is valid; Throw all unverified users back to the login page.
4B) ACCESS CHECK
<?php
// (A) ACCESS CHECK
require "4a-protect.php";
?>

<form method="post">
  <h1>IT WORKS!</h1>
  <?php print_r($user); ?>
  <input type="hidden" name="logout" value="1">
  <input type="submit" value="Logout">
</form>
Lastly, all that’s left is to require "4a-protect.php" at the top of all your protected pages.
EXTRA) OTHER PLACES TO STORE THE JWT
5A) LOGIN PAGE HTML
<form method="post" id="login" onsubmit="return login()">
  <h1>LOGIN</h1>
  <input type="email" placeholder="Email" name="email" required value="jon@doe.com">
  <input type="password" placeholder="Password" name="password" required value="123456">
  <input type="submit" value="Sign In">
</form>
In the above example, we kept the JWT in $_COOKIE["jwt"]. But cookies are not the only place that can store tokens, let’s modify that login page a little bit here.
5B) LOGIN PAGE JAVASCRIPT
function login () {
  // (A) FORM DATA
  let data = new FormData(document.getElementById("login"));

  // (B) AJAX FETCH
  fetch("5c-login-ajax.php", { method:"post", body:data })
  .then(res => res.json())
  .then(res => {
    if (res.status) {
      // (B1) STORE THE TOKEN IN LOCALSTORAGE
      localStorage.setItem("jwt", res.msg);

      /* (B2) IN INDEXED DATABSE
      IDB.transaction("Settings", "readwrite")
      .objectStore("Settings")
      .add({"jwt":res.msg}); */

      /* (B3) OR EVEN IN STORAGE CACHE
      var jwtBlob = new Blob([res.msg], {type: "text/plain"});
      var urlBlob = URL.createObjectURL(jwtBlob);
      fetch(urlBlob)
      .then(res => {
        caches.open("NAME").then(cache => cache.put("jwt.txt", res));
        URL.revokeObjectURL(urlBlob);
      }); */

      // (B4) DONE
      location.href = "5d-api.html";
    } else { alert(res.msg); }
  })
  .catch(err => console.error(err));
  return false;
}
That’s right. In modern Javascript, we can also store the token in local storage, session storage, an indexed database, or even a storage cache. For those who are lost – JWT is not “strictly for PHP Javascript only”. JWT can also be securely saved in mobile apps, and be used for authentication.
5C) LOGIN AJAX HANDLER
<?php
if (isset($_POST["email"]) && isset($_POST["password"])) {
  // (A) LOAD LIBRARY
  require "2-lib-users.php";

  // (B) VERIFY CREDENTIALS
  $jwt = $_USER->login($_POST["email"], $_POST["password"]);
  echo json_encode([
    "status" => $jwt===false ? false : true,
    "msg" => $jwt === false ? $_USER->error : $jwt
  ]);
} else {
  echo json_encode([
    "status" => false,
    "msg" => "Invalid email/password"
  ]);
}
Don’t think this needs much explanation – It’s the same old login process, just “broken out” into an AJAX/API manner.
5D) API CALL WITH JWT
<script>
// (A) FORM DATA - JWT
let data = new FormData();
data.append("jwt", localStorage.getItem("jwt"));
data.append("key", "value");

// (B) ATTACH JWT IN FETCH CALL
fetch("5e-api.php", { method:"POST", body:data })
.then(res => res.text())
.then(txt => console.log(txt))
.catch(err => console.error(err));
</script>
After signing in, just include the JWT in all AJAX/API calls.
5E) VERIFY JWT
<?php
// (A) JWT NOT SET!
if (!isset($_POST["jwt"])) { exit("NO"); }

// (B) VERIFY JWT
require "2-lib-users.php";
$user = $_USER->validate($_POST["jwt"]);
if ($user===false) { exit("NO"); }

// (C) PROCEED AS USUAL
echo "YES";
Lastly, verify the JWT in the AJAX handler or API before processing the request.
EXTRAS
That’s all for the tutorial, and here is a small section on some extras and links that may be useful to you.
SECURITY NOTES
I have read that keeping the JWT in localStorage or cookie is not safe. But most people just shrug it off – Where else are you going to keep it? Write the JWT on a piece of paper? So yes, the safer way seems to be setting an “HTTP Only Cookie”. It’s not invulnerable, but at least safer. I am not a security expert by any means, so dear experts – Please share some of your insights.
P.S. Also, enforce the use of https:// in your project.
LINKS & REFERENCES
- PHP-JWT – GitHub
- jwt.io
- Set Cookie – PHP
THE END
Thank you for reading, and we have come to the end. I hope that it has helped you to better understand, and if you want to share anything with this guide, please feel free to comment below. Good luck and happy coding!
I’m an old school php session guy who want to transition to jwt, but having challenges implementing it. So I will definitely try this and use it for my projects. Thanks for sharing
Great tutoriál. It would be great if you could expand this tutorial yet with usage of jwt refresh tokens, thank you in advance 🙂
If you got problems at 7-page.php, try to modify code line 11: change to
use Firebase\JWT\Key;try { $jwt = JWT::decode($_COOKIE["jwt"], new Key(JWT_SECRET, JWT_ALGO)); }
Thanks for sharing, there were some changes to use
new Key()– Shall update this tutorial in due time.Great tuto
That’s exactly what i was looking for
Thank you so much
Really good example. Thanks.