Welcome to a tutorial on how to create a restaurant food ordering system with Javascript. Yes, you read that right, Javascript-only. There are no server-side databases, and only NodeJS is involved. But be warned, this is not a “complete ordering system”, but more of an experiment of mine to see how far we can go with client-side technologies.
There are quite a number of experimental (as at the time of writing) and advanced stuff used in this project, and it is not intended for beginner code ninjas. Brace yourselves, this is not going to be as easy, but exciting nonetheless. Read on!
TABLE OF CONTENTS
DOWNLOAD & NOTES
Here is the download link to the example code, so you don’t have to copy-paste everything.
EXAMPLE CODE DOWNLOAD
Just click on “download zip” or do a git clone. I have released it under the MIT license, so feel free to build on top of it or use it in your own project.
SORRY FOR THE ADS...
But someone has to pay the bills, and sponsors are paying for it. I insist on not turning Code Boxx into a "paid scripts" business, and I don't "block people with Adblock". Every little bit of support helps.
Buy Me A Coffee Code Boxx eBooks
JAVASCRIPT FOOD ORDERING
All right, let us now get into the details of building an ordering system with NodeJS.
QUICK SETUP
Run npm i express peer to install the required modules.
PART 1) PRODUCTS
var products = {
  1: {
    name : "Burger",
    img : "burger.png",
    price : 5.7
  },
  2 : {
    name : "Pizza",
    img : "pizza.png",
    price : 3.9
  }
};
In a “normal system”, this would have been kept in a database. But to keep things simple, I took the shortcut and placed all the items in a Javascript object instead.
PART 2) FRONT-END ORDERING
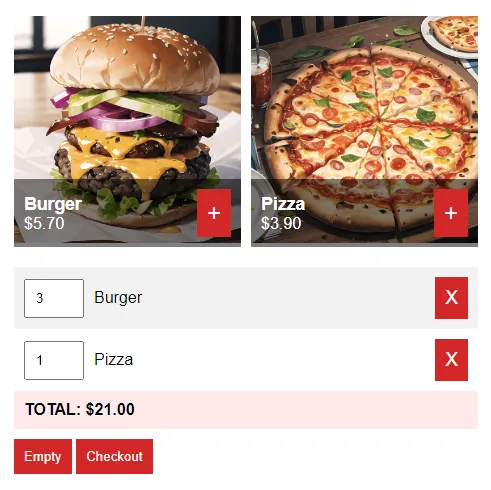
The next step is rather Captain Obvious, build a front-end page to display the products and a shopping cart. As this is a literal carbon copy of my Javascript Shopping Cart tutorial, go ahead and head over there if you want more details.
PART 3) BACK-END MANAGEMENT
3A) ORDER MANAGER PAGE
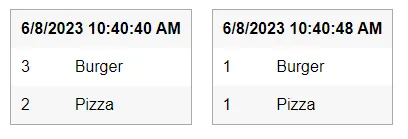
<div id="orders-list"></div>When customers or staff “check out” orders in the front end, they will be pushed to this manager page – The kitchen will then process the orders accordingly.
3B) ORDER MANAGER JAVASCRIPT
// (A) HANDSHAKE WITH PEER SERVER
const peer = new Peer("MANAGER", {
  host: "localhost",
  port: 9000,
  path: "/"
});

// (B) ON RECEIVING MESSAGE FROM OTHER PEERS
peer.on("connection", conn => { conn.on("data", data => {
  // (B1) GENERATE NEW HTML ORDER
  let order = document.createElement("table");
  order.className = "order";
  order.onclick = () => order.remove();

  // (B2) TIMESTAMP
  let row = order.insertRow(),
      cell = row.insertCell(),
      now = new Date();
  cell.colSpan = 2;
  cell.style.fontWeight = 700;
  cell.innerHTML = `${now.toLocaleDateString()} ${now.toLocaleTimeString()}`;

  // (B3) ADD ITEMS
  data = JSON.parse(data);
  for (let [pid, qty] of Object.entries(data)) {
    row = order.insertRow();
    cell = row.insertCell();
    cell.innerHTML = qty;
    cell = row.insertCell();
    cell.innerHTML = products[pid]["name"];
  }

  // (B4) ADD ORDER TO HTML LIST
  document.getElementById("orders-list").appendChild(order);
  conn.close();
}));
Yep, I have kept the manager page as simple as possible.
- “Register” with the peer server – More on that below.
- Accept order data from the kiosk devices, draw it in HTML, and close the connection thereafter.
PART 4) NODE EXPRESS & PEER SERVER
// (A) LOAD MODULES
const express = require("express"),
      path = require("path"),
      { PeerServer } = require("peer");

// (B) EXPRESS SERVER
// (B1) INIT + ASSETS
const app = express();
app.use("/assets", express.static(path.join(__dirname, "assets")))

// (B2) FOOD ORDER FRONTEND
app.get("/", (req, res) => res.sendFile(path.join(__dirname, "/2-cart.html")));

// (B3) FOOD ORDER BACKEND
app.get("/manager", (req, res) => res.sendFile(path.join(__dirname, "/3-manager.html")));

// (B4) MANIFEST + SERVICE WORKER
app.get("/front.json", (req, res) => res.sendFile(path.join(__dirname, "/assets/5-front.json")));
app.get("/back.json", (req, res) => res.sendFile(path.join(__dirname, "/assets/5-back.json")));
app.get("/sw.js", (req, res) => res.sendFile(path.join(__dirname, "/assets/5-worker.js")));

// (C) START!
// HTTP SERVER @80
// PEER SERVER @9000
app.listen(80, () => console.log(`Server running at port 80`));
const peerServer = PeerServer({ port: 9000, path: "/" });
Not going to explain this line-by-line, but a real quick and dirty explanation –
- Run Express HTTP server at port 80.
- Run peer server at port 9000 – This is used to facilitate the “push order” from the front end to the back.
PART 5) PROGRESSIVE WEB APP
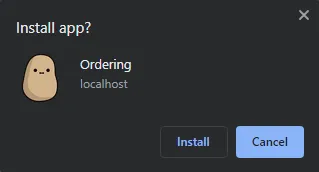 We already have a working system with the above front end, back end, and Node server. This part is completely optional, but it’s awesome nonetheless – Create an installable progressive web app. Some people think it is difficult, but we only need 3 things.
5A) HTML APP METADATA
<!-- ICONS -->
<link rel="icon" href="assets/favicon.png" type="image/png">
<meta name="mobile-web-app-capable" content="yes">
<meta name="theme-color" content="white">
<link rel="apple-touch-icon" href="assets/ico-512.png">
<meta name="apple-mobile-web-app-capable" content="yes">
<meta name="apple-mobile-web-app-status-bar-style" content="black">
<meta name="apple-mobile-web-app-title" content="Ordering Demo">
<meta name="msapplication-TileImage" content="assets/ico-512.png">
<meta name="msapplication-TileColor" content="#ffffff">
First, is to insert a whole load of “web app” metadata into the header section.
5B) WEB MANIFEST FILE
{
  "short_name": "Ordering",
  "name": "Ordering",
  "icons": [{
    "src": "assets/favicon.png",
    "sizes": "64x64",
    "type": "image/png"
  }, {
    "src": "assets/ico-512.png",
    "sizes": "512x512",
    "type": "image/png"
  }],
  "start_url": "/",
  "scope": "/",
  "background_color": "white",
  "theme_color": "white",
  "display": "fullscreen"
}
Next, a web manifest file to hold information on the web app itself – The name, icon, settings, theme, etc…
5C) SERVICE WORKER
// (A) CREATE/INSTALL CACHE
self.addEventListener("install", evt => {
  self.skipWaiting();
  evt.waitUntil(
    caches.open("OrderDemo")
    .then(cache => cache.addAll([
      // (A1) IMAGES
      "assets/burger.png",
      "assets/pizza.png",
      "assets/favicon.png",
      "assets/ico-512.png",
      // (A2) PAGES + SCRIPTS
      "assets/1-products.js",
      "assets/2-cart.css",
      "assets/2-cart.js",
      "assets/3-manager.css",
      "assets/3-manager.js",
      "front.json",
      "back.json"
    ]))
    .catch(err => console.error(err))
  );
});

// (B) CLAIM CONTROL INSTANTLY
self.addEventListener("activate", evt => self.clients.claim());

// (C) LOAD FROM CACHE FIRST, FALLBACK TO NETWORK IF NOT FOUND
self.addEventListener("fetch", evt => evt.respondWith(
  caches.match(evt.request).then(res => res || fetch(evt.request))
));
Finally, a service worker. For the uninitiated, service workers are just Javascript that runs in the background. In this one:
- (A) We save a whole list of the project files into the browser cache. Not the usual cache, but a persistent storage cache.
- (C) Hijack the fetch calls, and serve the files from the cache if it is saved. If not, fall back to loading from the network.
In short, reducing the reliance on the server and making this work like a native-installed app.
EXTRAS
That’s all for this project, and here is a small section on some extras and links that may be useful to you.
LIMITATIONS & MISSING PIECES
Yes, this little experiment worked. But as you can see, there are many missing bits and pieces.
- No security – No staff login, any device can become the manager.
- No table number, quite an easy fix though.
- No database to store the orders (it is possible to build one with indexed databases).
- No payment processor. This is going to be difficult without a “full-fledged” server.
Otherwise, I will say that modern Javascript is pretty darn good enough. It may not reach the performance level of native apps, but web apps are powerful in their own ways – Any customer can just scan a QR code to access the front end, and turn their own devices into ordering kiosks. Instantly.
Business owners are no longer limited to expensive ordering and POS systems as well. Any web-enabled device can be turned into an ordering kiosk essentially.
COMPATIBILITY CHECKS
- Local Storage – CanIUse
- Arrow Function – CanIUse
Works well in all modern browsers. If you want to be safe, use Modernizr to do feature checks and even load polyfills.
LINKS & REFERENCES
- POS System With Pure Javascript HTML CSS – Code Boxx
- Shopping Cart With Pure JS – Code Boxx
- How To Activate Chrome Kiosk Mode – Code Boxx
THE END
Thank you for reading, and we have come to the end of this guide. I hope that it has helped you with your project, and if you want to share anything with this guide, please feel free to comment below. Good luck and happy coding!