Welcome to a tutorial on how to create a simple Javascript Flashcard web app. This is yet another old-school assignment that never seems to change over the years. So here’s a slightly different take on the classic, a Flashcard web app that is installable and offline capable. Read on!
TABLE OF CONTENTS
JAVASCRIPT FLASHCARDS

All right, let us now get into more details on how the Javascript Flashcards web app works.
PART 1) THE HTML
<!-- (A) MAIN MENU -->
<div id="screenA">
  <div class="mItem" onclick="cards.view('v')">
    <div class="mi">view_array</div>
    <div class="mTxt">View Cards</div>
  </div>
  <div class="mItem" onclick="cards.view('m')">
    <div class="mi">edit</div>
    <div class="mTxt">Manage Cards</div>
  </div>
</div>

<!-- (B) MANAGE/VIEW CARDS -->
<div id="screenB" class="hide">
  <!-- (B1) CARDS WRAPPER -->
  <div id="bCard"></div>

  <!-- (B2) CONTROLS -->
  <div id="bManage">
    <div class="mi" onclick="cards.screen(0)">reply</div>
    <div class="mi bManage" onclick="cards.delete()">clear</div>
    <div class="mi bManage" onclick="cards.add()">add</div>
    <div class="mi" onclick="cards.move()">navigate_before</div>
    <div class="mi" onclick="cards.move(1)">navigate_next</div>
    <div id="bCardCount">
      <span id="bCardNow"></span> / <span id="bCardAll"></span>
    </div>
  </div>
</div>
For the HTML interface, it is a simple “2-in-1 pages layout”.
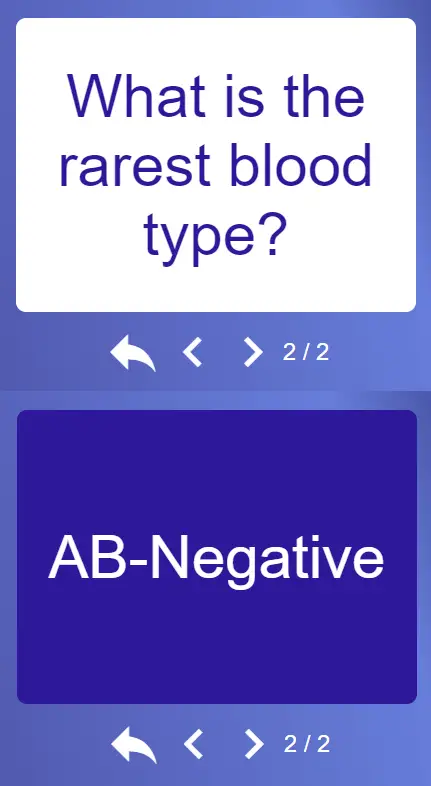
<div id="screenA">Main menu with 2 buttons – View and manage cards.<div id="screenB">View or edit cards.<div id="bCard">Container to show the current card, to be generated by the Javascript; Each card will have 2 sides – The front (question) and the back (answer).<div id="bManage">A collection of “buttons” – Back, last/next, add and delete.
PART 2) THE JAVASCRIPT
2A) PROPERTIES
var cards = {
  // (A) PROPERTIES
  data : null, // flashcards data array
  cNow : null, // current flashcard
  cMode : null, // current mode - "v"iew or "m"anage
  hScr : null, // html screens
  hCard : null, // html card wrapper
  // ...
};
Captain Obvious to the rescue, var cards contains all the mechanics of the flashcards. I will divide the properties into 3 “general groups”:
dataHolds the flashcards, in the format of[["FRONT", "BACK"], ["FRONT", "BACK"], ...]. This data will be saved intolocalStoragefor persistent storage.cNow cModeFlags.cNowThe current card. That is, ifcNow==1, we should be displaying the second card.cModeThe current “HTML display mode”.vto show the flashcards, andmto manage the cards.
hScr hCardReferences to the HTML elements.hScrAn array for the “HTML screens”[<div id="screenA">, <div id="screenB">].hCardThe current card<div id="bCard">.
2B) INIT
// (B) INIT APP
init : () => {
  // (B1) RESTORE CARDS FROM LOCALSTORAGE
  cards.data = localStorage.getItem("cards");
  if (cards.data == null) { cards.data = []; }
  else { cards.data = JSON.parse(cards.data); }

  // (B2) GET HTML ELEMENTS
  cards.hScr = [
    document.getElementById("screenA"),
    document.getElementById("screenB")
  ];
  cards.hCard = document.getElementById("bCard");
},
// ...
window.onload = cards.init;
This should be pretty self-explanatory now.
- On window load,
cards.init()will run. - (B1) Load the cards from
localStorageand restore them intocards.data. - (B2) Get the HTML elements.
2C) HTML INTERFACE
// (C) SWTICH HTML SCREEN
screen : i => { for (let j in cards.hScr) {
  if (i==j) { cards.hScr[j].classList.remove("hide"); }
  else { cards.hScr[j].classList.add("hide"); }
}},

// (D) UPDATE CURRENT & TOTAL CARDS
count : () => {
  document.getElementById("bCardNow").innerHTML = cards.data.length==0 ? 0 : cards.cNow + 1;
  document.getElementById("bCardAll").innerHTML = cards.data.length;
},

// (E) VIEW/MANAGE CARDS
view : mode => {
  // (E1) VIEW MODE - CONTINUE ONLY WHEN THERE ARE CARDS
  if (mode=="v" && cards.data.length==0) {
    alert("Add some cards first...");
    return;
  }

  // (E2) UPDATE FLAGS & CARDS COUNT
  cards.cMode = mode;
  cards.cNow = 0;
  cards.count();

  // (E3) SHOW/HIDE "MANAGE CARD" CONTROLS
  if (mode=="v") { for (let i of document.querySelectorAll(".bManage")) {
    i.classList.add("hide");
  }} else { for (let i of document.querySelectorAll(".bManage")) {
    i.classList.remove("hide");
  }}

  // (E4) DRAW CARD & SHOW
  cards.draw();
  cards.screen(1);
},

// (F) DRAW CARD
draw : () => {
  // (F1) VIEW MODE CARD
  if (cards.cMode=="v") {
    cards.hCard.innerHTML = `<div class="card" onclick="this.classList.toggle('flip')">
    <div class="front">${cards.data[cards.cNow][0]}</div>
    <div class="back">${cards.data[cards.cNow][1]}</div>
    </div>`;
  }

  // (F2) MANAGE MODE CARD
  else {
    if (cards.data.length==0) {
      cards.hCard.innerHTML = `<div class="mFront">Add a card first.</div>`;
    } else {
      cards.hCard.innerHTML = `
      <textarea class="mFront" onchange="cards.update(this.value, 1)">${cards.data[cards.cNow][0]}</textarea>
      <textarea class="mBack" onchange="cards.update(this.value)">${cards.data[cards.cNow][1]}</textarea>`;
    }
  }
},

// (G) LAST/NEXT CARD
move : next => {
  // (G1) UPDATE CURRENT CARD
  if (next) { cards.cNow++; }
  else { cards.cNow--; }
  if (cards.cNow >= cards.data.length) { cards.cNow = 0; }
  if (cards.cNow < 0) { cards.cNow = cards.data.length - 1; }

  // (G2) UPDATE HTML INTERFACE
  cards.count();
  cards.draw();
},
This next section of the Javascript deals with the HTML interface. Not going to explain all of it line-by-line, so here’s a quick summary instead:
- (C)
cards.screen()To switch between the main menu and the show/edit card screen. - (D)
cards.count()Update the HTML current and the total number of cards. - (E)
cards.view()Switch the view/edit card screen, set up the necessary flags and HTML interface. - (F)
cards.draw()Draw the currently selected card. - (G)
cards.move()Navigate to the last/next card.
2D) LOCAL STORAGE CARDS
// (H) SAVE CARD DATA TO LOCALSTORAGE
save : () => localStorage.setItem("cards", JSON.stringify(cards.data)),

// (I) ADD EMPTY CARD
add : () => {
  cards.data.splice(cards.cNow, 0, ["Front", "Back"]);
  cards.save();
  cards.count();
  cards.draw();
},

// (J) UPDATE CURRENT CARD
update : (txt, side) => {
  if (side) { cards.data[cards.cNow][0] = txt; }
  else { cards.data[cards.cNow][1] = txt; }
  cards.save();
},

// (K) DELETE CURRENT CARD
delete : () => { if (cards.data.length!=0) {
  cards.data.splice(cards.cNow, 1);
  cards.save();
  if (cards.data.length == 0) { cards.cNow = 0; }
  else if (cards.cNow+1 >= cards.data.length) {cards.cNow = cards.data.length-1; }
  cards.count();
  cards.draw();
}}
Finally, these functions deal with the flashcard data cards.data. Once again, not going to explain line-by-line… A quick summary:
- (H)
cards.save()Savescards.datainto thelocalStorageas a JSON encoded string. - (I)
cards.add()Add a new flashcard. - (J)
cards.update()Update the current flashcard. - (K)
cards.delete()Delete the current flashcard.
PART 3) PROGRESSIVE WEB APP
3A) HTML HEADERS
<!-- ANDROID + CHROME + APPLE + WINDOWS APP -->
<meta name="mobile-web-app-capable" content="yes">
<meta name="theme-color" content="white">
<link rel="apple-touch-icon" href="icon-512.png">
<meta name="apple-mobile-web-app-capable" content="yes">
<meta name="apple-mobile-web-app-status-bar-style" content="black">
<meta name="apple-mobile-web-app-title" content="Offline JS Flashcards">
<meta name="msapplication-TileImage" content="icon-512.png">
<meta name="msapplication-TileColor" content="#ffffff">

<!-- WEB APP MANIFEST -->
<!-- https://web.dev/add-manifest/ -->
<link rel="manifest" href="3-manifest.json">

<!-- SERVICE WORKER -->
<script>
if ("serviceWorker" in navigator) {
  navigator.serviceWorker.register("3-worker.js");
}
</script>
The app is actually complete at this stage. But to bring it up into a “progressive web app”, we need to insert 3 more things:
- Set a whole bunch of web app metadata into the HTML head. This is quite a pain, and everybody has a different set… I will just leave this as it is, covering Windows, Android, and iOS.
- Add a web app manifest.
- Register a service worker.
3B) WEB MANIFEST
{
  "short_name": "Flashcards",
  "name": "JS Flashcards",
  "icons": [{
    "src": "favicon.png",
    "sizes": "64x64",
    "type": "image/png"
  }, {
    "src": "icon-512.png",
    "sizes": "512x512",
    "type": "image/png"
  }],
  "start_url": "1-flashcard.html",
  "scope": "/",
  "background_color": "white",
  "theme_color": "white",
  "display": "standalone"
}
The web manifest is as it is – A file containing the app name, icons, start URL, themes, settings, etc…
3C) SERVICE WORKER
// (A) CREATE/INSTALL CACHE
self.addEventListener("install", evt => {
  self.skipWaiting();
  evt.waitUntil(
    caches.open("JSFlashCard")
    .then(cache => cache.addAll([
      "1-flashcard.html",
      "2-flashcard.css",
      "2-flashcard.js",
      "favicon.png",
      "icon-512.png"
    ]))
    .catch(err => console.error(err))
  );
});

// (B) CLAIM CONTROL INSTANTLY
self.addEventListener("activate", evt => self.clients.claim());

// (C) LOAD FROM CACHE FIRST, FALLBACK TO NETWORK IF NOT FOUND
self.addEventListener("fetch", evt => evt.respondWith(
  caches.match(evt.request).then(res => res || fetch(evt.request))
));
For those who have never heard of “service worker”, this is a piece of Javascript that runs in the background. For this service worker:
- (A) We create a new storage cache in the browser and save all the project files inside.
- (C) “Hijack” the browser fetch requests. If the requested file is found in the cache, serve the cached file. If not, fall back to load from the network.
In other words, this service worker pretty much turns the entire app offline.
DOWNLOAD & NOTES

Here is the download link to the example code, so you don’t have to copy-paste everything.
SORRY FOR THE ADS...
But someone has to pay the bills, and sponsors are paying for it. I insist on not turning Code Boxx into a "paid scripts" business, and I don't "block people with Adblock". Every little bit of support helps.
Buy Me A Coffee Code Boxx eBooks
EXAMPLE CODE DOWNLOAD
Click here for the source code on GitHub gist, just click on “download zip” or do a git clone. I have released it under the MIT license, so feel free to build on top of it or use it in your own project.
EXTRA BITS & LINKS

That’s all for the tutorial, and here is a small section on some extras and links that may be useful to you.
COMPATIBILITY CHECKS
- Arrow Functions – CanIUse
- Service Workers – CanIUse
- Add To Home Screen – CanIUse
- Template Literals – CanIUse
This example should work on most modern “Grade A” browsers, but “installable” will only work on selected browsers at the time of writing.
LINKS & REFERENCES
- Example on CodePen – Simple Javascript Flashcards
THE END

Thank you for reading, and we have come to the end. I hope that it has helped you to better understand, and if you want to share anything with this guide, please feel free to comment below. Good luck and happy coding!
Please try to put an live demo in every project.
Please try to read before commenting, there is a demo on CodePen.
Sadly, I wish things are as simple as you wanted it – https://code-boxx.com/faq/#nodemo