Welcome to a tutorial on how to create a simple customer queue system using Javascript. Yes, this is a web-based customer queue number system. But this is not a “traditional” one, this is a “leveled up” web app that works offline. Read on!
TABLE OF CONTENTS
JS CUSTOMER QUEUE

All right, let us now get into some details on how the Javascript customer queue system works.
PART 1) THE HTML
1A) “ADMIN PAGE”
<!-- (A) CURRENT QUEUE NUMBER -->
<div id="qNow" onclick="queue.next()">
  <div id="qNowNum">0</div>
  <div id="qNowTitle">NOW</div>
</div>

<!-- (B) TOTAL IN QUEUE -->
<div id="qAll" onclick="queue.add()">
  <div id="qAllNum">0</div>
  <div id="qAllTitle">ALL</div>
</div>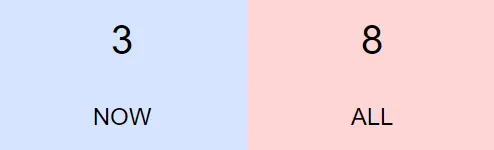
The “admin page” is very simple, there are only 2 segments.
qNowThe “currently serving” queue number. Click on this to advance the queue number.qAllThe total number of customers in the queue. Click on this to issue a queue number.
1B) “DISPLAY BOARD PAGE”
<div id="qNowDis">0</div>Yep, this page is pretty much the “display board” for the “currently serving” queue number.
PART 2) THE JAVASCRIPT
var queue = {
  // (A) INIT
  now : 0,      // current queue number
  all : 0,      // total in queue
  alarm : null, // alarm sound
  hNow : null,  // html current queue number
  hAll : null,  // html total in queue
  hDis : null,  // html current queue number (display board)
  init : () => {
    // (A1) OPEN "DISPLAY BOARD"
    let board = window.open("1b-js-queue.html", "_blank", "popup");

    // (A2) GET HTML ELEMENTS
    queue.hNow = document.getElementById("qNowNum");
    queue.hAll = document.getElementById("qAllNum");
    board.onload = () => {
      queue.hDis = board.document.getElementById("qNowDis");
    };

    // (A3) LOAD ALARM SOUND
    queue.alarm = new Audio("ding-dong.mp3");
  },

  // (B) ADD CUSTOMER TO QUEUE
  add : () => {
    // (B1) ADD TO TOTAL QUEUE NUMBER
    queue.all++;
    queue.hAll.innerHTML = queue.all;

    // (B2) PRINT QUEUE NUMBER
    // possible to generate a new window with queue number
    // but print will always open the "select printer" dialog box
    /*
    let qslip = window.open();
    qslip.onload = () => {
      qslip.document.body.innerHTML = queue.all;
      qslip.print();
    };
    */
  },

  // (C) ADVANCE QUEUE NUMBER
  next : () => { if (queue.now < queue.all) {
    // (C1) ADD TO CURRENT QUEUE NUMBER
    queue.now++;
    queue.hNow.innerHTML = queue.now;
    queue.hDis.innerHTML = queue.now;

    // (C2) PLAY ALARM SOUND
    if (queue.alarm.paused) { queue.alarm.play(); }
    else { queue.alarm.currentTime = 0; }
  }}
};
window.addEventListener("load", queue.init);
Captain Obvious to the rescue, queue.init() runs on page load to initiate the app. The basic mechanics are actually very straightforward.
- We use 2 variables to track the customer queue.
queue.nowis the “currently serving” queue number.queue.allis the “total number in queue”.
queue.add()Simply incrementqueue.allwhen the admin clicks on “issue queue number”.queue.next()When the admin clicks on “next customer”. Incrementqueue.now, play the alarm sound, and update the HTML.
Yep, that’s all.
PART 3) PROGRESSIVE WEB APP
3A) HTML HEADERS
<!-- ANDROID + CHROME + APPLE + WINDOWS APP -->
<meta name="mobile-web-app-capable" content="yes">
<meta name="theme-color" content="white">
<link rel="apple-touch-icon" href="icon-512.png">
<meta name="apple-mobile-web-app-capable" content="yes">
<meta name="apple-mobile-web-app-status-bar-style" content="black">
<meta name="apple-mobile-web-app-title" content="JS Queue">
<meta name="msapplication-TileImage" content="icon-512.png">
<meta name="msapplication-TileColor" content="#ffffff">
<!-- WEB APP MANIFEST -->
<!-- https://web.dev/add-manifest/ -->
<link rel="manifest" href="3-manifest.json">
<!-- SERVICE WORKER -->
<script>
if ("serviceWorker" in navigator) {
navigator.serviceWorker.register("4-worker.js");
}
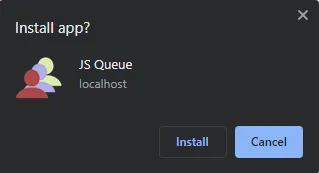
</script>At this stage, we already have a complete working system. But to “level up” and turn this into an “offline installable web app”, we need to insert a few things into the HTML header.
- Define the app icons. A real pain in the “S” as every platform uses a different meta tag and icon size. I figured the easiest way is to just use a huge 512 X 512 icon and let the platforms resize it.
- Define a web manifest file.
- Register a service worker.
3B) WEB MANIFEST
{
  "short_name": "Queue",
  "name": "JS Queue",
  "icons": [{
    "src": "favicon.png",
    "sizes": "64x64",
    "type": "image/png"
  }, {
    "src": "icon-512.png",
    "sizes": "512x512",
    "type": "image/png"
  }],
  "start_url": "1a-js-queue.html",
  "scope": "/",
  "background_color": "white",
  "theme_color": "white",
  "display": "standalone"
}
The “manifest file” is what it is, it contains information about the web app. The name, icons, starting page, color themes, settings, etc…
3C) SERVICE WORKER
// (A) CREATE/INSTALL CACHE
self.addEventListener("install", evt => {
  self.skipWaiting();
  evt.waitUntil(
    caches.open("JSQueue")
    .then(cache => cache.addAll([
      "favicon.png",
      "icon-512.png",
      "ding-dong.mp3",
      "1a-js-queue.html",
      "1b-js-queue.html",
      "2-js-queue.js",
      "2-js-queue.css"
    ]))
    .catch(err => console.error(err))
  );
});

// (B) CLAIM CONTROL INSTANTLY
self.addEventListener("activate", evt => self.clients.claim());

// (C) LOAD FROM CACHE FIRST, FALLBACK TO NETWORK IF NOT FOUND
self.addEventListener("fetch", evt => evt.respondWith(
  caches.match(evt.request).then(res => res || fetch(evt.request))
));
For beginners who have never heard of “service worker” before, this is simply a piece of Javascript that runs in the background.
- (A) Create a storage cache in the browser and save all the project files.
- (C) “Hijack” fetch requests. Load from the cache if it is found, fallback to load from the network if not.
Simply put, this service worker supports “offline mode” by saving all the necessary project files into a cache.
DOWNLOAD & NOTES

Here is the download link to the example code, so you don’t have to copy-paste everything.
QUICK NOTES
- Download and unzip into your HTTP folder.
- Access
1a-js-queue.htmlin the browser, allow the popup. - It is best to have 2 monitors for this to work properly – One screen for the “admin”, another to display the “current queue number”.
- Click on “ALL” to issue a queue number. Click on “NOW” to advance to the next customer.
https://is required for “installable” to work properly.http://localhostis an exception for testing.
SORRY FOR THE ADS...
But someone has to pay the bills, and sponsors are paying for it. I insist on not turning Code Boxx into a "paid scripts" business, and I don't "block people with Adblock". Every little bit of support helps.
Buy Me A Coffee Code Boxx eBooks
EXAMPLE CODE DOWNLOAD
Click here to download. I have released it under the MIT license, so feel free to build on top of it or use it in your own project.
EXTRA BITS & LINKS

That’s all for the tutorial, and here is a small section on some extras and links that may be useful to you.
IMPROVEMENT IDEAS
- Store the queue numbers in
localStorage. So that the numbers will “resume” even after closing the browser entirely. - Define your own algorithm to reset the queue number… Or it will keep running until a very large number.
- Deal with the “issued queue number” in one way or another.
- As a “serverless app”, the only way is to generate a dummy page with the queue number and print it.
- But with some server-side scripts, this can also send out emails and/or SMS notifications.
- Flash the screen on “next customer”.
- The “display board” is literally an empty canvas – Do anything you want with it. Add time, add a news ticker, serve advertisement, stream videos, etc…
COMPATIBILITY CHECKS
- Arrow Functions – CanIUse
- Service Worker – CanIUse
- Add To Home Screen – CanIUse
The basic features of this example will work on most browsers. But at the time of writing, “installing” will only work with certain browsers.
LINKS & REFERENCES
- PHP Customer Queue System – Code Boxx
THE END

Thank you for reading, and we have come to the end. I hope that it has helped you to better understand, and if you want to share anything with this guide, please feel free to comment below. Good luck and happy coding!