Welcome to a tutorial on how to create a customer queue number system with PHP. Need to run an online queue number system? Or maybe in an intranet setting? Well, here’s a simple example built with WebSockets and PHP – Read on!
TABLE OF CONTENTS
DOWNLOAD & NOTES
Here is the download link to the example code, so you don’t have to copy-paste everything.
EXAMPLE CODE DOWNLOAD
Just click on “download zip” or do a git clone. I have released it under the MIT license, so feel free to build on top of it or use it in your own project.
SORRY FOR THE ADS...
But someone has to pay the bills, and sponsors are paying for it. I insist on not turning Code Boxx into a "paid scripts" business, and I don't "block people with Adblock". Every little bit of support helps.
Buy Me A Coffee Code Boxx eBooks
PHP QUEUE NUMBER SYSTEM
All right, let us now get into more details on how to create a queue number system in PHP.

PRELUDE) SETUP OVERVIEW
Before we start, here’s a quick overview of the system structure. There are 3 components:
1-server.phpQueue management WebSocket server.3a-admin.htmlThis “admin page” issues queue numbers, and advances the queue to the next customer.4a-board.htmlA “currently serving” display board.
Yes, this example can run on a single device or as many as you want.
- Single device, but requires 2 screens. One for the admin, another for the “now serving”.
- Multiple devices. One to act as the server, as many admin and display boards as you like.
PART 1) WEBSOCKET SERVER
1A) COMMAND LINE CHECK
<?php
// (A) COMMAND LINE CHECK
// CREDITS : https://stackoverflow.com/questions/933367/php-how-to-best-determine-if-the-current-invocation-is-from-cli-or-web-server
function is_cli () {
  if (php_sapi_name()==="cli") { return true; }
  if (defined("STDIN")) { return true; }
  if (array_key_exists("SHELL", $_ENV)) { return true; }
  if (!array_key_exists("REQUEST_METHOD", $_SERVER)) { return true; }
  if (empty($_SERVER["REMOTE_ADDR"]) && !isset($_SERVER["HTTP_USER_AGENT"]) && count($_SERVER["argv"])>0) { return true; }
  return false;
}
if (!is_cli()) { exit("Please run this in the command line."); }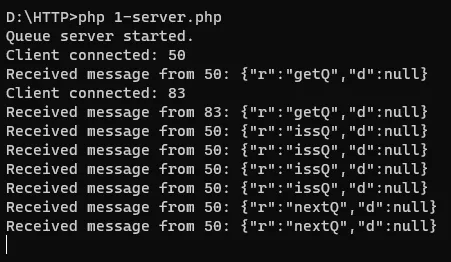
First, this script drives the mechanics behind the queue number system. Take note that it should be run in the command line… The first section makes sure it is so, with some “rather extensive checks”.
1B) LOAD RATCHET
// (B) LOAD RATCHET
require "vendor/autoload.php";
use Ratchet\MessageComponentInterface;
use Ratchet\ConnectionInterface;
use Ratchet\Server\IoServer;
use Ratchet\Http\HttpServer;
use Ratchet\WebSocket\WsServer;
For you guys who are new:
- Ratchet is a PHP library for WebSockets.
- WebSockets are basically persistent connections.
Long story short, it is very difficult to drive a live queue system using the “connect download disconnect” HTTP. Thus the use of WebSockets.
1C) QUEUE CLASS
// (C) QUEUE CLASS
class Queue implements MessageComponentInterface {
  // (C1) PROPERTIES
  private $debug = true; // debug mode
  protected $clients; // connected clients
  private $qt = 0; // total queue number
  private $qn = 0; // current queue number

  // (C2) CONSTRUCTOR - INIT LIST OF CLIENTS
  public function __construct () {
    $this->clients = new \SplObjectStorage;
    if ($this->debug) { echo "Queue server started.\r\n"; }
  }

  // (C3) ON CLIENT CONNECT - STORE INTO $THIS->CLIENTS
  public function onOpen (ConnectionInterface $conn) {
    $this->clients->attach($conn);
    if ($this->debug) { echo "Client connected: {$conn->resourceId}\r\n"; }
  }

  // (C4) ON CLIENT DISCONNECT - REMOVE FROM $THIS->CLIENTS
  public function onClose (ConnectionInterface $conn) {
    $this->clients->detach($conn);
    if ($this->debug) { echo "Client disconnected: {$conn->resourceId}\r\n"; }
  }

  // (C5) ON ERROR
  public function onError (ConnectionInterface $conn, \Exception $e) {
    $conn->close();
    if ($this->debug) { echo "Client error: {$conn->resourceId} | {$e->getMessage()}\r\n"; }
  }

  // (C6) ON RECEIVING MESSAGE FROM CLIENT
  public function onMessage (ConnectionInterface $from, $msg) {
    if ($this->debug) { echo "Received message from {$from->resourceId}: {$msg}\r\n"; }
    $msg = json_decode($msg, true);
    switch ($msg["r"]) {
      // (C6-1) INVALID REQUEST
      default: break;

      // (C6-2) ADMIN - UPDATE QUEUE NUMBER REQUEST
      case "getQ":
        $from->send(json_encode([
          "r" => "putQ",
          "qt" => $this->qt,
          "qn" => $this->qn
        ]));
        break;

      // (C6-3) ISSUE A QUEUE NUMBER
      case "issQ":
        $this->qt++;
        $this->putAllQ();
        break;

      // (C6-4) NEXT CUSTOMER
      case "nextQ":
        if ($this->qn < $this->qt) {
          $this->qn++;
          $this->putAllQ();
        }
        break;
    }
  }

  // (C7) PUSH QUEUE UPDATE TO ALL CLIENTS
  public function putAllQ () {
    // (C7-1) QUEUE MESSAGE
    $msg = json_encode([
      "r" => "putQ",
      "qt" => $this->qt,
      "qn" => $this->qn
    ]);

    // (C7-2) SEND TO ALL
    foreach ($this->clients as $client) { $client->send($msg); }
  }
}
Oh no. Big scary library.
- (C1 to C5) When a client connects, we store the connection in
$this->clients; Remove it when the client disconnects. - (C6 & C7) This is the “core” of the queue system.
- (C1)
$this->qtTotal queue number.$this->qnCurrent queue number. - (C6-3) When the admin issues a queue number,
$this->qt++. Push updated queue numbers to all clients. - (C6-4) When the admin hits “next customer”,
$this->qn++. Push updated queue numbers to all clients.
- (C1)
That’s all.
1D) START WEBSOCKET SERVER
// (D) WEBSOCKET SERVER START!
$server = IoServer::factory(new HttpServer(new WsServer(new Queue())), 8080); // @CHANGE if not port 8080
$server->run();
Don’t think this needs explanation.
PART 2) JAVASCRIPT “WEBSOCKET LIBRARY”
var queue = {
  // (A) PROPERTIES
  host : "ws://localhost:8080", // @CHANGE to your own!
  socket : null, // websocket object

  // (B) CONNECT TO WS SERVER
  connect : opt => {
    // (B1) CREATE WEB SOCKET
    queue.socket = new WebSocket(queue.host);

    // (B2) READY - CONNECTED TO SERVER
    if (opt.open) { queue.socket.onopen = opt.open; }

    // (B3) ON CONNECTION CLOSE
    if (opt.close) { queue.socket.onclose = opt.close; }

    // (B4) ON RECEIVING DATA FROM SEREVER
    if (opt.msg) { queue.socket.onmessage = opt.msg; }

    // (B5) ON ERROR
    if (opt.error) { queue.socket.onerror = opt.error; }
  },

  // (C) SEND MESSAGE
  send : (req, data) => {
    if (data === undefined) { data = null; }
    queue.socket.send(JSON.stringify({ r: req, d: data }));
  }
};
Next, we have a “Javascript library” to work with the PHP WebSocket server. This is more for convenience so that we won’t have duplicated code later on.
PART 3) ADMIN PAGE
3A) ADMIN HTML
<!-- (A) SERVER STATUS -->
<div id="server" class="red">Disconnected</div>

<!-- (B) CURRENT & TOTAL QUEUE NUMBER -->
<div id="qTotal">
  <div class="qTxt">TOTAL</div>
  <div class="qNum">0</div>
</div>
<div id="qNow">
  <div class="qTxt">NOW</div>
  <div class="qNum">0</div>
</div>

<!-- (C) INSTRUCTIONS -->
<div id="instruct">
  Tap on "total" to issue a queue number.<br>
  Tap on "now" to move to the next queue number.
</div>
This should be pretty straightforward, there are only 3 sections on this page.
<div id="server>The current server status. Is connected or disconnected from the WebSocket server.<div id="qTotal"> <div id="qNow">Total in the queue, and the “now serving” queue number.<div id="instruct">Short instructions.
3B) ADMIN JAVASCRIPT
var adm = {
  // (A) PROPERTIES
  connected : false, // connected to websocket
  ready : false, // app ready
  hQT : null, // html queue total
  hQN : null, // html queue now
  hSS : null, // html server status

  // (B) ADMIN INIT
  init : () => {
    // (B1) GET HTML ELEMENTS
    adm.hQT = document.querySelector("#qTotal .qNum");
    adm.hQN = document.querySelector("#qNow .qNum");
    adm.hSS = document.getElementById("server");

    // (B2) ATTACH CONTROLS
    document.getElementById("qTotal").onclick = adm.issQ;
    document.getElementById("qNow").onclick = adm.nextQ;

    // (B3) CONNECT TO WEBSOCKET
    queue.connect({
      // (B3-1) ON OPEN/CLOSE/ERROR
      open : e => adm.toggle(true),
      close : e => adm.toggle(false),
      error : e => adm.toggle(false),

      // (B3-2) INIT QUEUE NUMBER
      msg : e => {
        try {
          let res = JSON.parse(e.data);
          if (res.r=="putQ") { adm.putQ(res.qt, res.qn); }
        } catch (e) {
          alert("Init error");
          console.error(e);
        }
      }
    });
  },

  // (C) TOGGLE CONNECTION STATUS
  toggle : good => {
    if (good) {
      adm.connected = true;
      adm.sc.className = "green";
      adm.st.innerHTML = "Connected";
      adm.getQ();
    } else {
      adm.connected = false;
      adm.ready = false;
      adm.sc.className = "red";
      adm.st.innerHTML = "Disconnected";
    }
  },

  // (D) REQUEST QUEUE NUMBERS UPDATE FROM SERVER
  getQ : () => { if (adm.connected) {
    queue.send("getQ");
  }},

  // (E) UPDATE HTML QUEUE NUMBERS
  putQ : (qt, qn) => { if (adm.connected) {
    adm.qtn.innerHTML = qt;
    adm.qnn.innerHTML = qn;
    adm.ready = true;
  }},

  // (F) ISSUE QUEUE NUMBER
  issQ : () => { if (adm.ready) {
    queue.send("issQ");
  }},

  // (G) NEXT!
  nextQ : () => { if (adm.ready) {
    queue.send("nextQ");
  }}
};
window.onload = adm.init;
Yikes. Big scary script once again, but a quick summary:
- (B)
init()Runs on page load. Gets all the HTML elements, connect to the WebSocket server, and updates the queue counter. - (C)
toggle()A “helper function” to update HTML “connected to server status”. - (D)
getQ()Get the current queue number from the server. - (E)
putQ()Send the current queue number to the server. - (F)
issQ()Issue a queue number (increment total in the queue by 1). - (G)
nextQ()Next customer (increment now serving by 1).
PART 4) NOW SERVING DISPLAY BOARD
4A) DISPLAY BOARD HTML
<!-- (A) CLICK TO START -->
<div id="start" onclick="board.start()">START</div>

<!-- (B) DISPLAY BOARD -->
<div id="board">
  <!-- (B1) SERVER STATUS -->
  <div id="server" class="red">Disconnected</div>

  <!-- (B2) CURRENT QUEUE NUMBER -->
  <div id="qTxt">NOW SERVING</div>
  <div id="qNum">0</div>
</div>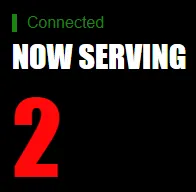
Pretty much a simplified admin panel.
<div id="start">Click on this button to start… It is necessary for the user to click at least once, so we can play the alarm sound on queue advance.<div id="server">Same old “connected to server” status.<div id="qNum">Now serving queue number.
4B) DISPLAY BOARD JAVASCRIPT
var board = {
  // (A) PROPERTIES
  connected : false, // connected to websocket
  aDD : null, // ding dong audio
  hQN : null, // html queue now
  hSS : null, // html server status

  // (B) ADMIN INIT
  init : () => {
    // (B1) PRELOAD AUDIO
    board.aDD = new Audio("ding-dong.mp3");

    // (B2) GET + TOGGLE HTML ELEMENTS
    board.hSS = document.getElementById("server");
    board.hQN = document.getElementById("qNum");
    document.getElementById("start").style.display = "none";
    document.getElementById("board").style.display = "block";

    // (B3) CONNECT TO WEBSOCKET
    queue.connect({
      // (B3-1) ON OPEN/CLOSE/ERROR
      open : e => board.toggle(true),
      close : e => board.toggle(false),
      error : e => board.toggle(false),

      // (B3-2) INIT QUEUE NUMBER
      msg : e => {
        try {
          let res = JSON.parse(e.data);
          if (res.r=="putQ") { board.putQ(res.qn); }
        } catch (e) {
          alert("Init error");
          console.error(e);
        }
      }
    });
  },

  // (C) TOGGLE CONNECTION STATUS
  toggle : good => {
    if (good) {
      board.connected = true;
      board.sc.className = "green";
      board.st.innerHTML = "Connected";
      board.getQ();
    } else {
      board.connected = false;
      board.sc.className = "red";
      board.st.innerHTML = "Disconnected";
    }
  },

  // (D) REQUEST QUEUE NUMBERS UPDATE FROM SERVER
  getQ : () => { if (board.connected) {
    queue.send("getQ");
  }},

  // (E) UPDATE HTML QUEUE NUMBERS
  putQ : qn => { if (board.connected && board.hQN.innerHTML!=qn) {
    board.hQN.innerHTML = qn;
    board.aDD.currentTime = 0;
    board.aDD.play();
  }}
};

window.onload = board.init;
Look no further, this is actually a simplified version of the admin; This only displays the current queue number, nothing else.
EXTRAS
That’s all for the tutorial, and here is a small section on some extras and links that may be useful to you.
A COUPLE OF IMPROVEMENTS
Yes, this is only a working example and foundation. There are many things you can add and customize to make it better.
- Define your own “reset queue number” algorithm… If not, it will run to very large numbers in due time.
- Probably makes sense to save the current queue number into a database or file. The queue number will not be lost when the server crashes.
- Also possible to tie in an existing user database – Send notifications when the customer’s turn nears.
- Not much of an issue if this example is within an intranet. But various security checks need to be in place if you want to put this online.
A NOTE ON DYNAMIC PROPERTIES
At the time of this update:
- PHP 8.2 has deprecated the use of dynamic properties. If you do not know what that means – Follow up with this post.
- Unfortunately, the PHP Ratchet library is still using dynamic properties and will throw “creation of dynamic property is deprecated” warnings.
- Which is why we use
error_reporting(E_ALL & ~E_DEPRECATED)to “silence it”. - Not sure if PHP Ratchet will be updated, or if later versions of PHP will throw fatal errors on dynamic properties. So, other possible “fixes”:
- Edit the Ratchet library, add
#[\AllowDynamicProperties]before all the classes. - Alternatively, extend the standard class –
Class XYZ extends stdClass. - Look into alternative libraries, most of them only work on Linux/Mac though – Workerman, Open Swoole, Laravel WebSocket
- Edit the Ratchet library, add
COMPATIBILITY CHECKS
- Arrow Functions – CanIUse
- Web Socket – CanIUse
A modern “Grade A” browser is required for this example to work correctly.
LINKS & REFERENCES
THE END
Thank you for reading, and we have come to the end. I hope that it has helped you to better understand, and if you want to share anything with this guide, please feel free to comment below. Good luck and happy coding!
May I ask why the 1-server.php does not connect the admin.php and the board.php on my virtual host even after starting it in the command prompt. I am using port 81 in my vhost configuration as it was the only one working and still uses port 8080 in 1-server.php queue server start. Total newbie here.
I cannot give you a straight answer for that – “Not working, not connecting” can be “whatever and anything”. Open the developer’s console, at least learn how to read error messages first. Good luck!
https://code-boxx.com/faq/#notwork “Not working”
https://code-boxx.com/how-to-debug-javascript/
Sir thanks to your code, I reviewed it, I have questions how you can make a server pc? with multiple connection? what is the setup of 1-php-server.php?
Thank you
Quick example, assuming it is within your local network.
1) Server – 192.168.0.100, smart TV – 192.168.0.101
2) On the server, create a virtual host on http://192.168.0.100.
3) Run 1-server.php as usual. This will deploy the endpoint at ws://192.168.0.100:8080.
4) Change 2-queue.js to ws://192.168.0.100:8080
5) Access http://192.168.0.100/4a-board.html on the smart TV. The end.
P.S. Things can get complicated depending on your network setup – Routing, assigning fixed IP, DHCP/APIPA, firewall, virtual host, etc… It’s up to you to do your own research now. Good luck.
Thanks a lot Sir, I manage to do it 🙂