Welcome to a tutorial on how to create a simple library management system using Javascript. Yes, you read that right. This example does not involve any server-side scripts at all, and will showcase how we can use modern Javascript to build an offline system – Read on!
TABLE OF CONTENTS
JAVASCRIPT LIBRARY MANAGEMENT

All right, let us now get into the details of how the Javascript library management system works.
PART 1) THE HTML
<!-- (A) ADD/EDIT MEDIA -->
<div id="libFormWrap"><form id="libForm" onsubmit="return lib.add()">
  <div id="formClose" class="mi" onclick="lib.toggle(false)">
    close
  </div>
  <input type="hidden" id="formID">
  <label>ISBN/ISSN/Serial Number</label>
  <input type="text" id="formCode" required>
  <label>Title</label>
  <input type="text" id="formTitle" required>
  <label>Author</label>
  <input type="text" id="formAuthor" required>
  <label>Location</label>
  <input type="text" id="formLoc" required>
  <input type="submit" value="Save">
</form></div>

<!-- (B) MEDIA LIST -->
<div id="libListWrap">
  <div id="libListHead">
    <h1>MEDIA LIST</h1>
    <div id="formAdd" class="mi" onclick="lib.toggle(true)">
      add
    </div>
  </div>
  <div id="libList"></div>
</div>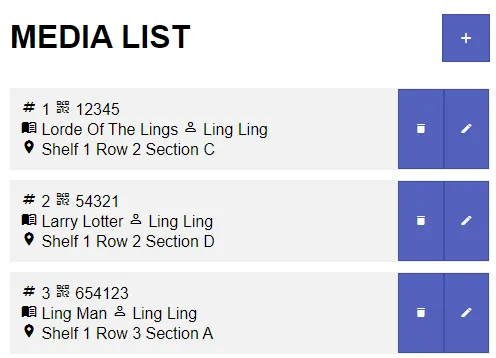
The HTML interface should be very straightforward. Just one quick note, I prefer to use the term “media” because libraries can be more than books.
- An “add/edit media” form.
- An empty
<div>to generate the list of media in the library.
PART 2) THE JAVASCRIPT
2A) INIT
var lib = {
  // (A) PROPERTIES
  // (A1) INDEXED DB
  iDB : null, iTX : null, iName : "MyLib",

  // (A2) HTML ELEMENTS
  hForm : null, hID : null, hCode : null,
  hTitle : null, hAuthor : null, hLoc : null, hList : null,

  // (B) INIT
  init : () => {
    // (B1) REQUIREMENTS CHECK - INDEXED DB
    window.indexedDB = window.indexedDB || window.mozIndexedDB || window.webkitIndexedDB || window.msIndexedDB;
    if (!window.indexedDB) {
      alert("Your browser does not support indexed database.");
      return;
    }

    // (B2) REQUIREMENTS CHECK - STORAGE CACHE
    if (!"caches" in window) {
      alert("Your browser does not support cache storage.");
      return;
    }

    // (B3) OPEN IDB
    let req = window.indexedDB.open(lib.iName, 1);

    // (B4) IDB OPEN ERROR
    req.onerror = evt => {
      alert("Indexed DB init error - " + evt.message);
      console.error(evt);
    };

    // (B5) IDB UPGRADE NEEDED
    req.onupgradeneeded = evt => {
      lib.iDB = evt.target.result;

      // (B5-1) IDB UPGRADE ERROR
      lib.iDB.onerror = evt => {
        alert("Indexed DB upgrade error - " + evt.message);
        console.error(evt);
      };

      // (B5-2) IDB VERSION 1
      if (evt.oldVersion < 1) {
        let store = lib.iDB.createObjectStore(lib.iName, {
          keyPath: "id",
          autoIncrement: true
        });
        store.createIndex("code", "code");
        store.createIndex("title", "title");
        store.createIndex("author", "author");
      }
    };

    // (B6) IDB OPEN OK
    req.onsuccess = evt => {
      // (B6-1) IDB OBJECTS
      lib.iDB = evt.target.result;
      lib.iTX = () => {
        return lib.iDB
        .transaction(lib.iName, "readwrite")
        .objectStore(lib.iName);
      };

      // (B6-2) GET HTML ELEMENTS
      lib.hForm = document.getElementById("libFormWrap");
      lib.hID = document.getElementById("formID");
      lib.hCode = document.getElementById("formCode");
      lib.hTitle = document.getElementById("formTitle");
      lib.hAuthor = document.getElementById("formAuthor");
      lib.hLoc = document.getElementById("formLoc");
      lib.hList = document.getElementById("libList");

      // (B6-3) DRAW BOOKS LIST
      lib.draw();
    };
  },
  // ...
};
window.addEventListener("DOMContentLoaded", lib.init);
Captain Obvious at your service, lib.init() runs on window load, and it initializes the web app. This seems massive at first, but I will leave it as it is… This checks if the browser supports indexed databases, and sets up a “library media” database. I will leave a link below if you want to learn more about indexed databases.
2B) TOGGLE ADD/EDIT HTML FORM
// (C) TOGGLE ADD/EDIT MEDIA FORM
toggle : id => {
  // (C1) HIDE FORM
  if (id == false) {
    lib.hID.value = "";
    lib.hCode.value = "";
    lib.hTitle.value = "";
    lib.hAuthor.value = "";
    lib.hLoc.value = "";
    lib.hForm.classList.remove("show");
  }

  // (C2) SHOW FORM
  else {
    // (C2-1) "EDIT" MODE
    if (Number.isInteger(id)) {
      let req = lib.iTX().get(id);
      req.onsuccess = (evt) => {
        lib.hID.value = id;
        lib.hCode.value = req.result.code;
        lib.hTitle.value = req.result.title;
        lib.hAuthor.value = req.result.author;
        lib.hLoc.value = req.result.location;
      };
    }

    // (C2-2) SHOW FORM
    lib.hForm.classList.add("show");
  }
},
Nothing much here, lib.toggle() is a helper function to show and hide the HTML add/edit media form. Just take note if the id parameter.
id == falseClear the form and hide it.id == trueSimply show the form.id == NUMBERThis is for “edit mode”. Get theidfrom the database, populate the form, and show it.
2C) ADD & DELETE BOOKS
// (D) ADD A NEW BOOK
add : () => {
  // (D1) DATA TO SAVE
  let data = {
    id : lib.hID.value,
    code : lib.hCode.value,
    title : lib.hTitle.value,
    author : lib.hAuthor.value,
    location : lib.hLoc.value
  };

  // (D2) SAVE OR UPDATE
  if (data.id == "") {
    delete data.id;
    lib.iTX().add(data);
  } else {
    data.id = parseInt(data.id);
    lib.iTX().put(data);
  }

  // (D3) DONE
  lib.toggle(false);
  lib.draw();
  return false;
},

// (E) DELETE ENTRY
del : id => { if (confirm(`Delete ${id}?`)) {
  // (E1) DELETE BOOK
  lib.iTX().delete(id);

  // (E2) REDRAW LIST
  lib.draw();
}},
Once again, we are not going into nitty little details on “how to store data in an indexed database”. But just a quick note that library books have the following “data structure”:
{
  id : PRIMARY KEY,
  code : ISBN, IISN, or any self-assigned "code",
  title : Title of the media,
  author : Author of the media,
  location : Where the media is currently kept
}
Feel free to add more fields as required. For those who are new, indexed databases are literally just “object stores”. There is no “data structure” restrictions like relational databases, they will save the data so long as it is a valid object. Does not matter what fields they have/don’t have.
2D) DRAW THE MEDIA LIST
// (F) DRAW BOOKS LIST
draw : () => {
  lib.hList.innerHTML = "";
  lib.iTX().getAll().onsuccess = evt => { for (let book of evt.target.result) {
    let row = document.createElement("div");
    row.className = "row";
    row.innerHTML = `<div class="binfo">
      <div>
        <i class="mi">numbers</i> ${book.id}
        <i class="mi">qr_code_2</i> ${book.code}
      </div>
      <div>
        <i class="mi">menu_book</i> ${book.title}
        <i class="mi">person_outline</i> ${book.author}
      </div>
      <i class="mi">room</i> ${book.location}
    </div>
    <input type="button" class="mi" value="delete" onclick="lib.del(${book.id})">
    <input type="button" class="mi" value="edit" onclick="lib.toggle(${book.id})">`;
    lib.hList.appendChild(row);
  }};
}
Lastly, this will extract all the book entries from the indexed database and draw them in HTML rows.
PART 3) PROGRESSIVE WEB APP
3A) HTML HEADERS
<!-- ANDROID + CHROME + APPLE + WINDOWS APP -->
<meta name="mobile-web-app-capable" content="yes">
<meta name="theme-color" content="white">
<link rel="apple-touch-icon" href="icon-512.png">
<meta name="apple-mobile-web-app-capable" content="yes">
<meta name="apple-mobile-web-app-status-bar-style" content="black">
<meta name="apple-mobile-web-app-title" content="Lib Manager">
<meta name="msapplication-TileImage" content="icon-512.png">
<meta name="msapplication-TileColor" content="#ffffff">
<!-- WEB APP MANIFEST -->
<!-- https://web.dev/add-manifest/ -->
<link rel="manifest" href="3-manifest.json">
<!-- SERVICE WORKER -->
<script>
if ("serviceWorker" in navigator) {
navigator.serviceWorker.register("4-worker.js");
}
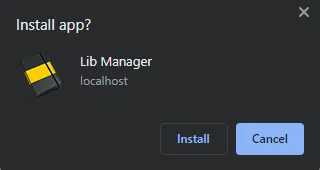
</script>At this stage, we already have a fully functioning basic app. To level up and turn this into an “installable offline progressive web app”, all we need are a few things. In the <head> section of the HTML page:
- We define the app icon for Android/iOS/Windows. This is kind of a pain as everyone has a different standard. So I just provided a huge 512X512 icon, and let the platforms resize it themselves.
- Define a web app manifest.
- Install a service worker.
3B) WEB MANIFEST
{
  "short_name": "Lib",
  "name": "Lib Manager",
  "icons": [{
    "src": "favicon.png",
    "sizes": "64x64",
    "type": "image/png"
  }, {
    "src": "icon-512.png",
    "sizes": "512x512",
    "type": "image/png"
  }],
  "start_url": "1-js-lib.html",
  "scope": "/",
  "background_color": "white",
  "theme_color": "white",
  "display": "standalone"
}
A “manifest” simply contains information on the web app itself – The app name, icon, which page to start, theme, etc…
3C) SERVICE WORKER
// (A) CREATE/INSTALL CACHE
self.addEventListener("install", evt => {
  self.skipWaiting();
  evt.waitUntil(
  caches.open("JSLibMgr")
    .then(cache => cache.addAll([
      "favicon.png",
      "icon-512.png",
      "maticon.woff2",
      "1-js-lib.html",
      "2-js-lib.js",
      "2-js-lib.css"
    ]))
    .catch(err => console.error(err))
  );
});

// (B) CLAIM CONTROL INSTANTLY
self.addEventListener("activate", evt => self.clients.claim());

// (C) LOAD FROM CACHE FIRST, FALLBACK TO NETWORK IF NOT FOUND
self.addEventListener("fetch", evt => evt.respondWith(
  caches.match(evt.request).then(res => res || fetch(evt.request))
));
For those who have never heard of “service worker” before, it is basically a piece of Javascript that runs in the background. For this simple worker:
- (A) We save all the related library management files into the browser’s cache.
- (C) “Hijack” the fetch requests. Load files from the cache first, then fall back to the network if not found in the cache.
In other words, this worker script will support offline capabilities – Run the app off the browser cache, not from the network.
DOWNLOAD & NOTES

Here is the download link to the example code, so you don’t have to copy-paste everything.
SORRY FOR THE ADS...
But someone has to pay the bills, and sponsors are paying for it. I insist on not turning Code Boxx into a "paid scripts" business, and I don't "block people with Adblock". Every little bit of support helps.
Buy Me A Coffee Code Boxx eBooks
EXAMPLE CODE DOWNLOAD
Click here for the source code on GitHub gist, just click on “download zip” or do a git clone. I have released it under the MIT license, so feel free to build on top of it or use it in your own project.
EXTRA BITS & LINKS

That’s all for the tutorial, and here is a small section on some extras and links that may be useful to you.
RESTRICTIONS & MORE NOTES
My developer senses are tingling. I can hear the trolls screaming “this is not a complete system”! Of course, this is only a tutorial.
- There are no server-side databases and processing involved, all data is stored on the user’s device itself.
- This system is only good for a single device, or as a personal library manager.
- If you want to open the books for borrowing, it is possible to add an “on loan” flag to the data structure. Then, update the HTML interface accordingly.
- Can’t run away from server-side scripts and databases if you want a “full-fledged library system with admin, users, members, and login”.
COMPATIBILITY CHECKS
- Arrow Functions – CanIUse
- Service Worker – CanIUse
- Add To Home Screen – CanIUse
- Indexed Database – CanIUse
This example will only work on most modern browsers.
LINKS & REFERENCES
- IndexedDB API – MDN
THE END

Thank you for reading, and we have come to the end. I hope that it has helped you to better understand, and if you want to share anything with this guide, please feel free to comment below. Good luck and happy coding!