Welcome to a step-by-step tutorial on how to get started with WebAssembly (WASM for short). Ever since the launch of WASM in 2017, it has created quite a stir in the web development world – From excited code ninjas to demented “the end of Javascript is here” doomsayers. In any case, this is something worth looking into.
The overly simplified steps to work with WebAssembly are:
- Install Emscripten on your computer.
- Create your C, C++, or Rust code.
- Compile into WASM module with Emscripten.
- Glue-code the compiled WASM into an HTML page and serve it straight through HTTP.
But just how exactly are these done? Read on to write your first “Hello World” WASM application!
ⓘ I have included a zip file with all the example source code at the start of this tutorial, so you don’t have to copy-paste everything… Or if you just want to dive straight in.
TLDR – QUICK SLIDES
[web_stories_embed url=”https://code-boxx.com/web-stories/get-started-with-web-assembly/” title=”Get Started With Web Assembly” poster=”https://code-boxx.com/wp-content/uploads/2023/02/STORY-JS-R4.webp” width=”360″ height=”600″ align=”center”]
Fullscreen Mode – Click Here
TABLE OF CONTENTS
DOWNLOAD & NOTES

Firstly, here is the download link to the example code as promised.
QUICK NOTES
If you spot a bug, feel free to comment below. I try to answer short questions too, but it is one person versus the entire world… If you need answers urgently, please check out my list of websites to get help with programming.
EXAMPLE CODE DOWNLOAD
Click here to download the source code, I have released it under the MIT license, so feel free to build on top of it or use it in your own project.
WEB ASSEMBLY BASICS

Before we go into the code stuff, let us start with some boring basics and the background of WebAssembly – Feel free to skip if you already know.
WHAT IS WEB ASSEMBLY?
WebAssembly (abbreviated Wasm) is a binary instruction format for a stack-based virtual machine. Wasm is designed as a portable compilation target for programming languages, enabling deployment on the web for client and server applications.
– Official definition from WebAssembly.org
In simple terms, allowing Javascript to run a piece of compiled code.
INTERPRETED VS COMPILED
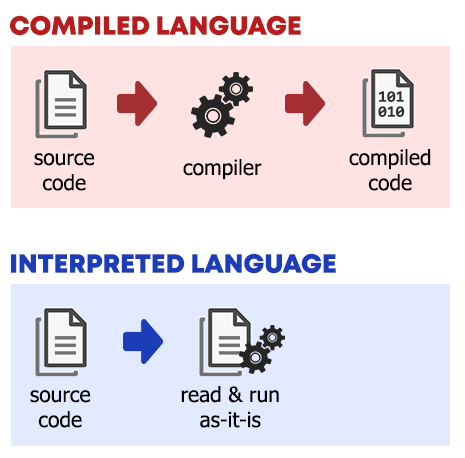
Just what does “running compiled code in Javascript” mean? For the uninitiated:
- Interpreted Language – The source code is read “as it is” and executed on the fly. Examples of interpreted languages include Javascript, Python, PHP, and Perl.
- Compiled Language – The source code has to be first compiled into lower-level “machine code”. Examples of compiled languages include Java, C, C++, and RUST.
SO WHY WEB ASSEMBLY?
Some of you should be very confused now. Why so much trouble to “integrate” another programming language into Javascript?
- Because Javascript is an interpreted language, the performance is not on the same level as a “natively compiled app”.
- As web applications become more demanding these days, web assembly became a viable option to boost the performance of web apps.
- There are also concerns with security – Javascript code is visible to everyone, but compiled code is difficult to reverse engineer.
“HELLO WORLD” WEB ASSEMBLY

Now that you have a good idea of what WASM is, let us get started with actually building the mandatory “hello world” app.
STEP 1) INSTALL EMSCRIPTEN
1A) PREREQUISITES – PYTHON
Python is required, download from their official website if you have not already done so.
1B) DOWNLOAD EMSCRIPTEN
There are 2 ways to get Emscripten.
- If you have GIT installed, just run
git clone https://github.com/emscripten-core/emsdk.git. - Alternatively, you can also directly download it from Github as a zip file.
1C) DOWNLOAD THE TOOLCHAIN
Sadly, the copy that you have just downloaded is only the core… We still need to get the SDK tools manually. So next, fire up the terminal, navigate to the folder where you installed Emscripten, and run the following:
cd WHERE/YOU/INSTALLED/EMSCRIPTEN
emsdk update
emsdk install latest
emsdk activate latest
emsdk_env.bat
emcmdprompt.batcd WHERE/YOU/INSTALLED/EMSCRIPTEN
./emsdk install latest
./emsdk activate latest
source ./emsdk_env.shP.S. If you get a “Python was not found” error, the system path is most probably not set properly. Do some research on your own.
STEP 2) WRITE CODE (IN C, C++, OR RUST)
#include <stdio.h>
int main(int argc, char ** argv) {
  printf("Hello world!\n");
}
The installation nightmare is over, and now for the simple “Hello World in C”. For you guys who have not touched on C before, here is a quick layman explanation:
#include <stdio.h>Include the “standard input-output” library. Without this, the app will be “mute” and cannot even output the “Hello World” text.int main()This main function will run upon launch.printf("Hello world!")Don’t think this one needs an explanation.
STEP 3) COMPILE
To compile the “hello world” script into a WASM file:
emcc 2-hello-world.c -s WASM=1 -o hello-world.html-s WASM=1Specify that we want a WASM file output.-o hello-world.htmlGenerate the HTML page as well, with the Javascript “Glue Code” all done up nicely.
STEP 4) LAUNCH!
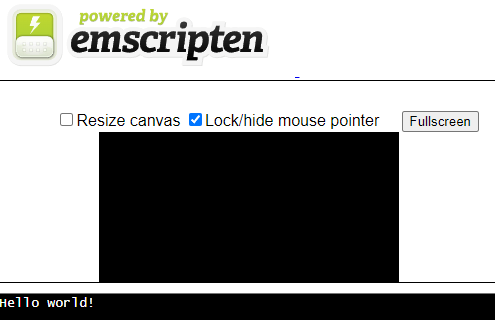
Finally, just access the generated hello-world.html in your web browser. Congratulations – You have created your first WASM application!
P.S. Use http:// not file://. Alternatively, you can use Emscripten’s built-in simple HTTP server – emrun --no_browser --port 8080 hello-world.html. But take note, you will need to recompile the code with the --emrun linker flag.
EXTRA BITS & LINKS

Well done, code ninja! Even though this is only one step, you have already successfully created your first WASM application. Here is a small section on some extras and links that may be useful to you.
CAN WASM, JS, HTML TALK WITH EACH OTHER?
Yes. If you poke around on the demo HTML page above – The “Hello World” output from the WASM application is placed into an HTML <textarea>. If you have GUI components, they will be rendered into an HTML <canvas>. It works the other way as well, we can call the WASM function through Javascript.
WHAT ARE THE POSSIBLE USES?
Sadly, WebAssembly still doesn’t seem to be too widely adopted at the time of writing. But the gaming industry is having a blast with the improved performance – List of WebAssembly Games on HackerNoon. The possibilities are endless though – Online Word Processors, Spreadsheets, Presentation Slides, Photo Editors, Video Editing, etc…
LINKS & REFERENCES
That’s all for this tutorial, and you probably still have a ton of burning questions – How exactly do we “glue” the Javascript and WASM together? How do we customize the HTML page? How do we call WASM functions? Well, take it easy, and here are a couple of good links to check out.
- WebAssembly Tutorial on MDN.
- Emscripten
- Webassembly.org
- Tutorialspoint – C, C++, Rust.
INFOGRAPHIC CHEAT SHEET

THE END

Thank you for reading, and we have come to the end. I hope that it has helped you to better understand, and if you want to share anything with this guide, please feel free to comment below. Good luck and happy coding!
Excellent tutorial, thank you W.S. Toh! //Mark