Welcome to a tutorial on how to send an email with an HTML template in NodeJS. If you have already done some research, everybody has a different solution for “HTML email template in NodeJS”. Here’s a quick compilation of the common ones, and a few simple examples of my own – Read on!
TABLE OF CONTENTS
DOWNLOAD & NOTES
Here is the download link to the example code, so you don’t have to copy-paste everything.
EXAMPLE CODE DOWNLOAD
The example code is released under the MIT license, so feel free to build on top of it or use it in your own project.
SORRY FOR THE ADS...
But someone has to pay the bills, and sponsors are paying for it. I insist on not turning Code Boxx into a "paid scripts" business, and I don't "block people with Adblock". Every little bit of support helps.
Buy Me A Coffee Code Boxx eBooks
NODEJS EMAIL WITH TEMPLATE
All right, let us now get into the examples of sending emails with an HTML template in NodeJS.
TUTORIAL VIDEO
1) STRING REPLACE
1A) HTML TEMPLATE
<html><body>
  <h1>Hi {name}!</h1>
  <p>This message is sent at {time}.</p>
</body></html>
This should be self-explanatory. Just the “regular HTML”, but replace variables enclosed in curly brackets – {VARIABLE}.
1B) NODEJS EMAIL SCRIPT
// (A) HTML TEMPLATE & NODE MAILER
const template = require("fs").readFileSync("1a-template.html", "utf8"),
mailer = require("nodemailer").createTransport({
  host: "127.0.0.1",
  port: 25
});

// (B) "MAILING LIST"
[
  ["Joa Doe", "joa@doe.com"],
  ["Job Doe", "job@doe.com"]
].forEach(person => {
  // (B1) MAIL MESSAGE
  let message = {
    from: "sys@site.com",
    to: person[1],
    subject: "Demo",
    html: template
  };
  message.html = message.html.replace("{name}", person[0]);
  message.html = message.html.replace("{time}", new Date().toString());

  // (B2) SEND
  mailer.sendMail(message, (error, info) => console.log("Message sent"));
});- Install Nodemailer before running this script –
npm install nodemailer - (A) Read the HTML template as a string, and initialize Nodemailer.
- (B) Loop through the list of recipients, and send the email accordingly. Yes, we are just doing a simple string replace here.
P.S. I am using a “lazy passwordless local SMTP” for testing here. Remember to change the Nodemailer transport settings to your own – Host, port, secure, TLS, user/password, etc… I will leave a link to the official documentation below.
2) TEMPLATE LITERAL
// (A) NODE MAILER
const mailer = require("nodemailer").createTransport({
  host: "127.0.0.1",
  port: 25
});

// (B) "MAILING LIST"
[
  ["Joe Doe", "joe@doe.com"],
  ["Joh Doe", "joh@doe.com"]
].forEach(person => {
  // (B1) MAIL MESSAGE
  let message = {
    from: "sys@site.com",
    to: person[1],
    subject: "Demo",
    html: `<html><body>
      <h1>Hi ${person[0]}!</h1>
      <p>This message is sent at ${new Date().toString()}.</p>
    </body></html>`
  };

  // (B2) SEND
  mailer.sendMail(message, (error, info) => console.log("Message sent"));
});
This is pretty much the same as the previous example, except that we are using template literals now. Beginners, do your own research on “Javascript template literals” – You are missing out on “good stuff” if you do not know what this is.
3) EJS
3A) HTML TEMPLATE
<html><body>
  <h1>Hi <%=name%>!</h1>
  <p>This message is sent at <%=time%>.</p>
</body></html>
For those who have not heard, EJS is a popular template engine in NodeJS. Will leave links below if you want to learn more about this template system.
3B) NODEJS EMAIL SCRIPT
// (A) EJS + NODE MAILER
const ejs = require("ejs"),
mailer = require("nodemailer").createTransport({
  host: "127.0.0.1",
  port: 25
});

// (B) "MAILING LIST"
[
  ["Joi Doe", "joi@doe.com"],
  ["Jol Doe", "jol@doe.com"]
].forEach(person => {
  // (B1) MAIL MESSAGE
  ejs.renderFile(
    "3a-template.ejs", {
      name: person[0],
      time : new Date().toString()
    },

    // (B2) SEND
    (error, message) => {
      mailer.sendMail({
        from: "sys@site.com",
        to: person[1],
        subject: "Demo",
        html: message
      }, (error, info) => console.log("Message sent"));
    }
  );
});- EJS is required for this example –
npm install ejs - (A) Load EJS and initialize Nodemailer as usual.
- (B) Loop through the list of recipients. Use EJS to render the HTML template, then send it out.
4) EXPRESS HANDLEBARS
4A) HTML TEMPLATE
<html><body>
  <h1>Hi {{name}}!</h1>
  <p>This message is sent at {{time}}.</p>
</body></html>
Finally, we have yet another common template system called “Express Handlebars”. Will leave links below.
4B) NODEJS EMAIL SCRIPT
// (A) HANDLEBARS & MAILER
const path = require("path"),
hb = require("nodemailer-express-handlebars"),
mailer = require("nodemailer").createTransport({
  host: "127.0.0.1",
  port: 25
});

// (B) USE HANDLEBAR
mailer.use("compile", hb({
  viewEngine: {
    partialsDir: path.resolve("./"),
    defaultLayout: false,
  },
  viewPath: path.resolve("./")
}));

// (C) "MAILING LIST"
[
  ["Jon Doe", "joi@doe.com"],
   ["Joy Doe", "jol@doe.com"]
].forEach(person => {
  mailer.sendMail({
    from: "sys@site.com",
    to: person[1],
    subject: "Demo",
    template: "4a-template",
    context : {
      name: person[0],
      time : new Date().toString()
    }
  }, (error, info) => console.log("Message sent"));
});
A little bit different from the above examples, but you should be an expert by now…
- This example needs
npm install nodemailer-express-handlebars - (A) Load Handlebars and initialize Nodemailer.
- (B) Set Nodemailer to use the Handlebars template.
- (C) Loop through the list of recipients, and send out the emails.
EXTRAS
That’s all for the tutorial, and here is a small section on some extras and links that may be useful to you.
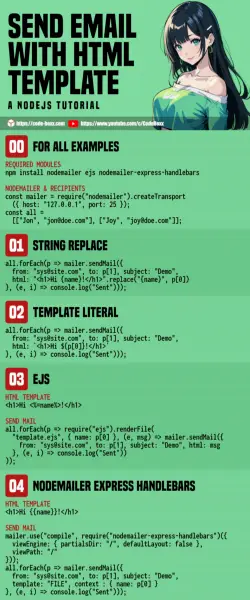
INFOGRAPHIC CHEATSHEET

LINKS & REFERENCES
- Nodemailer SMTP Transport
- EJS – Embedded Javascript Templating
- Nodemailer Handlebars
- Express Handlebars
THE END
Thank you for reading, and we have come to the end. I hope that it has helped you to better understand, and if you want to share anything with this guide, please feel free to comment below. Good luck and happy coding!
