Welcome to a tutorial on how to send an email with an HTML template in Python. So you want to send an email, but use an HTML file as the template? Here are a few common ways to do it – Read on!
TABLE OF CONTENTS
DOWNLOAD & NOTES
Here is the download link to the example code, so you don’t have to copy-paste everything.
EXAMPLE CODE DOWNLOAD
The example code is released under the MIT license, so feel free to build on top of it or use it in your own project.
SORRY FOR THE ADS...
But someone has to pay the bills, and sponsors are paying for it. I insist on not turning Code Boxx into a "paid scripts" business, and I don't "block people with Adblock". Every little bit of support helps.
Buy Me A Coffee Code Boxx eBooks
EMAIL WITH HTML TEMPLATE
All right, let us now get into examples of sending an email with an HTML template in Python.
TUTORIAL VIDEO
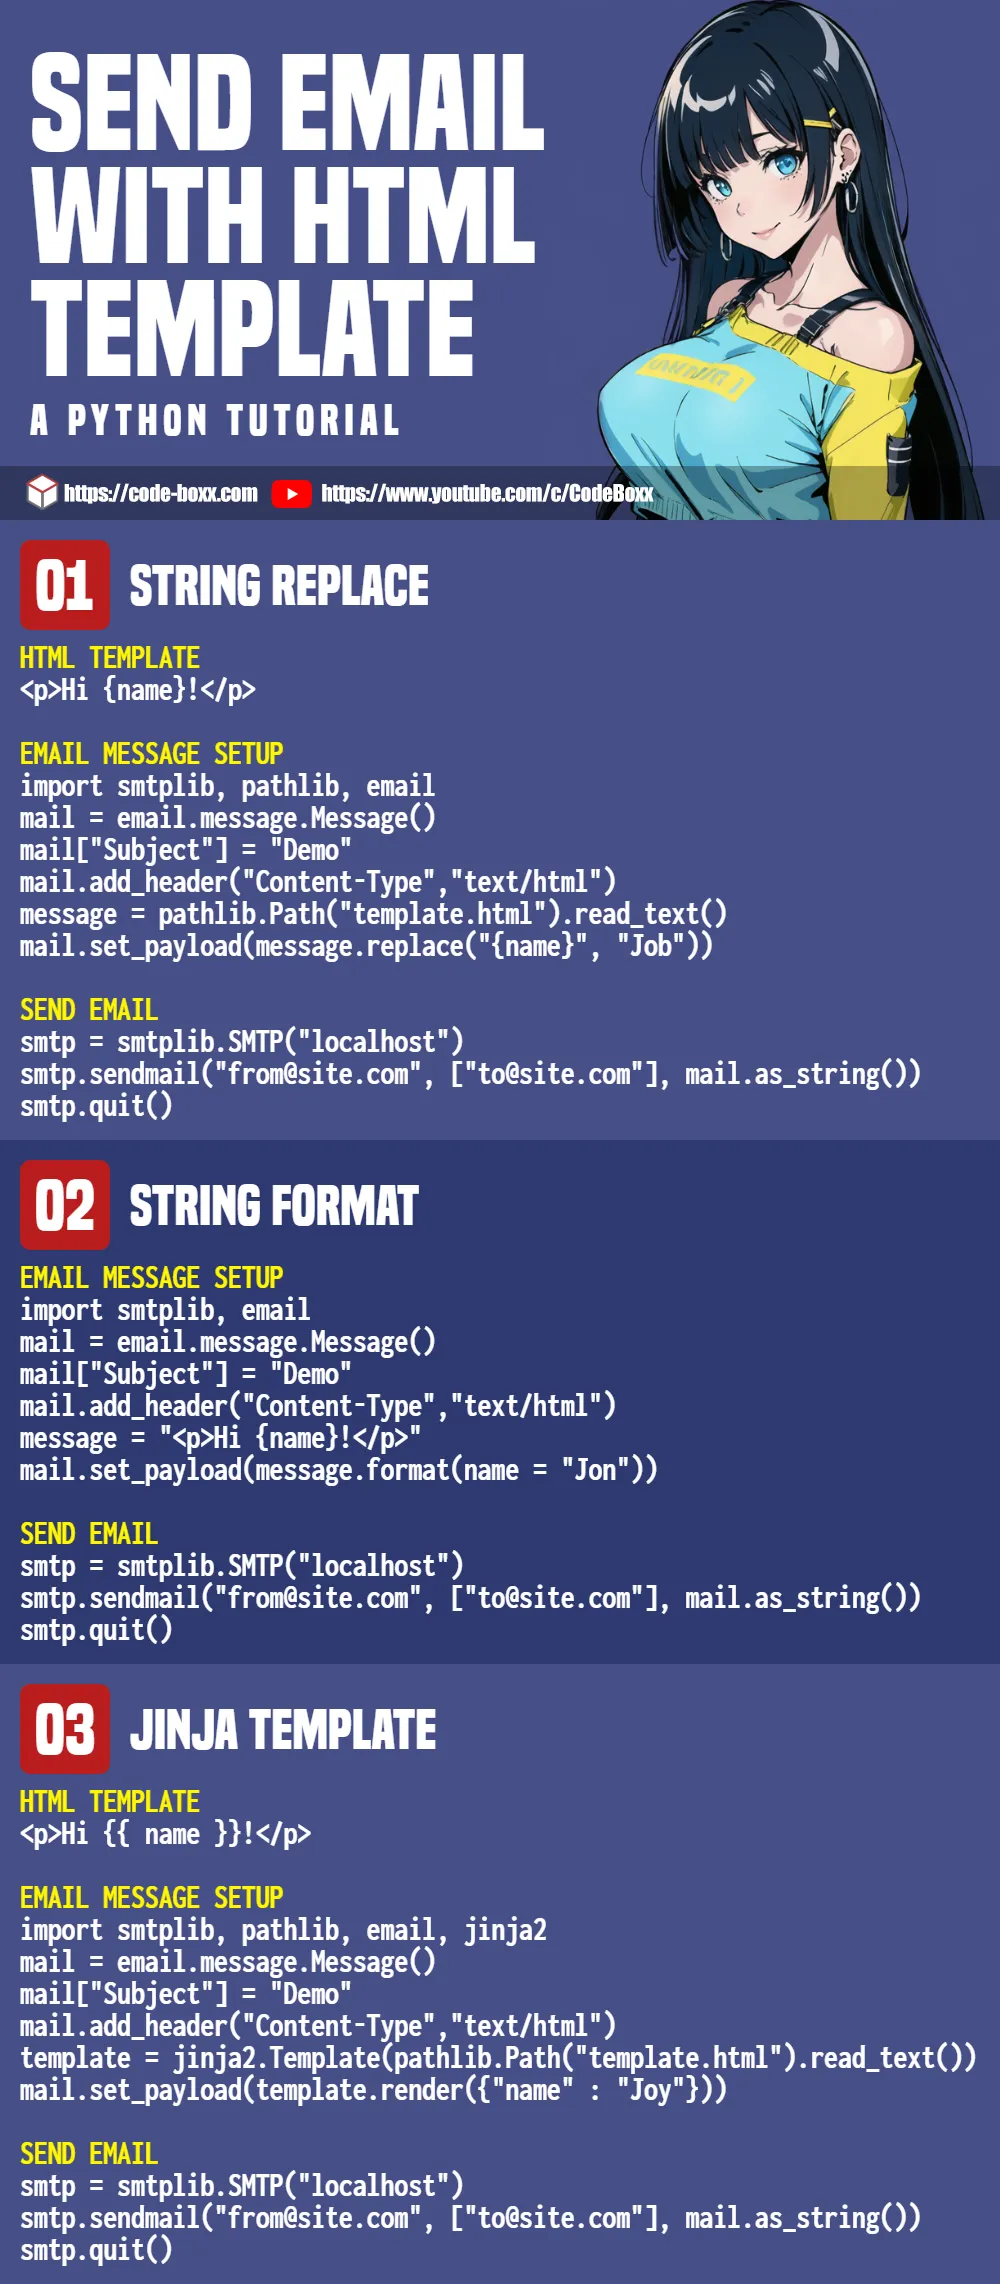
EXAMPLE 1) USING STRING REPLACE
1A) HTML TEMPLATE
<html><body>
  <p>Hi {name}!</p>
  <p>Sent at <strong>{time}</strong>.</p>
</body></html>
This is just the “usual HTML”, but replace all variables with a pair of curly brackets – {VARIABLE}.
1B) STRING REPLACE
# (A) LOAD MODULES
import smtplib, pathlib, email, datetime

# (B) READ TEMPLATE & REPLACE VARIABLES
message = pathlib.Path("M1A_template.html").read_text()
message = message.replace("{name}", "Job Doe")
message = message.replace("{time}", datetime.datetime.now().strftime("%Y-%m-%d %H:%M:%S"))

# (C) EMAIL MESSAGE SETUP
mail = email.message.Message()
mail["Subject"] = "Demo"
mail.add_header("Content-Type","text/html")
mail.set_payload(message)

# (D) SEND!
smtp = smtplib.SMTP("localhost")
#smtp.starttls()
#smtp.login(USER, PASSWORD)
smtp.sendmail("from@site.com", ["to@site.com"], mail.as_string())
smtp.quit()- Load the necessary modules.
- Read the entire HTML file as a string, then replace all the
{VARIABLE}. - Set the email message.
- Send the email out. Remember to change the SMTP server to your own, and set the user/password where necessary.
EXAMPLE 2) USING STRING FORMAT
2A) HTML TEMPLATE
message = """<html><body>
  <p>Hi {name}!</p>
  <p>Sent at <strong>{time}</strong>.</p>
</body></html>"""
Take note that this is a Python script. The HTML template is defined as a message string, with the variables enclosed in curly brackets {VARIBLES} – Otherwise also known as “String Formatting”, and will only work with Python 3.
2B) STRING FORMAT
# (A) LOAD MODULES
import smtplib, email, datetime
import M2A_template as etemp

# (B) EMAIL MESSAGE SETUP
mail = email.message.Message()
mail["Subject"] = "Demo"
mail.add_header("Content-Type","text/html")
mail.set_payload(etemp.message.format(
  name = "Jon Doe",
  time = datetime.datetime.now().strftime("%Y-%m-%d %H:%M:%S")
))

# (C) SEND!
smtp = smtplib.SMTP("localhost")
#smtp.starttls()
#smtp.login(USER, PASSWORD)
smtp.sendmail("from@site.com", ["to@site.com"], mail.as_string())
smtp.quit()- Load the necessary modules, and also the email template.
- Just use string format to insert variables into the template.
- Send the email.
EXAMPLE 3) USING JINJA TEMPLATE
3A) HTML TEMPLATE
<html><body>
  <p>Hi {{ name }}!</p>
  <p>Sent at <strong>{{ time }}</strong>.</p>
</body></html>
For beginners who have not heard of “Jinja”, it is a popular web template engine. In this example, we only placed variables enclosed in 2 curly brackets {{ VARIABLE }}. But Jinja is a lot more capable than just “replace variables”, I will leave links below if you want to learn more about Jinja.
3B) STRING FORMAT
# (A) LOAD MODULES
import smtplib, pathlib, email, jinja2, datetime

# (B) EMAIL MESSAGE SETUP
mail = email.message.Message()
mail["Subject"] = "Demo"
mail.add_header("Content-Type","text/html")
template = jinja2.Template(pathlib.Path("M3A_template.html").read_text())
mail.set_payload(template.render({
  "name" : "Joy Doe",
  "time" : datetime.datetime.now().strftime("%Y-%m-%d %H:%M:%S")
}))

# (C) SEND!
smtp = smtplib.SMTP("localhost")
#smtp.starttls()
#smtp.login(USER, PASSWORD)
smtp.sendmail("from@site.com", ["to@site.com"], mail.as_string())
smtp.quit()
Pretty much the same story again, but we use Jinja to load and render the HTML template.
EXTRAS
That’s all for the tutorial, and here is a small section on some extras and links that may be useful to you.
INFOGRAPHIC CHEATSHEET
LINKS & REFERENCES
THE END
Thank you for reading, and we have come to the end. I hope that it has helped you to better understand, and if you want to share anything with this guide, please feel free to comment below. Good luck and happy coding!