Welcome to a tutorial on how to create an offline digital signage with HTML and Javascript. Yes, anyone can make a webpage with drag-and-drop builders these days. Then, just access it on a smart TV and call it “digital signage”. But let’s create a modern and robust signage web app in this guide – Read on!
TABLE OF CONTENTS
DOWNLOAD & NOTES
Here is the download link to the example code, so you don’t have to copy-paste everything.
EXAMPLE CODE DOWNLOAD
The example code is released under the MIT license, so feel free to build on top of it or use it in your own project.
TLDR & NOTES
This is not a newbie-friendly project/tutorial. But a good case study for progressive web apps (PWA) nonetheless. To get this example to “work properly”:
- You need an HTTP server. If you are using Chrome, the easiest way is to just install an extension called “Web Server for Chrome“.
- Unzip the project files into your HTTP folder.
- Start the web server, access
http://localhost/signage.html, and engage in fullscreen mode. - Take note, the demo slides are made for portrait orientation.
SORRY FOR THE ADS...
But someone has to pay the bills, and sponsors are paying for it. I insist on not turning Code Boxx into a "paid scripts" business, and I don't "block people with Adblock". Every little bit of support helps.
Buy Me A Coffee Code Boxx eBooks
OFFLINE DIGITAL SIGNAGE
All right, let us now get into the details of building a digital signage progressive web app – Just visit the webpage once, install it, and it can run without access to the server.
TUTORIAL VIDEO
PART 1) BASIC PROJECT FOLDERS
There are only 2 folders for this project.
assetsPublic images, video, JS, CSS, fonts, etc…slidesPut your HTML slides in here.
PART 2) THE SLIDES
<script>parent.signage.stime = 3000;</script>
<style>
/* (A) WHOLE PAGE - THIS PAGE IS BUILT FOR PORTAIT ORIENTATION */
* { box-sizing: border-box; }
body {
  padding: 0; margin: 0; overflow: hidden;
  width: 100vw; height: 100vh;
  background: url("http://localhost/assets/pizza.webp") center no-repeat;
  background-size: cover;
}

/* (B) TEXT POSITION */
#text {
  font-family: Impact, Haettenschweiler, 'Arial Narrow Bold', sans-serif;
  font-size: 1.5em; color: #fff;
  position: relative; top: 50px;
  text-align: center; text-shadow: black 0 0 5px;
}
</style>

<div id="text">
  <h1>PINEAPPLE PIZZA</h1>
  <div>so good, the italians will cry!</div>
</div>
The first step of the project is to create the slides.
- All the slides are just HTML files. Design them however you wish.
- Place inside the
slidesfolder in running order –1.html,2.html, etc… - All images, videos, fonts, and scripts are to be placed inside the
assetsfolder. - The only “requirement” is to define a
parent.signage.stime = 3000at the top – This specifies how long to show this slide, in microseconds.
PART 3) ASSETS LIST
[
  3,
  "pizza.webp",
  "pie.webp",
  "bubble-tea.gif"
]
Once the slides are created, we will need a JSON file to list all the assets used.
- The first number is the total number of slides. I.E. This example has 3 slides.
- Followed by all the images, videos, fonts, scripts, etc…
Well, server-side scripts can automatically extract all the assets used. But since we are not dealing server-side here, it is what it is – This has to be done manually.
PART 4) SIGNAGE PAGE
4A) THE HTML & CSS
<iframe id="slides"></iframe>* { box-sizing: border-box; }
body { padding: 0; margin: 0; overflow: hidden; }
#slides { width: 100vw; height: 100vh; border: 0; }So far so good? With the slides in place, we can now build the “main signage app”… Which is pretty much just an <iframe> that rotates through the slides.
4B) THE JAVASCRIPT
var signage = {
  // (A) PROPERTIES
  cname : "scache", // storage cache name
  hslides : null,   // html iframe
  now : 0,          // current slide
  stime : null,     // time to display current slide
  timer : null,     // current slide timer

  // (B) INIT
  init : async () => {
    // (B1) REGISTER SERVICE WORKER
    navigator.serviceWorker.register("worker.js");

    // (B2) GET HTML IFRAME
    signage.hslides = document.getElementById("slides");

    // (B3) "INSTALL" ASSETS CACHE
    if (!await caches.has(signage.cname)) {
      fetch("cache.json")
      .then(r => r.json())
      .then(async f => {
        // (B3-1) ASSETS
        for (let i=0; i<f.length; i++) {
          if (i==0) { continue; }
          f[i] = `assets/${f[i]}`;
        }

        // (B3-2) SLIDES
        localStorage.setItem("slides", f[0]);
        for (let i=1; i<=f[0]; i++) {
          f.push(`slides/${i}.html`);
        }
        f.shift();

        // (B3-3) SIGNAGE APP ITSELF
        f.push(
          "manifest.json",
          "signage.html", "signage.css", "signage.js",
          "assets/favicon.png", "assets/icon-512.png"
        );

        // (B3-4) CREATE CACHE
        (await caches.open(signage.cname)).addAll(f);
        signage.run();
      });
    } else { signage.run(); }
  },

  // (C) RUN SLIDES
  run : () => {
    // (C1) STOP TIMER + NEXT SLIDE
    if (signage.timer) { clearTimeout(signage.timer); }
    signage.now++;
    if (signage.now > localStorage.getItem("slides")) { signage.now = 1; }

    // (C2) ON SLIDE LOAD - START TIMER
    if (localStorage.getItem("slides") > 1) {
      signage.hslides.onload = () => {
        signage.timer = setTimeout(signage.run, signage.stime);
      };
    }

    // (C3) GO!
    signage.hslides.src = `slides/${signage.now}.html`;
  },

  // (D) FLUSH CACHE
  // run this in the console - signage.flush()
  flush : async () => {
    if (await caches.has(signage.cname)) {
      await caches.delete(signage.cname);
    }
  }
};

// (E) INIT SIGNAGE
window.addEventListener("DOMContentLoaded", signage.init);
There’s quite a bit going on here, but the key mechanics are:
- (E, B1) On window load, register a service worker – Will walk through more below.
- (B3) Fetch
cache.jsonabove, save all the app and asset files into the browser storage cache. - (C) Display and loop through the HTML slides, which is pretty much just setting
<iframe src="slides/N.html">.
PART 5) PROGRESSIVE WEB APP
5A) SERVICE WORKER
self.addEventListener("fetch", e => e.respondWith(
  caches.match(e.request).then(res => res || fetch(e.request))
));- A “service worker” is simply “Javascript that runs in the background”.
- This snippet will “hijack” all fetch calls. Serve the requested file if found in the storage cache, and fallback to fetch from the server if not found.
- That is, supporting “offline mode” – Load files from the storage cache instead of the server.
5B) INSTALLABLE WEB APP – MANIFEST FILE
{
  "short_name": "Signage",
  "name": "Signage",
  "icons": [{
    "src": "assets/favicon.png",
    "sizes": "128x128",
    "type": "image/png"
  }, {
    "src": "assets/icon-512.png",
    "sizes": "512x512",
    "type": "image/png"
  }],
  "start_url": "signage.html",
  "scope": "/",
  "background_color": "white",
  "theme_color": "white",
  "display": "standalone"
}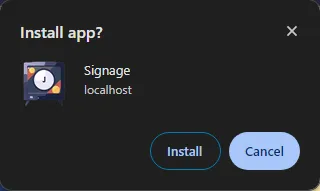
How do we create an “installable web app”? Define a manifest file. This should be pretty self-explanatory – The app name, icon, settings, colors, etc…
5C) HTML HEADERS
<link rel="manifest" href="manifest.json">
<meta name="mobile-web-app-capable" content="yes">
<meta name="theme-color" content="white">
<link rel="apple-touch-icon" href="assets/icon-512.png">
<meta name="apple-mobile-web-app-capable" content="yes">
<meta name="apple-mobile-web-app-status-bar-style" content="black">
<meta name="apple-mobile-web-app-title" content="Signage">
<meta name="msapplication-TileImage" content="assets/icon-512.png">
<meta name="msapplication-TileColor" content="#ffffff">- One last step, set the manifest file in the head section of the signage page.
- The manifest file should be understood by most modern browsers.
- But for compatibility with a certain fruit company that does not like to follow international standards, we insert more
<meta>tags.
EXTRAS
That’s all for the tutorial, and here is a small section on some extras and links that may be useful to you.
HOW TO FLUSH THE STORAGE CACHE
// (D) FLUSH CACHE
// run this in the console - signage.flush()
flush : async () => {
  if (await caches.has(signage.cname)) {
    await caches.delete(signage.cname);
  }
}- For beginners, the storage cache is a different one from the “usual browser cache”.
- It is persistent and cannot be refreshed with “force reload”, the only way is to empty the storage cache and rebuild it.
- So if you want to change or update the slides:
- Update the files in
slides/andassets/. - Update the
cache.jsonfile. - In all clients, run
signage.flush()in the developer’s console.
- Update the files in
WHAT’S SO GREAT ABOUT PWA?
I can smell the “expert trolls” screaming “So stupid, just create a slideshow and copy HTML files into a smart device”. That works, but there are merits to developing a PWA:
- Easy mass deployment – Create one “server”. Clients only have to access the server and hit “install”.
- Easy mass update – If you work with a server-side script, you can send push requests to update the storage cache/slides.
- Offline capable, all clients are decentralized and serverless. They will still work even if the Internet and server is down.
- Being a PWA opens up a world of possibilities. Maybe live streams, radio podcasts, flash offers, etc…
COMPATIBILITY CHECKS
- Arrow Functions – CanIUse
- Service Worker – CanIUse
- Cache Storage – CanIUse
Works on all modern “Grade A” browsers.
LINKS & REFERENCES
- Add websites and PWAs to Chrome kiosks – Google (yes, we can turn Google Chrome into a kiosk)
- Chrome Kiosk Mode On PC Android iOS Chrome OS – Code Boxx
THE END
Thank you for reading, and we have come to the end. I hope that it has helped you to better understand, and if you want to share anything with this guide, please feel free to comment below. Good luck and happy coding!