Welcome to a tutorial on how to create an inventory management system with pure Javascript. If you are wondering if it is possible to build an entire inventory system using HTML, CSS, and client-side Javascript only – Yes, it is very possible. But be warned, this is more of an “experiment” and not a “complete system”.
This is here to showcase how modern Javascript is capable of handling heavy lifting without a server, otherwise also known as a “serverless setup” and “progressive web app” (PWA). With that, read on for the example!
TABLE OF CONTENTS
JAVASCRIPT INVENTORY SYSTEM

All right, let us now get into some details of the experimental Javascript inventory system.
PART 1) THE HTML
<!-- (A) PAGE A : ITEMS LIST -->
<div id="pgA" class="ninja">
<div id="itemAdd" onclick="items.addEdit()">+</div>
<div id="itemList" class="zebra"></div>
</div>
<!-- (B) PAGE B : ADD ITEM -->
<form id="pgB" class="ninja" onsubmit="items.save(); return false;">
<label>SKU</label>
<input type="hidden" id="itemOSKU">
<input type="text" required id="itemSKU">
<label>Name</label>
<input type="text" required id="itemName">
<div id="itemGo" class="flex">
<input type="button" value="Back" onclick="inv.pg('A')">
<input type="submit" value="Save">
</div>
</form>
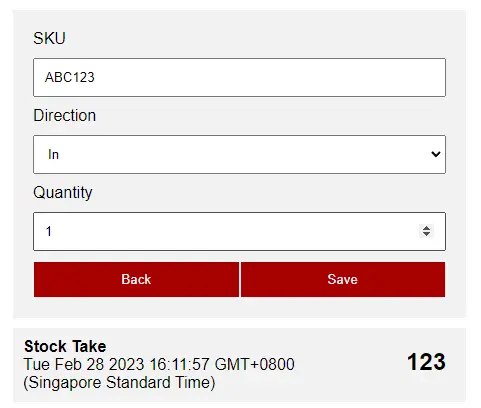
<!-- (C) PAGE C : MOVEMENT -->
<div id="pgC" class="ninja">
<!-- (C1) MOVEMENT FORM -->
<form onsubmit="move.save(); return false;">
<label>SKU</label>
<input type="text" readonly id="moveSKU">
<label>Direction</label>
<select id="moveDirection">
<option value="I">In</option>
<option value="O">Out</option>
<option value="T">Stock Take</option>
</select>
<label>Quantity</label>
<input type="number" required id="moveQty">
<div id="mGo" class="flex">
<input type="button" value="Back" onclick="inv.pg('A')">
<input type="submit" value="Save">
</div>
</form>
<!-- (C2) MOVEMENT HISTORY -->
<div id="moveList" class="zebra"></div>
<input id="moveBack" type="button" value="Back" onclick="inv.pg('A')">
</div>
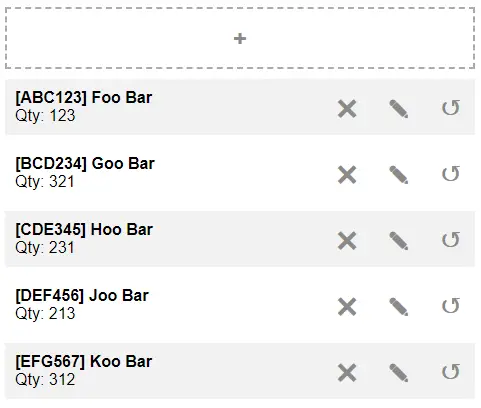
For a start, let us deal with the HTML page itself, this is quite essentially just “3 screens in 1 page”.
<div id="pgA">A list of all the items.<div id="pgB">When the user clicks on the add/edit item, this page will display the item form.<div id="pgC">When the user clicks on the “movement” button, this page will display an “item movement” form, as well as the movement history.
PART 2) INDEXED DATABASE LIBRARY
// (A) INDEXED DB
const IDB = window.indexedDB || window.mozIndexedDB || window.webkitIndexedDB || window.msIndexedDB;
var invDB = {
  // (B) INITIALIZE DATABASE
  db : null,
  init : () => new Promise((resolve, reject) => {
    // (B1) OPEN INVENTORY DATABASE
    invDB.db = IDB.open("JSINV", 1);

    // (B2) CREATE INVENTORY DATABASE
    invDB.db.onupgradeneeded = e => {
      // (B2-1) INVENTORY DATABASE
      invDB.db = e.target.result;

      // (B2-2) ITEMS STORE
      let store = invDB.db.createObjectStore("Items", { keyPath: "sku" });
      store.createIndex("name", "name");

      // (B2-3) MOVEMENT STORE
      store = invDB.db.createObjectStore("Movement", { keyPath: ["sku", "date"] }),
      store.createIndex("direction", "direction");
    };

    // (B3) ON IDB OPEN
    invDB.db.onsuccess = e => {
      invDB.db = e.target.result;
      resolve(true);
    };

    // (B4) ON IDB ERROR
    invDB.db.onerror = e => reject(e.target.error);
  }),

  // (C) TRANSACTION "MULTI-TOOL"
  tx : (action, store, data) => new Promise((resolve, reject) => {
    // (C1) GET OBJECT STORE
    let req, tx = invDB.db.transaction(store, "readwrite").objectStore(store);

    // (C2) PROCESS ACTION
    switch (action) {
      // (C2-1) NADA
      default: reject("Invalid database action"); break;

      // (C2-2) PUT
      case "put":
        req = tx.put(data);
        req.onsuccess = e => resolve(true);
        break;

      // (C2-3) DELETE
      case "del":
        req = tx.delete(data);
        req.onsuccess = e => resolve(true);
        break;

      // (C2-4) GET
      case "get":
        req = tx.get(data);
        req.onsuccess = e => resolve(e.target.result);
        break;

      // (C2-5) GET ALL
      case "getAll":
        req = tx.getAll(data);
        req.onsuccess = e => resolve(e.target.result);
        break;

      // (C2-6) CURSOR
      case "cursor":
        resolve(tx.openCursor(data));
        break;
    }
    req.onerror = e => reject(e.target.error);
  })
};
Indexed database plays a huge part in this mini-project, this library simplifies all the “database actions”.
- At the time of writing, different browsers still use their own prefix, and thus the need for
const IDB. - On window load, we will run
invDB.init(). This pretty much creates the necessary “database tables” and sets up the data structure. invDB.tx()Add, update, delete, get, get all.
PART 3) THE DATABASE STRUCTURE
Now, a quick summary of the database structure before we move on. There are 2 stores (tables if you are used to SQL) in this project.
ItemsThe available items.skuThe SKU of the item, primary key.nameName of the item.qtyThe current quantity of the item.
MovementThe movement history of items.skuSKU of the item, composite primary key.dateTimestamp of the movement, composite primary key.direction“I”n, “O”ut, “S”tock Take.qtyQuantity moved.
PART 4) INITIATING THE WEB APP
var inv = {
  // (A) INITIALIZE APP
  init : () => {
    // (A1) CHECK - INDEXED DATABASE SUPPORT
    if (!IDB) {
      alert("INDEXED DB IS NOT SUPPORTED ON THIS BROWSER!");
      return;
    }

    // (A2) CHECK - SERVICE WORKER SUPPORT
    if ("serviceWorker" in navigator) {
      navigator.serviceWorker.register("js-inventory-worker.js");
    } else {
      alert("SERVICE WORKER IS NOT SUPPORTED ON THIS BROWSER!");
      return;
    }

    // (A3) DATABASE + INTERFACE SETUP
    if (await invDB.init()) { items.list(true); }
    else {
      alert("ERROR OPENING INDEXED DB!");
      return;
    }
  },

  // (B) TOGGLE PAGE
  pg : p => { for (let i of ["A", "B", "C"]) {
    if (p==i) {
      document.getElementById("pg" + i).classList.remove("ninja");
    } else {
      document.getElementById("pg" + i).classList.add("ninja");
    }
  }}
};
window.addEventListener("DOMContentLoaded", inv.init);inv.init()Runs on window load. Check the requirements, install a service worker, and sets up the indexed database.inv.pg()Remember the “3 pages in one”? Use this function to switch between them.
PART 5) ITEMS LIBRARY
var items = {
// (A) HTML ITEMS LIST
list : async (toggle) => {
// (A1) GET ALL ITEMS
let all = await invDB.tx("getAll", "Items"),
hList = document.getElementById("itemList");
// (A2) DRAW HTML LIST
hList.innerHTML = "";
if (all.length==0) {
hList.innerHTML = "<div class='row'><div class='grow'>No items found</div></div>";
} else { for (let i of all) {
let row = document.createElement("div");
row.className = "row flex";
row.innerHTML =
`<div class="grow">
<div class="bold">[${i["sku"]}] ${i["name"]}</div>
Qty: ${i["qty"]}
</div>
<input type="button" value="✖" onclick="items.del('${i["sku"]}')">
<input type="button" value="✎" onclick="items.addEdit('${i["sku"]}')">
<input type="button" value="↺" onclick="move.list('${i["sku"]}')">`;
hList.appendChild(row);
}}
if (toggle) { inv.pg("A"); }
},
// (B) DELETE ITEM
del : async (sku) => { if (confirm("Delete item?")) {
await invDB.tx("del", "Movement", IDBKeyRange.bound([sku, 0], [sku, Date.now()]));
await invDB.tx("del", "Items", sku);
items.list(true);
}},
// (C) ADD/EDIT ITEM
addEdit : async (sku) => {
// (C1) RESET FORM
document.getElementById("pgB").reset();
document.getElementById("itemOSKU").value = "";
// (C2) EDIT MODE
if (typeof sku == "string") {
let item = await invDB.tx("get", "Items", sku);
document.getElementById("itemOSKU").value = sku;
document.getElementById("itemSKU").value = item.sku;
document.getElementById("itemName").value = item.name;
}
// (C3) SWITCH PAGE
inv.pg("B");
},
// (D) SAVE ITEM
save : async () => {
// (D1) GET DATA FROM HTML FORM
let osku = document.getElementById("itemOSKU").value,
data = {
sku : document.getElementById("itemSKU").value,
name : document.getElementById("itemName").value,
qty : 0
};
// (D2) ADD NEW ITEM
if (osku=="") {
// (D2-1) CHECK IF ALREADY EXIST
if (await invDB.tx("get", "Items", data["sku"]) !== undefined) {
alert(`${data["sku"]} is already registered!`);
return;
}
// (D2-2) SAVE
await invDB.tx("put", "Items", data);
items.list(true);
}
// (D3) UPDATE ITEM
else {
// (D3-1) GET ITEM
let item = await invDB.tx("get", "Items", osku);
data["qty"] = item["qty"];
// (D3-2) JUST SAVE IF NOT CHANGING SKU
if (osku==data["sku"]) {
await invDB.tx("put", "Items", data);
items.list(true);
}
// (D3-3) HEADACHE IF CHANGING SKU
else {
// (D3-3-1) CHECK IF NEW SKU ALREADY REGISTERED
if (await invDB.tx("get", "Items", data["sku"]) !== undefined) {
alert(`${data["sku"]} is already registered!`);
return;
}
// (D3-3-2) ADD NEW SKU + DELETE OLD SKU
invDB.tx("put", "Items", data);
invDB.tx("del", "Items", osku);
// (D3-3-3) "UPDATE" SKU OF ALL MOVEMENT WITH PUT-DEL
let req = await invDB.tx("cursor", "Movement", IDBKeyRange.bound([osku, 0], [osku, Date.now()]));
req.onsuccess = e => {
const cursor = e.target.result;
if (cursor) {
// ERROR - CANNOT DIRECTLY CHANGE KEY. THUS THE "DUMB" PUT-DELETE WAY.
// cursor.update({ sku: NEW SKU });
let entry = cursor.value;
entry.sku = data["sku"];
invDB.tx("put", "Movement", entry);
cursor.delete();
cursor.continue();
} else { items.list(true); }
};
}
}
}
};
Following up, we have a library to deal with the items.
items.list()Get all items in the database, and draw them in the HTML list.items.del()Delete the given item.items.addEdit()When the user clicks on add/edit item, prepare and show the item form.items.save()Add or update an item.
PART 6) ITEM MOVEMENT LIBRARY
var move = {
  // (A) HTML ITEM MOVEMENT LIST
  list : async (sku) => {
    // (A1) "PRESET" MOVEMENT FORM
    document.getElementById("moveSKU").value = sku;
    document.getElementById("moveDirection").value = "I";
    document.getElementById("moveQty").value = 1;

    // (A2) GET MOVEMENT
    let all = await invDB.tx("getAll", "Movement", IDBKeyRange.bound([sku, 0], [sku, Date.now()])),
        hList = document.getElementById("moveList"),
        d = { "I" : "In", "O" : "Out", "T" : "Stock Take" };

    // (A3) DRAW MOVEMENT
    hList.innerHTML = "";
    if (all.length == 0) {
      hList.innerHTML = "<div class='row'><div class='grow'>No movement found</div></div>";
    } else { for (let m of all) {
      let row = document.createElement("div"),
          date = new Date(m["date"]).toString();
      row.className = "row flex";
      row.innerHTML =
      `<div class="grow">
        <strong>${d[m["direction"]]}</strong><br>${date}
      </div>
      <div class="moveQty">${m["qty"]}</div>`;
      hList.appendChild(row);
    }}
    inv.pg("C");
  },

  // (B) SAVE MOVEMENT
  save : async () => {
    // (B1) GET HTML FORM DATA
    let data = {
      sku: document.getElementById("moveSKU").value,
      direction: document.getElementById("moveDirection").value,
      qty: +document.getElementById("moveQty").value,
      date: Date.now()
    };

    // (B2) GET ITEM
    let item = await invDB.tx("get", "Items", data["sku"]);

    // (B3) UPDATE QUANTITY
    if (data["direction"] == "T") { item["qty"] = data["qty"]; }
    else if (data["direction"] == "I") { item["qty"] += data["qty"]; }
    else { item["qty"] -= data["qty"]; }
    if (item["qty"] < 0) { data["qty"] = 0; }
    await invDB.tx("put", "Items", item);

    // (B4) ADD MOVEMENT
    await invDB.tx("put", "Movement", data);

    // (B5) DONE
    move.list(data["sku"]);
    items.list()
  }
};
Lastly, a library to deal with the item movement.
move.list()Show the movement of the selected item.move.save()Save an item movement.
PART 7) PROGRESSIVE WEB APP
7A) THE HTML
<!-- META -->
<title>JS Inventory Management</title>
<meta charset="utf-8">
<meta name="description" content="Experimental JS Inventory System">
<meta name="viewport" content="width=device-width, initial-scale=1.0, maximum-scale=1.5">

<!-- ICONS -->
<link rel="icon" href="images/favicon.png" type="image/png">
<meta name="mobile-web-app-capable" content="yes">
<meta name="theme-color" content="white">
<link rel="apple-touch-icon" href="images/icon-512.png">
<meta name="apple-mobile-web-app-capable" content="yes">
<meta name="apple-mobile-web-app-status-bar-style" content="black">
<meta name="apple-mobile-web-app-title" content="JS Inventory">
<meta name="msapplication-TileImage" content="images/icon-512.png">
<meta name="msapplication-TileColor" content="#ffffff">

<!-- MANIFEST -->
<link rel="manifest" href="js-inventory-manifest.json">

<!-- INVENTORY CSS + JS -->
<link rel="stylesheet" href="js-inventory.css">
<script src="js-inventory-db.js"></script>
<script src="js-inventory-items.js"></script>
<script src="js-inventory-move.js"></script>
<script src="js-inventory.js"></script>
At this stage, we already have a working web app. But let’s bring it one step forward, and make it into a PWA. Some people think that it is very complicated, but it’s really not that bad. The essential pieces are:
- Define a manifest file
<link rel="manifest" href="js-inventory-manifest.json"> - Register a service worker (in the Javascript), and cache the critical files.
That’s about it.
7B) MANIFEST FILE
{
  "short_name": "JS Inventory",
  "name": "JS Inventory",
  "icons": [{
    "src": "images/favicon.png",
    "sizes": "64x64",
    "type": "image/png"
  }, {
    "src": "images/icon-512.png",
    "sizes": "512x512",
    "type": "image/png"
  }],
  "start_url": "js-inventory.html",
  "scope": "/",
  "background_color": "white",
  "theme_color": "white",
  "display": "standalone"
}
Nothing much here. The manifest file simply specifies the web app name, icons, colors, and all those misc stuff.
7C) SERVICE WORKER
// (A) CREATE/INSTALL CACHE
self.addEventListener("install", evt => {
  self.skipWaiting();
  evt.waitUntil(
    caches.open("JSINV")
    .then(cache => cache.addAll([
      "js-inventory.css",
      "js-inventory.html",
      "js-inventory-db",
      "js-inventory-db.js",
      "js-inventory-items.js",
      "js-inventory-move.js",
      "js-inventory-manifest.json",
      "images/favicon.png",
      "images/icon-512.png"
    ]))
    .catch(err => console.error(err))
  );
});

// (B) CLAIM CONTROL INSTANTLY
self.addEventListener("activate", evt => self.clients.claim());

// (C) LOAD FROM CACHE FIRST, FALLBACK TO NETWORK IF NOT FOUND
self.addEventListener("fetch", evt => evt.respondWith(
  caches.match(evt.request).then(res => res || fetch(evt.request))
});
Long story short – Save the entire app into the browser cache. That is, it works offline without the server.
DOWNLOAD & NOTES

Here is the download link to the example code, so you don’t have to copy-paste everything.
SORRY FOR THE ADS...
But someone has to pay the bills, and sponsors are paying for it. I insist on not turning Code Boxx into a "paid scripts" business, and I don't "block people with Adblock". Every little bit of support helps.
Buy Me A Coffee Code Boxx eBooks
EXAMPLE CODE DOWNLOAD
Click here for the source code on GitHub gist, just click on “download zip” or do a git clone. I have released it under the MIT license, so feel free to build on top of it or use it in your own project.
EXTRA BITS & LINKS

That’s all for the tutorial, and here is a small section on some extras and links that may be useful to you.
COMPATIBILITY CHECKS
- Arrow Functions – CanIUse
- Indexed Database – CanIUse
- Service Workers – CanIUse
- Add To Home Screen – CanIUse
This example requires a “Grade A” browser.
IT WORKS… BUT DOES IT MAKES SENSE?
Yep, we can build up this experiment into a “full system” with some more effort:
- User management
- User login
- Items management
- Generate reports
But here comes the million-dollar question, is it worth the effort to build this system?
- While this is essentially “serverless”, the initial setup still requires
http:// https://to install properly. - How about future app updates? Still requires a server.
- How about data backup? Still requires a server.
- Trying to sync data across several decentralized devices is another headache.
- Indexed database is clunky and basic compared to SQL.
So my personal conclusion is simple – This inventory PWA works for a single device. But otherwise, a server-client setup is still preferable.
LINKS & REFERENCES
- Storage Boxx PHP Inventory Management System – Code Boxx
THE END

Thank you for reading, and we have come to the end. I hope that it has helped you to better understand, and if you want to share anything with this guide, please feel free to comment below. Good luck and happy coding!