Welcome to a tutorial and example on how to create a custom audio player with a playlist. Looking to build your own audio player and add a playlist to it? Sadly, there are no native implementations of a playlist at the time of writing. So the only way to build a playlist is to create an array of songs, and feed it into the player – Read on for an example!
TABLE OF CONTENTS
CUSTOM AUDIO PLAYER WITH PLAYLIST

All right, let us now get into the example of creating a custom audio player with a playlist.
STEP 1) THE HTML
<div id="aWrap">
<!-- (A) PLAY/PAUSE BUTTON -->
<button id="aPlay" disabled><span id="aPlayIco" class="material-icons">
play_arrow
</span></button>
<!-- (B) TIME -->
<div id="aCron">
<span id="aNow"></span> / <span id="aTime"></span>
</div>
<!-- (C) SEEK BAR -->
<input id="aSeek" type="range" min="0" value="0" step="1" disabled>
<!-- (D) VOLUME SLIDE -->
<span id="aVolIco" class="material-icons">volume_up</span>
<input id="aVolume" type="range" min="0" max="1" value="1" step="0.1" disabled>
<!-- (E) PLAYLIST -->
<div id="aList"></div>
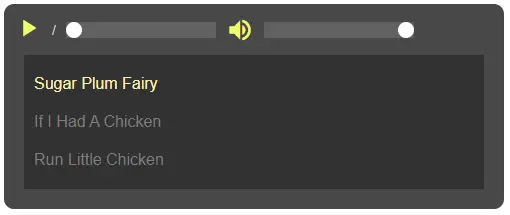
</div>There are only 5 components for this custom audio player.
<button id="aPlay">– Play/pause button.<span id="aNow"></span>– The current playtime.<span id="aTime"></span>– Total time of the current track.<input id="aSeek">Time seek slider bar, this is in seconds.<input id="aVolume">Volume slider bar, this is a value from 0.0 (mute) to 1.0 (loudest).<div id="aList">The playlist, generated with Javascript in the next step.
STEP 2) INITIALIZE PLAYER
window.addEventListener("DOMContentLoaded", () => {
  // (A) PLAYER INIT
  // (A1) PLAYLIST - CHANGE TO YOUR OWN!
  let playlist = [
    {name: "Sugar Plum Fairy", src: "S1.mp3"},
    {name: "If I Had A Chicken", src: "S2.mp3"},
    {name: "Run Little Chicken", src: "S3.mp3"}
  ];

  // (A2) AUDIO PLAYER & GET HTML CONTROLS
  const audio = new Audio(),
        aPlay = document.getElementById("aPlay"),
        aPlayIco = document.getElementById("aPlayIco"),
        aNow = document.getElementById("aNow"),
        aTime = document.getElementById("aTime"),
        aSeek = document.getElementById("aSeek"),
        aVolume = document.getElementById("aVolume"),
        aVolIco = document.getElementById("aVolIco"),
        aList = document.getElementById("aList");

  // (A3) BUILD PLAYLIST
  for (let i in playlist) {
    let row = document.createElement("div");
    row.className = "aRow";
    row.innerHTML = playlist[i]["name"];
    row.addEventListener("click", () => audPlay(i));
    playlist[i]["row"] = row;
    aList.appendChild(row);
  }
});- Captain Obvious to the rescue. We wait until
DOMContentLoadedbefore proceeding, to prevent things from screwing up. - (A1) The
playlist, this is an array of objects. Each entry should have the track namenameand sourcesrc. Quick advice – It is more reliable to use an absolute URL here. I.E.http://site.com/songs/mysong.mp3instead ofmysong.mp3. - (A2) Create a new audio object, get all the HTML controls.
- (A3) Loop through
playlistto generate the HTML. Just take note that clicking on a track will triggeraudPlay().
STEP 3) PLAY MECHANISM
// (B) PLAY MECHANISM
// (B1) FLAGS
var audNow = 0, // current song
    audStart = false, // auto start next song

// (B2) PLAY SELECTED SONG
audPlay = (idx, nostart) => {
  audNow = idx;
  audStart = nostart ? false : true;
  audio.src = encodeURI(playlist[idx]["src"]);
  for (let i in playlist) {
    if (i == idx) { playlist[i]["row"].classList.add("now"); }
    else { playlist[i]["row"].classList.remove("now"); }
  }
};

// (B3) AUTO START WHEN SUFFICIENTLY BUFFERED
audio.addEventListener("canplay", () => { if (audStart) {
  audio.play();
  audStart = false;
}});

// (B4) AUTOPLAY NEXT SONG IN THE PLAYLIST
audio.addEventListener("ended", () => {
  audNow++;
  if (audNow >= playlist.length) { audNow = 0; }
  audPlay(audNow);
});

// (B5) INIT SET FIRST SONG
audPlay(0, true);- (B1) 2 flags are used to control the player.
- Remember that
playlistis an array?audNowkeeps track of which song is currently playing. audStartis used to control autoplay in (B3).
- Remember that
- (B2)
audPlay()will play the selected song. For example,audPlay(2)will play the third song inplaylist. This works very simply by settingaudio.src = playlist[N]["src"]. Also, take note of settingaudStarthere. - (B3) Automatically start playing when the current track is sufficiently buffered, but only if
audStartis set.- Basically,
canplaycan be triggered via 2 possible means. When we changeaudio.src = NEW SONG, or upon recovering from a bad connection. - We don’t want to piss the users by forcing a patchy playback when they have a bad connection.
- Thus the use of the
audStartflag, to make sure autoplay is only triggered after clicking on a playlist item (or when auto-starting the next song in the list).
- Basically,
- (B4) When the current song ends, we do a
audNow++and play the next song.
STEP 4) PLAY/PAUSE BUTTON
// (C) PLAY/PAUSE BUTTON
// (C1) AUTO SET PLAY/PAUSE TEXT
audio.addEventListener("play", () => aPlayIco.innerHTML = "pause");
audio.addEventListener("pause", () => aPlayIco.innerHTML = "play_arrow");

 // (C2) CLICK TO PLAY/PAUSE
aPlay.addEventListener("click", () => {
  if (audio.paused) { audio.play(); }
  else { audio.pause(); }
});- (C1) Automatically set the play/pause icon. This is Google’s Material Icon by the way. Links below.
- (C2) Self-explanatory? If the audio is paused, we click to play. If the audio is playing, we click to pause.
STEP 5) TRACK TIME
// (D) TRACK PROGRESS
// (D1) SUPPORT FUNCTION - FORMAT HH:MM:SS
var timeString = secs => {
  // (D1-1) HOURS, MINUTES, SECONDS
  let ss = Math.floor(secs),
      hh = Math.floor(ss / 3600),
      mm = Math.floor((ss - (hh * 3600)) / 60);
  ss = ss - (hh * 3600) - (mm * 60);

  // (D1-2) RETURN FORMATTED TIME
  if (hh>0) { mm = mm<10 ? "0"+mm : mm; }
  ss = ss<10 ? "0"+ss : ss;
  return hh>0 ? `${hh}:${mm}:${ss}` : `${mm}:${ss}` ;
};

// (D2) INIT SET TRACK TIME
audio.addEventListener("loadedmetadata", () => {
  aNow.innerHTML = timeString(0);
  aTime.innerHTML = timeString(audio.duration);
});

// (D3) UPDATE TIME ON PLAYING
audio.addEventListener("timeupdate", () => aNow.innerHTML = timeString(audio.currentTime));
- (D1) Both
audio.durationandaudio.currentTimeare in seconds. Thus the need for this support function to create a “nice-looking time string”. - (D2) Update the HTML total track time on receiving the metadata.
- (D3) Update the HTML time while the track is playing.
STEP 6) TIME SEEK BAR
// (E) SEEK BAR
audio.addEventListener("loadedmetadata", () => {
  // (E1) SET SEEK BAR MAX TIME
  aSeek.max = Math.floor(audio.duration);

  // (E2) USER CHANGE SEEK BAR TIME
  var aSeeking = false; // user is now changing time
  aSeek.addEventListener("input", () => aSeeking = true); // prevents clash with (e3)
  aSeek.addEventListener("change", () => {
    audio.currentTime = aSeek.value;
    if (!audio.paused) { audio.play(); }
    aSeeking = false;
  });

  // (E3) UPDATE SEEK BAR ON PLAYING
  audio.addEventListener("timeupdate", () => {
    if (!aSeeking) { aSeek.value = Math.floor(audio.currentTime); }
  });
});- (E1) Set the
maxof the seek bar on receiving the metadata. - (E2) When the user drags the seek bar, we update
audio.currentTimeaccordingly. - (E3) Update the seek bar as the track plays.
- (E2 & E3) Take note of the
aSeekingflag here. Basically, we don’t want (E3) to update while the user is manually dragging the bar.
STEP 7) VOLUME
// (F) VOLUME
aVolIco.addEventListener("click", () => {
  audio.volume = audio.volume==0 ? 1 : 0 ;
  aVolume.value = audio.volume;
  aVolIco.innerHTML = (aVolume.value==0 ? "volume_mute" : "volume_up");
});
aVolume.addEventListener("change", () => {
  audio.volume = aVolume.value;
  aVolIco.innerHTML = (aVolume.value==0 ? "volume_mute" : "volume_up");
});
Don’t think this needs any explanation…
STEP 8) ENABLE/DISABLE ALL CONTROLS
// (G) ENABLE/DISABLE CONTROLS
audio.addEventListener("canplay", () => {
  aPlay.disabled = false;
  aVolume.disabled = false;
  aSeek.disabled = false;
});
audio.addEventListener("waiting", () => {
  aPlay.disabled = true;
  aVolume.disabled = true;
  aSeek.disabled = true;
});
Enable all controls when the player can play, and disable all controls while the player is still loading. We can use canplaythrough to prevent “halfway breaks”, but the initial loading will take longer.
DOWNLOAD & NOTES

Here is the download link to the example code, so you don’t have to copy-paste everything.
SORRY FOR THE ADS...
But someone has to pay the bills, and sponsors are paying for it. I insist on not turning Code Boxx into a "paid scripts" business, and I don't "block people with Adblock". Every little bit of support helps.
Buy Me A Coffee Code Boxx eBooks
EXAMPLE CODE DOWNLOAD
Click here to download. I have released it under the MIT license, so feel free to build on top of it or use it in your own project.
EXTRA BITS & LINKS

That’s all for the tutorial, and here is a small section on some extras and links that may be useful to you.
BACK/NEXT BUTTONS
I don’t see these buttons as “necessary”, since there is already a playlist. But if you want to add them, here’s a simple Javascript snippet:
function backnext (n) {
  if (n) { audNow++; } else { audNow--; }
  if (audNow >= playlist.length) { audNow = 0; }
  if (audNow < 0) { audNow = playlist.length - 1; }
  audPlay(audNow);
}
MULTIPLE INSTANCES
It is a design issue and also a technical one.
- Is it really necessary to have multiple playlist players on a single page?
- A single playlist is easier to manage than multiple playlists.
- How do you deal with multiple instances playing at the same time? Allow all of them to play together? Does this make sense?
- Or track all the instances, and allow only one to play at a time? Isn’t this the same as a single instance?
- Is playing multiple audio on the same page a good idea for mobile devices and slow connections?
- How are you going to squeeze multiple players onto small screens? Good idea?
- Wouldn’t a “single player with multiple playlists” be a better idea?
So yep, feel free to challenge yourself if you really need “multiple instances”.
COMPATIBILITY CHECKS
This audio player will obviously not work with ancient browsers. But it should work well across all “Grade A” modern browsers.
LINKS & REFERENCES
- HTML Media Element– MDN
- HTML Audio – WhatWG
- PHP Audio Player With Playlist – Code Boxx
- Simple HTML Audio Player – Code Boxx
THE END

Thank you for reading, and we have come to the end. I hope that it has helped you to better understand, and if you want to share anything with this guide, please feel free to comment below. Good luck and happy coding!
I like the sound of the player, thank you! Unfortunately, it does not work on mobile devices, at least on iPhone IOS 17.2.1. Any thoughts on how to fix this?
Sorry, I don’t have any Apple devices to confirm or troubleshoot. “Not working” can be anything – Unsupported audio format, security, network issues, or Apple’s famous “we don’t follow international standards”.
“Sorry for the ads”
Your site is barely useable, but thanks for the apology.
https://code-boxx.com/faq/#ads