Welcome to a tutorial and examples on how to create tables from JSON data in Javascript. So code ninja, the time has finally come when you meet the worthy opponent called JSON. Just how do we deal with it, and create tables from JSON data?
The table creation will be different depending on how the JSON data is formatted. But in essence, it is a 2 steps process to create an HTML table from JSON data:
- Parse the JSON string into an object first.
- Loop through the object using a “for” loop and generate the HTML table.
Just how is that done? Let us walk through a few examples in this guide – Read on!
TLDR – QUICK SLIDES
[web_stories_embed url=”https://code-boxx.com/web-stories/create-html-table-json-data-javascript/” title=”Create HTML Table From JSON Data In Javascript” poster=”https://code-boxx.com/wp-content/uploads/2021/11/STORY-JS-20230518.webp” width=”360″ height=”600″ align=”center”]
Fullscreen Mode – Click Here
TABLE OF CONTENTS
GENERATING TABLES FROM JSON DATA

All right, let us now get into the examples of how to generate an HTML table from JSON data.
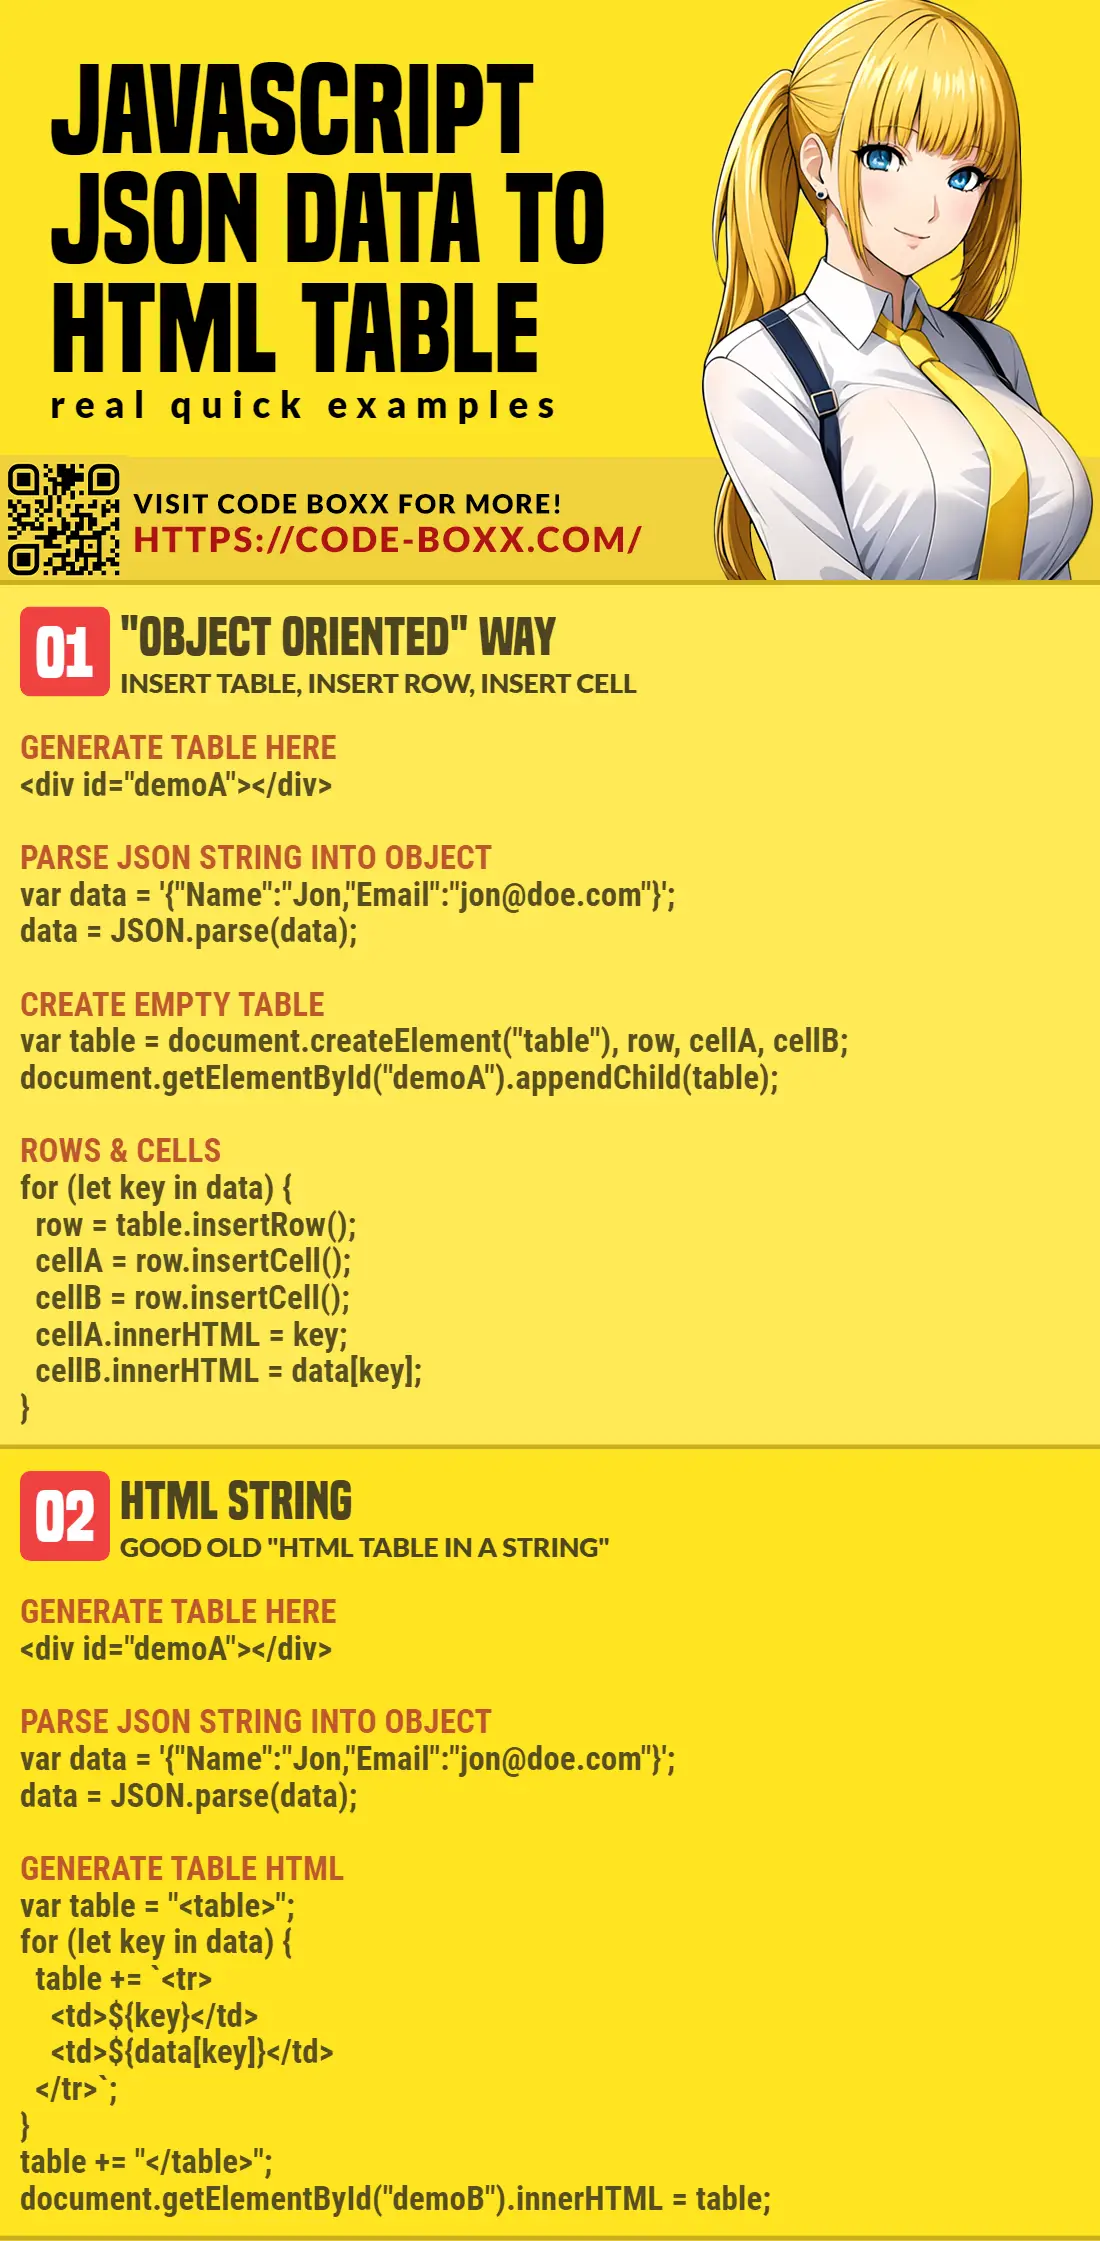
1) “OBJECT-ORIENTED” TABLE
<!-- (A) WE WILL GENERATE THE TABLE HERE -->
<div id="demoA"></div>

<script>
window.addEventListener("load", () => {
  // (B) PARSE THE JSON STRING INTO OBJECT FIRST
  var data = '{"Name":"John Doe","Email":"john@doe.com","Gender":"male"}';
  data = JSON.parse(data);
  // console.table(data);

  // (C) GENERATE TABLE
  // (C1) CREATE EMPTY TABLE
  var table = document.createElement("table"), row, cellA, cellB;
  document.getElementById("demoA").appendChild(table);
  for (let key in data) {
    // (C2) ROWS & CELLS
    row = table.insertRow();
    cellA = row.insertCell();
    cellB = row.insertCell();

    // (C3) KEY & VALUE
    cellA.innerHTML = key;
    cellB.innerHTML = data[key];
  }
});
</script>
Yep. It’s that simple. As in the introduction above, this is a 2-steps process:
- First,
JSON.parse()the raw string of data into an object. - Then, use the good old
for (let X in Y)to loop through the object, build the HTML table.var table = document.createElement("table")Creates the table.row = table.insertRow()Adds a row to the table.cell = row.insertCell()Adds a cell to the row.cell.innerHTML = "DATA"Sets the text within the cell.- Lastly, just append the table to wherever you need –
document.getElementById("ID").appendChild(table).
2) HTML TABLE STRING
<!-- (A) WE WILL GENERATE THE TABLE HERE -->
<div id="demoB"></div>

<script>
window.addEventListener("load", () => {
  // (B) PARSE THE JSON STRING INTO OBJECT FIRST
  var data = '{"Name":"John Doe","Email":"john@doe.com","Gender":"male"}';
  data = JSON.parse(data);
  // console.table(data);

  // (C) GENERATE TABLE
  var table = "<table>";
  for (let key in data) {
    table += `<tr><td>${key}</td><td>${data[key]}</td></tr>`;
  }
  table += "</table>";
  document.getElementById("demoB").innerHTML = table;
});
</script>
Don’t like the above “object-oriented” way of creating an HTML table? This is the more traditional way of creating an HTML string.
3) MULTI-DIMENSIONAL JSON DATA TO TABLE
<!-- (A) WE WILL GENERATE THE TABLE HERE -->
<div id="demoC"></div>

<script>
window.addEventListener("load", () => {
  // (B) PARSE THE JSON STRING INTO OBJECT FIRST
  var data = '{"Name":"John Doe","Email":"john@doe.com","Gender":"male","Colors":["red","green","blue"],"Pet":{"Name":"Roger Doe","Species":"Canis lupus familiaris"}}';
  data = JSON.parse(data);
  // console.table(data);

  // (C) GENERATE TABLE
  // (C1) CREATE EMPTY TABLE
  var table = document.createElement("table"), row, cellA, cellB;
  document.getElementById("demoC").appendChild(table);
  for (let key in data) {
    // (C2) ROWS & CELLS
    row = table.insertRow();
    cellA = row.insertCell();
    cellB = row.insertCell();

    // (C3) KEY & VALUE
    cellA.innerHTML = key;

    // (C3-1) COLORS FIELD
    if (key=="Colors") {
      cellB.innerHTML = data[key].join(", ");
    }

    // (C3-2) PET FIELD
    else if (key=="Pet") {
      cellB.innerHTML = `<div>Name: ${data[key]["Name"]}</div><div>Species: ${data[key]["Species"]}</div>`;
    }

    // (C3-3) OTHER FIELDS
    else {
      cellB.innerHTML = data[key];
    }
  }
});
</script>
Dealing with multi-dimensional objects is tricky, and we need to deal with each nested field specifically. In the above example:
Colorsis an array. Not much of an issue – We can concatenate it into a flat string and display it in a single cell.Petis an object with “sub-fields” ofNameandSpecies. The smart way is to split it into two rows in the cell.
That’s right, there is no “quick and dirty” way when it comes to multi-dimensional objects – You have to know each field, and decide for yourself how to display it in table form.
DOWNLOAD & NOTES

Here is the download link to the example code, so you don’t have to copy-paste everything.
SORRY FOR THE ADS...
But someone has to pay the bills, and sponsors are paying for it. I insist on not turning Code Boxx into a "paid scripts" business, and I don't "block people with Adblock". Every little bit of support helps.
Buy Me A Coffee Code Boxx eBooks
EXAMPLE CODE DOWNLOAD
Click here for the source code on GitHub gist, just click on “download zip” or do a git clone. I have released it under the MIT license, so feel free to build on top of it or use it in your own project.
EXTRA BITS & LINKS

That’s all for this tutorial, and here is a small section on some extras and links that may be useful to you.
THE SUMMARY
- Start by parsing the raw JSON string into an object with
JSON.parse(JSON-DATA). - Next, loop through the object using
for (let X in Y). - Then, create the HTML table by either manually writing the HTML or creating the table, rows, cells.
- Finally, append the table to where you want.
LINKS & REFERENCES
- Working with JSON – MDN
- CSS Grid – MDN
- Create Table From Array – Code Boxx
- Sortable Table – Code Boxx
INFOGRAPHIC CHEAT SHEET
THE END

Thank you for reading, and we have come to the end of this guide. I hope that it has helped you with your project, and if you want to share anything with this guide, please feel free to comment below. Good luck and happy coding!
This page is very helpful for me