Welcome to a beginner’s tutorial on how to allow only one click in Javascript. So you have a button or element that says “click here to do something”, but want to prevent the user from clicking it multiple times.
There are a number of ways to allow only one click in Javascript:
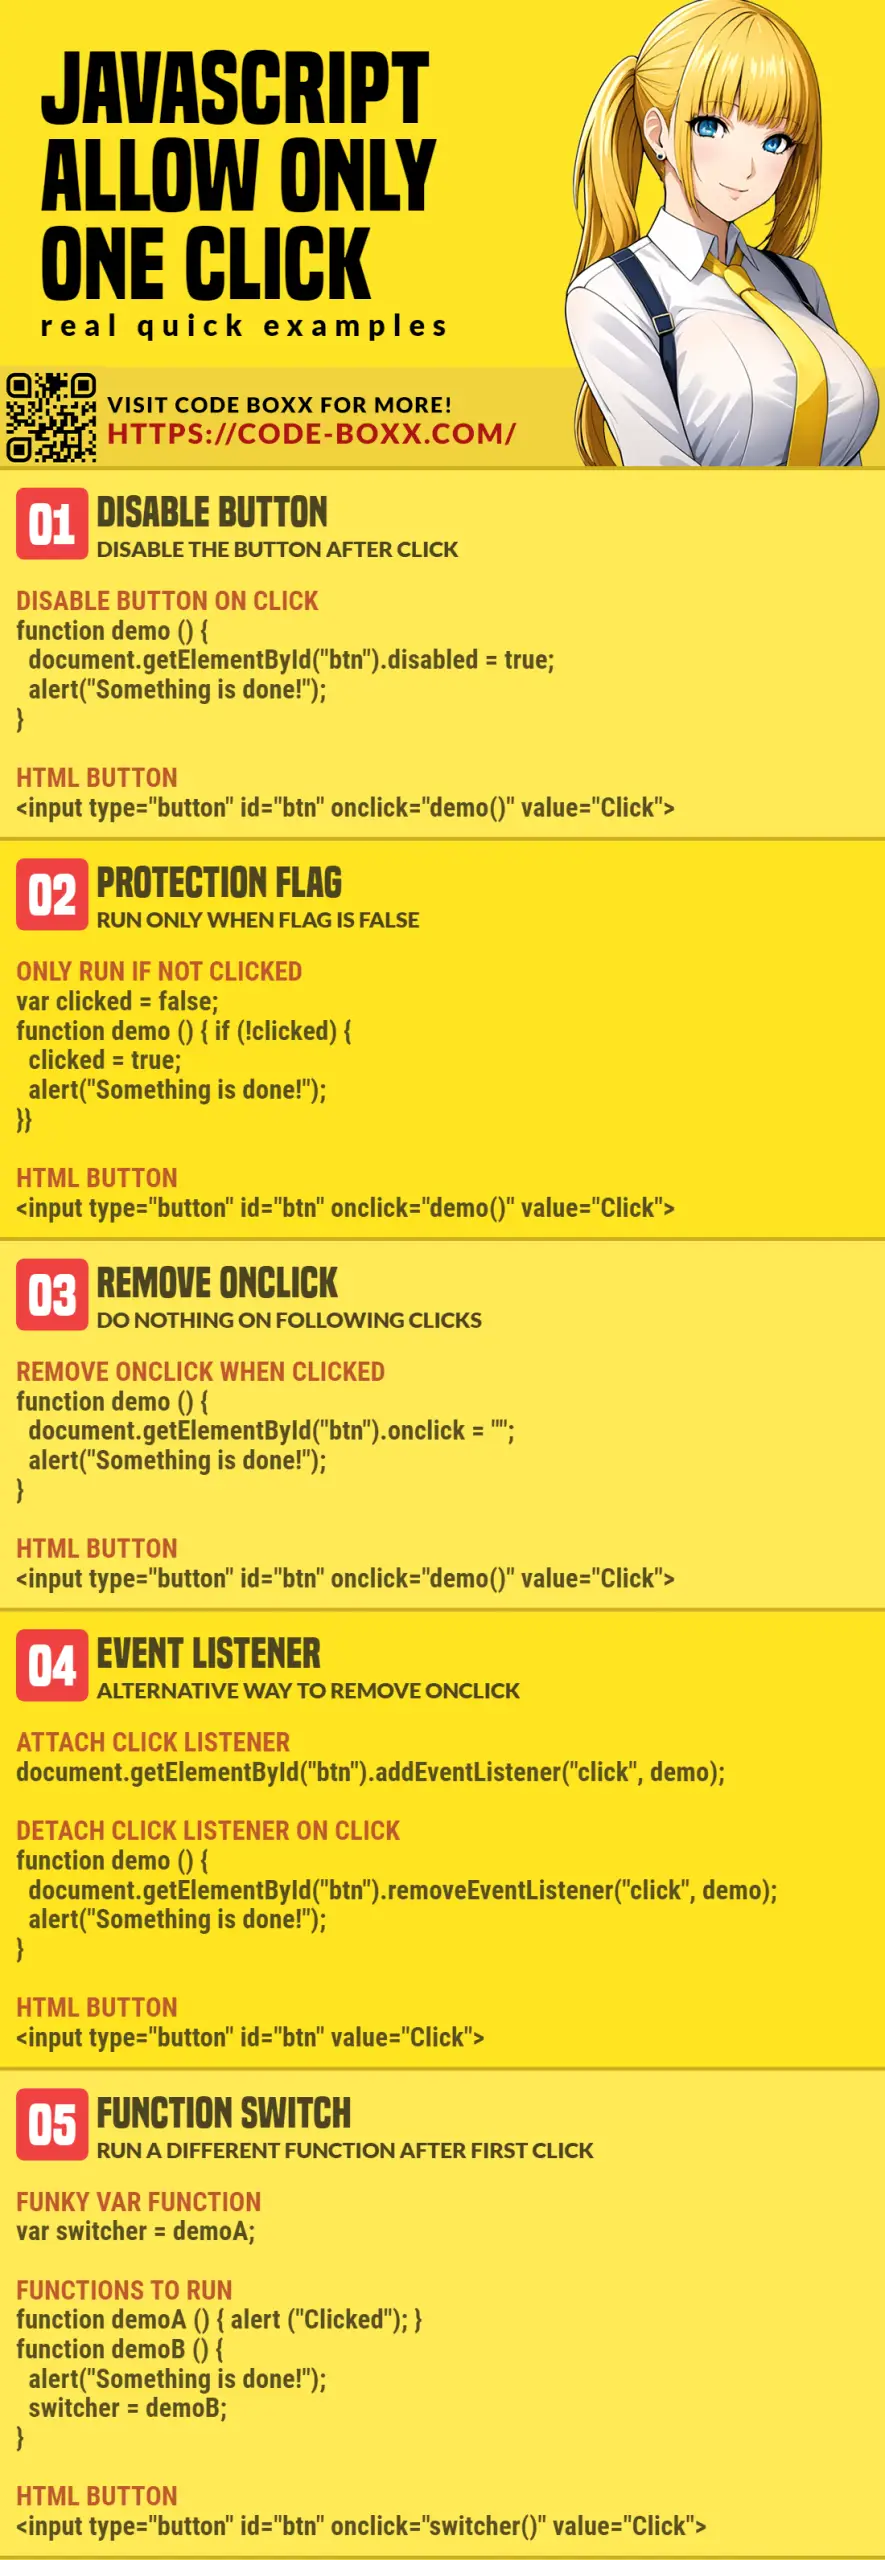
- Disable the button after clicking on it.
- Use a boolean flag to indicate “clicked”, don’t process again if this flag is true.
- Remove the on-click attribute from the button after clicking once.
- Attach an on-click event listener, and detach it after clicking once.
- Unorthodox method – Change the on-click function after clicking once.
So just how do we do all of these? Let us walk through some actual examples – Read on to find out!
TLDR – QUICK SLIDES
[web_stories_embed url=”https://code-boxx.com/web-stories/allow-only-one-click-in-javascript/” title=”How To Allow Only One Click In Javascript” poster=”https://code-boxx.com/wp-content/uploads/2021/11/STORY-JS-20230518.webp” width=”360″ height=”600″ align=”center”]
Fullscreen Mode – Click Here
TABLE OF CONTENTS
ONE-CLICK PROTECTION

With that, let us now move into the mechanisms we can put in place for “one-click protection”.
1) DISABLING THE BUTTON
<script>
function doSomething () {
  // (A) DISABLE THE BUTTON
  document.getElementById("myButton").disabled = true;

  // (B) DO YOUR PROCESSING HERE
  alert("Something is done!");

  // (C) RE-ENABLE AFTER PROCESSING IF YOU WANT
  // document.getElementById("myButton").disabled = false;
}
</script>

<!-- (D) HTML BUTTON -->
<input type="button" id="myButton" onclick="doSomething()"
       value="Click Here To Do Something">
It’s as simple as that, we manually disable the button with document.getElementById("myButton").disabled = true when it is clicked. But yep, take note this will only work on buttons:
<input type="button"><input type="submit"><button>
2) PROTECTION FLAG
<script>
// (A) FLAG FOR "ALREADY CLICKED".
var clicked = false;

// (B) FUNCTION - WILL ONLY RUN IF NOT CLICKED
function doSomething () { if (!clicked) {
  // (B1) SET CLICKED TO TRUE
  clicked = true;

  // (B2) DO YOUR PROCESSING HERE
  alert("Something is done!");

  // (B3) RE-ENABLE AFTER PROCESSING IF YOU WANT
  // clicked = false;
}}
</script>

<!-- (C) HTML ELEMENT -->
<div onclick="doSomething()">
  Click Here To Do Something
</div>
So what if we are not working with buttons? This is one of the possible mechanisms:
- First, we create a “protection” flag
var clicked = false. - Then in our
onclickhandling function, we will only proceedif (!clicked). - Should be Captain Obvious by now – We will set
clicked = trueto prevent further clicks from processing.
3) REMOVE ON-CLICK ATTRIBUTE
<script>
function doSomething () {
  // (A) REMOVE ONCLICK
  var element = document.getElementById("myDiv");
  element.onclick = "";

  // (B) DO YOUR PROCESSING HERE
  alert("Something is done!");

  // (C) RE-ENABLE AFTER PROCESSING IF YOU WANT
  // element.onclick = doSomething;
}
</script>

<!-- (D) HTML ELEMENT -->
<div id="myDiv" onclick="doSomething()">
  Click Here To Do Something
</div>
The above is actually not the preferred “orthodox” method, this one is. We simply remove the onclick from the element with a one-liner document.getElementById("myDiv").onclick = "".
4) ATTACH & DETACH EVENT LISTENER
<script>
// (A) ATTACH CLICK LISTENER ON PAGE LOAD
window.addEventListener("load", () => {
  document.getElementById("myDiv").addEventListener("click", doSomething);
});

// (B) THE USUAL FUNCTION
function doSomething () {
  // (B1) DETACH CLICK LISTENER
  var div = document.getElementById("myDiv");
  div.removeEventListener("click", doSomething);

  // (B2) EXTRA - CHANGE THE TEXT IF YOU WANT
  div.innerHTML = "You clicked";

  // (B3) DO YOUR PROCESSING HERE
  alert("Something is done!");

  // (B4) RE-ENABLE AFTER PROCESSING IF YOU WANT
  // div.addEventListener("click", doSomething);
}
</script>

<!-- (C) HTML ELEMENT -->
<!-- NOTE : NO ONCLICK, ASSIGNED WITH JAVASCRIPT -->
<div id="myDiv">
  Click Here To Do Something
</div>
Now, this one may seem to be a little more long-winded, but it will make sense in the long run as you learn more about the difference between addEventListener and onclick. That is out of point for this tutorial, so just know that there is something called addEventListener() and removeEventListener().
5) UNORTHODOX FUNCTION SWITCHER
<script>
// (A) ALREADY CLICKED
function doClicked () {
  alert("You have already clicked!");
}

// (B) NORMAL FUNCTION
function doSomething () {
  // (B1) SWITCH FUNKY TO DO THE IDLE FUNCTION
  funky = doClicked;

  // (B2) DO YOUR PROCESSING HERE
  alert("Something is done!");
}

// (C) FUNKY SWITCHING FUNCTION
var funky = doSomething;
</script>

<!-- (D) HTML BUTTON -->
<input type="button" id="myButton" onclick="funky()"
       value="Click Here To Do Something">
This last method is not actually “single click protection”, but switching to do something else completely after the first click.
- Create your first function
function doSomething()– This one will do your “main intended processing”. - Create your second function
function doClicked()– This one can be a simple “please wait, now processing” message, or an Easter egg to scare the user. - Then create a variable, point it to the first function
var funky = doSomething. - In the first line of
function doSomething(), switchfunky = doClicked. - That’s about it. Finally, just point the
onclickof the button tofunky.
DOWNLOAD & NOTES

Here is the download link to the example code, so you don’t have to copy-paste everything.
SORRY FOR THE ADS...
But someone has to pay the bills, and sponsors are paying for it. I insist on not turning Code Boxx into a "paid scripts" business, and I don't "block people with Adblock". Every little bit of support helps.
Buy Me A Coffee Code Boxx eBooks
EXAMPLE CODE DOWNLOAD
Click here for the source code on GitHub gist, just click on “download zip” or do a git clone. I have released it under the MIT license, so feel free to build on top of it or use it in your own project.
EXTRA BITS & LINKS

That’s all for this short tutorial, and here is a small section on some extras and links that may be useful to you.
WHICH IS THE BEST?
All of the above methods work just fine, so whichever suits your needs. But if you are doing this “one-click protection” to prevent things like multiple registrations. Please remember to do your checks on the server side as well, check if the given user name or email is already registered.
Also, if you are thinking to stop spam with this, please don’t… Implement a CAPTCHA instead. Google offers it as a free service, and I will put a link below.
LINKS & REFERENCES
- Get Element By ID – MDN
- Event Listener – MDN
- PHP Contact Form with Google Recaptcha – Code Boxx
TUTORIAL VIDEO
INFOGRAPHIC CHEAT SHEET
THE END

Thank you for reading, and we have come to the end of this guide. I hope that it has helped you with your project, and if you want to share anything with this guide, please feel free to comment below. Good luck and happy coding!
Thank you very much!
Thank you!