Welcome to a tutorial on how to create a very simple Progressive Web Application. Just heard of this “PWA” thing and wondering how to get started? Well, let us walk through a barebones PWA example in this guide – Feel free to use it as a template in your own project. Read on!
TABLE OF CONTENTS
BAREBONES PWA

All right, let us now get into the step-by-step example of creating a barebones PWA.
STEP 1) THE HTML
<!DOCTYPE html>
<html lang="en">
  <head>
    <!-- (A) "USUAL" TITLE CHARSET DESCRIPTION VIEWPORT -->
    <title>Barebones PWA</title>
    <meta charset="utf-8">
    <meta name="description" content="A barebones PWA page">
    <meta name="viewport" content="width=device-width, initial-scale=1.0, maximum-scale=1.5">

    <!-- (B) ICONS & PLATFORM SPECIFIC -->
    <!-- (B1) GOOD OLD FAVICON -->
    <link rel="icon" href="favicon.png" type="image/png">

    <!-- (B2) ANDROID/CHROME -->
    <meta name="mobile-web-app-capable" content="yes">
    <meta name="theme-color" content="white">

    <!-- (B3) IOS APP ICON + MOBILE SAFARI -->
    <link rel="apple-touch-icon" href="icon-512.png">
    <meta name="apple-mobile-web-app-capable" content="yes">
    <meta name="apple-mobile-web-app-status-bar-style" content="black">
    <meta name="apple-mobile-web-app-title" content="Hello World">

    <!-- (B4) WINDOWS -->
    <meta name="msapplication-TileImage" content="icon-512.png">
    <meta name="msapplication-TileColor" content="#ffffff">

    <!-- (C) WEB APP MANIFEST -->
    <!-- https://web.dev/add-manifest/ -->
    <link rel="manifest" href="2-manifest.json">

    <!-- (D) SERVICE WORKER -->
    <script>
    if ("serviceWorker" in navigator) { navigator.serviceWorker.register("3-sw.js"); }
    </script>

    <!-- (E) STYLESHEET + JAVASCRIPT -->
    <link rel="stylesheet" href="YOUR-STYLES.css">
    <script defer src="YOUR-SCRIPTS.js"></script>
  </head>
  <body>
    It Works!
  </body>
</html>
As you can see, this is just a “normal” HTML page, except that it has a ton of meta tags. Keep calm and let’s go through them.
- The usual title, character set, description, and HTML viewport – This is set to allow zoom in, not out. Read my other tutorial on disabling pinch-zoom to learn more.
- The optional and irritating part, setting home screen icons and browser-specific theme colors. Everyone has their own set of meta tags, these are the common ones that I gathered from the Internet.
- The web app manifest. This is an important part of a PWA, used to define the app name, description, icons, etc…
- Register a service worker. This is another important piece of the PWA, we will go through more below.
- Your stylesheets and Javascript, if any.
STEP 2) WEB APP MANIFEST
{
  "name": "Demo PWA",
  "short_name": "Demo",
  "icons": [{
     "src": "favicon.png",
     "sizes": "64x64",
     "type": "image/png"
  }, {
    "src": "icon-512.png",
    "sizes": "512x512",
    "type": "image/png"
  }],
  "start_url": "1-index.html",
  "scope": "/",
  "background_color": "white",
  "theme_color": "white",
  "display": "standalone"
}
This is a basic example of a web manifest, consisting of the app name, icons, start URL, and scope. There are many more things we can set in the manifest – Read more on web dev for the full list of manifest properties.
P.S. I find it a waste of time trying to set a ton of custom icon sizes for different systems. One simple way is to use 64X64 for the favicon, and feed a massive 512X512 to everyone else – Let the systems resize this massive icon automatically.
STEP 3) SERVICE WORKER
// (A) CREATE/INSTALL CACHE
self.addEventListener("install", evt => {
  self.skipWaiting();
  evt.waitUntil(
    caches.open("Demo")
    .then(cache => cache.addAll([
      "1-index.html",
      "2-manifest.json"
      //"YOUR-STYLES.css",
      //"YOUR-SCRIPTS.js",
      //"YOUR-IMAGES.jpg"
    ]))
    .catch(err => console.error(err))
  );
});

// (B) CLAIM CONTROL INSTANTLY
self.addEventListener("activate", evt => self.clients.claim());

// (C) LOAD FROM CACHE FIRST, FALLBACK TO NETWORK IF NOT FOUND
self.addEventListener("fetch", evt => evt.respondWith(
  caches.match(evt.request).then(res => res || fetch(evt.request))
));

/* (C) LOAD WITH NETWORK FIRST, FALLBACK TO CACHE IF OFFLINE
self.addEventListener("fetch", evt => evt.respondWith(
  fetch(evt.request).catch(() => caches.match(evt.request))
));*/
What is the whole point of this “service worker”? Offline caching. Yes, another huge part of PWA is being able to function even when the user is offline. A quick summary of what is happening here:
- (A) Create a storage cache and save a list of files inside. Take note, this is NOT the “common browser cache”, but a persistent app cache.
- (C) “Hijack” the browsers fetch calls. We can either:
- Try to load the requested file from the cache first. Fallback and load from the network if the file is not in the cache.
- Or load from the network first, then fall back to a cached copy if the user is offline.
I shall leave a link below if you want to learn more about offline caching.
DEPLOY & TEST
That’s all. Launch http://localhost/1-index.html in your browser and it should offer an option to install the PWA.
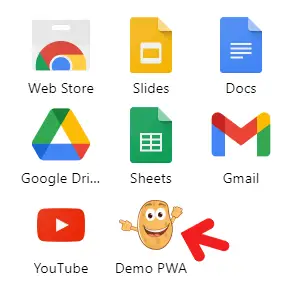
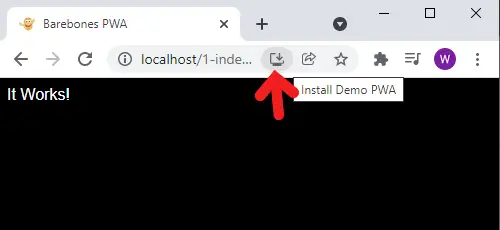 Go ahead and install it. The icon should appear on your home screen or desktop. If you open
 chrome://apps OR opera://apps OR edge://apps the icon should be right there as well.
 P.S. Deleting the icon on your home screen or desktop will not “uninstall” the PWA. You need to do it on the browser apps page itself.
DOWNLOAD & NOTES

Here is the download link to the example code, so you don’t have to copy-paste everything.
SORRY FOR THE ADS...
But someone has to pay the bills, and sponsors are paying for it. I insist on not turning Code Boxx into a "paid scripts" business, and I don't "block people with Adblock". Every little bit of support helps.
Buy Me A Coffee Code Boxx eBooks
EXAMPLE CODE DOWNLOAD
Click here for the source code on GitHub gist, just click on “download zip” or do a git clone. I have released it under the MIT license, so feel free to build on top of it or use it in your own project.
EXTRA BITS & LINKS

That’s all for the tutorial, and here is a small section on some extras and links that may be useful to you.
WHAT ARE THE REQUIREMENTS FOR A PWA?
Just what are the exact requirements to be considered a PWA? It seems like there’s no straight answer at the time of writing, but I will point to 3 principles on web dev:
- Capable: Can do all kinds of funky things. Video, audio, save data, send data, peer-to-peer, etc…
- Reliable: Has fallback for old browsers, and works even when offline.
- Installable: As above.
So yes, we have pretty much covered “reliable” and “installable” in this quick guide. It is up to you to develop your own “capable”.
SECURE ORIGIN
A gentle reminder – You must use https:// for “install app” to show up, and to register service workers. http://localhost is an exception for development and testing.
COMPATIBILITY CHECKS
- Arrow Functions – CanIUse
- Service Worker – CanIUse
- Storage Cache – CanIUse
Works on all modern “Grade A” browsers.
LINKS & REFERENCES
- Service Worker API – MDN
- Caching Files With Service Worker – Google Developers
THE END

Thank you for reading, and we have come to the end. I hope that it has helped you to better understand, and if you want to share anything with this guide, please feel free to comment below. Good luck and happy coding!