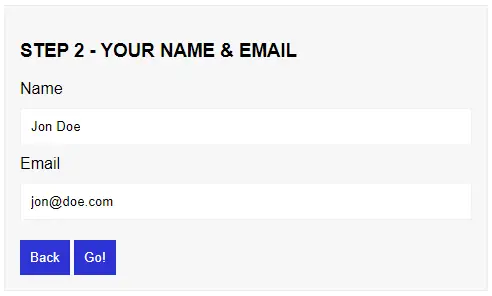
Welcome to a tutorial on how to create a wizard form with pure HTML and Javascript. Need to create a simple wizard form? Only to find crazy complex and bloated ones on the Internet? Here is a simple one that I made – Read on for the example!
TABLE OF CONTENTS
HTML JS WIZARD FORM
All right, let us now get into the example of building a simple wizard form with pure HTML and Javascript.

PART 1) THE HTML
<div id="wiz">
  <form class="step">
    <h3>STEP 1 - CHOOSE A MEME ANIMAL</h1>
    <label>
      <input type="radio" name="meme" value="Doge" required> Doge
    </label>
    <label>
      <input type="radio" name="meme" value="Cate" required> Cate
    </label>
    <input type="submit" value="Next">
  </form>

  <form class="step">
    <h3>STEP 2 - YOUR NAME & EMAIL</h1>
    <label>Name</label>
    <input type="text" name="name" required>
    <label>Email</label>
    <input type="email" name="email" required>
    <input type="button" class="back" value="Back">
    <input type="submit" value="Go!">
  </form>
</div>
Let us start by building the wizard form. No need to panic, keep calm and look carefully:
- We are just putting multiple steps
<form class="step">into a<div id="wiz">wrapper. - Just build the forms “as usual” – There must be a
<input type="submit">button for every step. - It is optional to add a back button –
<input type="button" class="back">.
That’s all.
PART 2) THE CSS
/* (A) ENTIRE PAGE */
* {
  font-family: Arial, Helvetica, sans-serif;
  box-sizing: border-box;
}

/* (B) WIZARD FORM */
#wiz {
  max-width: 600px;
  padding: 15px;
  border: 1px solid #eee;
  background: #f7f7f7;
}
#wiz .step { display: none; }
#wiz .now { display: block !important; }

/* (C) WIZARD FORM FIELDS */
#wiz label, #wiz input[type=text], #wiz input[type=email] {
  display: block;
  width: 100%;
}
#wiz label { margin: 10px 0; }
#wiz input[type=text], #wiz input[type=email] {
  border: 1px solid #f2f2f2;
  padding: 10px;
}
#wiz input[type=button], #wiz input[type=submit] {
  padding: 10px;
  margin-top: 20px;
  border: 0;
  color: #fff;
  background: #2d32d5;
  cursor: pointer;
}
The only functional part here is:
#wiz .step { display: none; }#wiz .now { display: block !important; }
The rest are cosmetics – Feel free to change them however you wish.
PART 3) THE JAVASCRIPT
function wiz () {
  // (A) FLAGS & PROPERITES
  let hSteps = document.querySelectorAll("#wiz form.step"), // wizard steps
      steps = hSteps.length - 1, // total number of steps
      now = 0; // current step

  // (B) LAST STEP / NEXT STEP / SUBMIT
  let proceed = next => {
    // (B1) UPDATE CURRENT STEP
    if (next) { now++; } else { now--; }

    // (B2) THIS IS THE LAST STEP
    // @TODO - COMPLETE THIS ON YOUR OWN!
    if (now>steps) {
      /* (B2-1) AJAX SUBMIT?
      let form = new FormData();
      for (let s of hSteps) {
        for (let [k,v] of new FormData(s)) { form.append(k,v); }
      }
      fetch("SERVER-SCRIPT", { method:"post", body:form })
      .then(res => res.text())
      .then(txt => alert(txt));
      */

      /* (B2-2) REDIRECT WITH URL SEARCH PARAMS?
      let params = new URLSearchParams();
      for (let s of hSteps) {
        for (let [k,v] of new FormData(s)) { params.append(k,v); }
      }
      location.href = "URL?" + params.toString();
      */
    }

    // (B3) SHOW LAST/NEXT STEP
    else { for (let i=0; i<=steps; i++) {
      if (i==now) { hSteps[i].classList.add("now"); }
      else { hSteps[i].classList.remove("now"); }
    }}

    // (B4) PREVENT DEFAULT HTML FORM SUBMIT
    return false;
  };

  // (C) AUTO ATTACH LAST STEP / NEXT STEP / SUBMIT
  for (let i=0; i<=steps; i++) {
    // (C1) LAST STEP - IF ANY
    let back = hSteps[i].querySelector(".back");
    if (back) { back.onclick = () => proceed(); }

    // (C2) NEXT STEP
    hSteps[i].onsubmit = () => proceed(true);
  }

  // (D) READY - SHOW FIRST STEP
  hSteps[0].classList.add("now");
}
window.addEventListener("DOMContentLoaded", wiz);
TLDR – Just change (B2) to your own, do something when the user completes the entire wizard form.
DOWNLOAD & NOTES
Firstly, here is the download link to the example code as promised.
SORRY FOR THE ADS...
But someone has to pay the bills, and sponsors are paying for it. I insist on not turning Code Boxx into a "paid scripts" business, and I don't "block people with Adblock". Every little bit of support helps.
Buy Me A Coffee Code Boxx eBooks
EXAMPLE CODE DOWNLOAD
Click here for the source code on GitHub gist, just click on “download zip” or do a git clone. I have released it under the MIT license, so feel free to build on top of it or use it in your own project.
EXTRA BITS & LINKS
That’s all for the tutorial, and here is a small section on some extras and links that may be useful to you.
COMPATIBILITY CHECKS
- Arrow Functions – CanIUse
- Fetch – CanIUse
Works on all modern “Grade A” browsers.
LINKS & REFERENCES
- Display Message After Submitting HTML Form – Code Boxx
- Submit Form Without Reloading – Code Boxx
- Example on Codepen – Simple HTML JS Wizard Form
THE END
Thank you for reading, and we have come to the end. I hope that it has helped you to better understand, and if you want to share anything with this guide, please feel free to comment below. Good luck and happy coding!
