Welcome to a tutorial on how to create a simple eCommerce website with PHP. Want to build an eCommerce website? Only to find overly complex project examples all over the Internet? Well, here’s a simple one that does not involve a database – Read on!
TABLE OF CONTENTS
DOWNLOAD & NOTES
Here is the download link to the example code, so you don’t have to copy-paste everything.
EXAMPLE CODE DOWNLOAD
Just click on “download zip” or do a git clone. I have released it under the MIT license, so feel free to build on top of it or use it in your own project.
SORRY FOR THE ADS...
But someone has to pay the bills, and sponsors are paying for it. I insist on not turning Code Boxx into a "paid scripts" business, and I don't "block people with Adblock". Every little bit of support helps.
Buy Me A Coffee Code Boxx eBooks
PHP ECOMMERCE
All right, let us now get into more details on how the simple eCommerce website works.
PART 1) PHP LIBRARY
<?php
if (isset($_POST["req"])) {
  // (A) PRODUCTS LIST
  $products = [
    1 => [
      "n" => "Laptop",
      "p" => 345.67,
      "i" => "img-a.png"
    ],
    2 => [
      "n" => "Smartphone",
      "p" => 123.45,
      "i" => "img-b.png"
    ],
    3 => [
      "n" => "Tablet",
      "p" => 234.56,
      "i" => "img-c.png"
    ],
    4 => [
      "n" => "Headphones",
      "p" => 34.56,
      "i" => "img-d.png"
    ]
  ];

  // (B) HANDLE REQUESTS
  switch ($_POST["req"]) {
    // (B1) INVALID REQUEST
    default: echo "Invalid request"; break;

    // (B2) GET PRODUCTS
    case "get":
      echo json_encode($products);
      break;

    // (B3) CHECKOUT
    case "checkout":
      // (B3-1) DATA YOGA
      $cart = json_decode($_POST["cart"], true);
      unset($_POST["req"]);
      unset($_POST["cart"]);

      // (B3-2) SEND VIA EMAIL
      $msg = "";
      foreach ($_POST as $k=>$v) { $msg .= "$k : $v\r\n"; }
      foreach ($cart as $i=>$q) {
        $msg .= sprintf("%u X %s - $%s\r\n",
          $q, $products[$i]["n"], $q * $products[$i]["p"]
        );
      }
      echo mail("admin@site.com", "Order Received", $msg)
        ? "OK" : "Failed to send email";
      break;
  }
}- Since there is no database, the only way is to hardcode products in an array. This is in the structure of
ID => DETAILS.nProduct name.pProduct price.iProduct image.
- This part is the AJAX handler, just send the request
$_POST["req"]along with the required parameters.$_POST["req"] = "get"Outputs the list of products in a JSON-encoded string.$_POST["req"] = "checkout"Checks out the cart items, and sends them out via email. Remember to change the email address to your own.$_POST["cart"]Required. A JSON-encoded string of cart items, in the format ofID : QUANTITY.$_POST["ANY OTHER"]Other information such as name, email, telephone, address, whatever you want to capture.
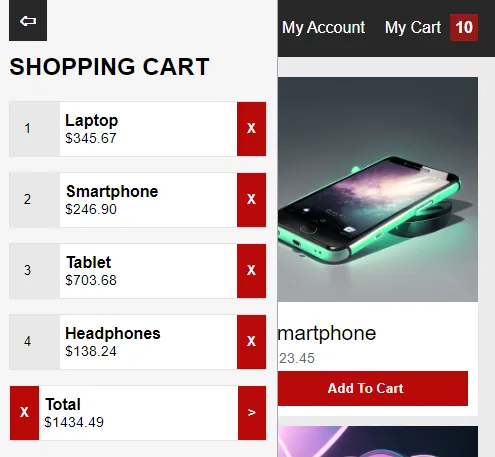
PART 2) SHOPPING PAGE
<!-- (A) PRODUCTS + SHOPPING CART -->
<div id="wrap">
<!-- (A1) HEADER -->
<div id="head">
<div id="iCart">
My Cart <span id="cCart">0</span>
</div>
<div id="iDummy">My Account</div>
</div>
<!-- (A2) PRODUCTS -->
<div id="products"></div>
<!-- (A3) CART ITEMS -->
<div id="wCart">
<span id="wCartClose" class="button" onclick="document.getElementById('wCart').classList.remove('show')">⇦</span>
<h2>SHOPPING CART</h2>
<div id="cart"></div>
</div>
</div>
<!-- (B) CHECKOUT FORM -->
<div id="checkout"><form onsubmit="return shop.checkout()">
<div id="cgClose" class="button" onclick="shop.togcf(false)">X</div>
<label>Name</label>
<input type="text" name="name" required value="Jon Doe">
<label>Email</label>
<input type="email" name="email" required value="jon@doe.com">
<input class="button" type="submit" value="Checkout">
</form></div>- The “main page” itself.
<div id="head">Pretty much just a “toggle show/hide cart” button.<div id="products">A container to draw the products in.<div id="cart">To draw the current cart items.
- A hidden checkout form. Feel free to add more fields that you want to capture.
PART 3) THE JAVASCRIPT
3A) AJAX FETCH HELPER FUNCTION
var shop = {
  // (A) HELPER - AJAX FETCH
  fetch : (data, after) => {
    // (A1) FORM DATA
    let form;
    if (data instanceof FormData) { form = data; }
    else {
      form = new FormData();
      for (let [k, v] of Object.entries(data)) { form.append(k, v); }
    }

    // (A2) FETCH
    fetch("1-lib.php", { method : "post", body : form })
    .then(res => res.text())
    .then(txt => after(txt))
    .catch(err => console.error(err));
  },
  // ...
};
var shopis an object that contains all the “shopping” mechanisms.shop.fetch()is but a simple helper function to do an AJAX call to1-lib.php.
3B) PROPERTIES
// (B) PROPERTIES
hPdt : null, // html products
hCart : null, // html cart
hCCart : null, // html cart count
hCO : null, // html checkout wrapper
hCOF : null, // html checkout form
products : null, // products list
cart : null, // cart items
qty : 0, // cart total item quantity
total : 0, // cart total amount
hPdt hCart hCCart hCO hCOFReferences to HTML elements.productsArray of products, which will be loaded from1-lib.php.cartThe current cart items, in the structure of{ ID : QUANTITY }.qtyThe current total quantity.totalThe current total amount.
3C) INITIALIZE
// (C) INITIALIZE
init : () => {
  // (C1) GET HTML ELEMENTS
  shop.hPdt = document.getElementById("products");
  shop.hCart = document.getElementById("cart");
  shop.hCCart = document.getElementById("cCart");
  shop.hCO = document.getElementById("checkout");
  shop.hCOF = document.querySelector("#checkout form");

  // (C2) CLICK TO TOGGLE CART
  document.getElementById("iCart").onclick = () => {
    document.getElementById("wCart").classList.toggle("show");
  };

  // (C3) RESTORE CART
  shop.cart = localStorage.getItem("cart");
  if (shop.cart == null) { shop.cart = {}; }
  else { shop.cart = JSON.parse(shop.cart); }

  // (C4) LOAD PRODUCTS > DRAW HTML
  shop.fetch({"req": "get"}, data => {
    // (C4-1) PARSE DATA INTO JS OBJECT
    shop.products = JSON.parse(data);

    // (C4-2) DRAW HTML PRODUCTS
    for (let [id, pdt] of Object.entries(shop.products)) {
      let row = document.createElement("div");
      row.className = "pCell";
      row.innerHTML = `<img class="pImg" src="assets/${pdt.i}">
      <div class="pDetails">
        <div class="pName">${pdt.n}</div>
        <div class="pPrice">$${pdt.p.toFixed(2)}</div>
        <input class="pAdd button" type="button" value="Add To Cart" onclick="shop.add(${id})">
      </div>`;
      shop.hPdt.appendChild(row);
    }

    // (C4-3) DRAW CART ITEMS
    shop.drawcart();
  });
},
window.onload = shop.init;
shop.init() Runs on page load. Not going to explain line-by-line, but a quick walkthrough:
- (C1) Get all the related HTML elements.
- (C2) Click to toggle show/hide the cart items.
- (C3) The shopping cart is saved in the
localStorageas a JSON-encoded string. This part simply restores the cart session fromlocalStoragetoshop.cart. - (C4) Fetch the product entries from
1-lib.php, and draw the HTML products plus cart items.
3D) CART ACTIONS
// (D) SAVE CART ITEMS INTO LOCALSTORAGE
save : () => localStorage.setItem("cart", JSON.stringify(shop.cart)),
// (E) DRAW CART ITEMS
drawcart : () => {
// (E1) RESET
let row;
shop.total = 0;
shop.hCart.innerHTML = "";
// (E2) EMPTY CART
if (Object.keys(shop.cart).length==0) {
row = document.createElement("div");
row.className = "cCell";
row.innerHTML = `Cart is empty`;
shop.hCart.appendChild(row);
shop.hCCart.innerHTML = 0;
}
// (E3) DRAW ITEMS
else {
for (let [i, q] of Object.entries(shop.cart)) {
// (E3-1) CALCULATE SUBTOTAL
let subtotal = q * shop.products[i]["p"];
shop.total += subtotal;
shop.qty += parseInt(q);
// (E3-2) ITEM ROW
row = document.createElement("div");
row.className = "cCell";
row.innerHTML = `<input class="cQty" type="number" value="${q}"
min="0" max="99" onchange="shop.change(${i}, this.value)">
<div class="cInfo">
<div class="cName">${shop.products[i]["n"]}</div>
<div class="cPrice">$${subtotal.toFixed(2)}</div>
</div>
<input class="cDel button" type="button" value="X" onclick="shop.remove(${i})">`;
shop.hCart.appendChild(row);
}
// (E3-3) CART TOTAL
row = document.createElement("div");
row.className = "cCell";
row.innerHTML = `<input class="cDel button" type="button" value="X" onclick="shop.empty()">
<div class="cInfo">
<div class="cName">Total</div>
<div class="cPrice">$${shop.total.toFixed(2)}</div>
</div>
<input class="cDel button" type="button" value=">" onclick="shop.togcf(true)">`;
shop.hCart.appendChild(row);
// (E3-4) TOTAL QUANTITY
shop.hCCart.innerHTML = shop.qty;
}
},
// (F) ADD PRODUCT TO CART
add : id => {
if (shop.cart[id]==undefined) { shop.cart[id] = 1; }
else { shop.cart[id]++; }
shop.save(); shop.drawcart();
},
// (G) CHANGE QUANTITY IN CART
change : (id, qty) => {
if (qty <= 0) { shop.remove(id) }
else { shop.cart[id] = qty; }
shop.save(); shop.drawcart();
},
// (H) REMOVE PRODUCT FROM CART
remove : id => {
delete shop.cart[id];
shop.save(); shop.drawcart();
},
// (I) EMPTY CART
empty : () => { if (confirm("Empty cart?")) {
shop.cart = {};
shop.save(); shop.drawcart();
}},
// (J) TOGGLE CHECKOUT FORM
togcf : show => {
if (show) { shop.hCO.className = "show"; }
else { shop.hCO.className = ""; }
},
// (K) CHECKOUT
checkout : () => {
// (K1) FORM DATA
let form = new FormData(shop.hCOF);
form.append("req", "checkout");
form.append("cart", JSON.stringify(shop.cart));
// (K2) AJAX PROCESS
shop.fetch(form, res => {
if (res=="OK") {
shop.cart = {};
shop.save();
shop.drawcart();
shop.togcf(false);
alert("CHECKOUT OK. DO SOMETHING - REDIRECT TO THANK YOU?");
} else { alert(res); }
});
// (K3) PREVENT FORM SUBMIT
return false;
}The last few sections of the Javascript deal with the shopping cart.
- (D)
save()Savesshop.cartinto thelocalStorage. - (E)
drawcart()Loops through the current cart itemsshop.cartand draws the HTML. - (F)
add()Add an item to the cart. - (G)
change()Update item quantity. - (H)
remove()Remove item from the cart. - (I)
empty()Remove all items from the cart. - (J)
togcf()Show/hide the checkout form. - (K)
checkout()Checkout the current cart items. Complete this function on your own.
EXTRAS
That’s all for the tutorial, and here is a small section on some extras and links that may be useful to you.
IMPROVEMENT IDEAS
This example works, but it is extremely simplistic. A lot can be done to make it better.
- Complete the checkout process – Capture more fields, send to admin, send to customer, and create your own “nice email template”. See links below.
- Add more security and checks – Double-check the checkout in
1-lib.phpfor valid name/email/products. - If you want user registration and login, the only way is to involve a database. Keeping user data in a flat file is never a good idea. See links below.
- Admin Panel – It is possible to build a simple one and secure it using HTTP authentication.
- Online payment – Paypal, Stripe, Google Pay, Apple Pay, Wise, Payoneer, whatever else.
The possibilities are endless and I cannot give free consultations to everyone. The rest is up to you to complete.
COMPATIBILITY CHECKS
- Arrow Functions – CanIUse
- Fetch – CanIUse
- Local Storage – CanIUse
This example should work on all modern “Grade A” browsers.
A WAY BETTER SHOPPING CART
 A shopping cart with product options, categories, discount coupons, user system, admin panel, API, and an installable web app - Click here to check out my eBook!
LINKS & REFERENCES
- PHP Send Email With HTML Template – Code Boxx
- Shopping Cart With PHP MySQL – Code Boxx
- Simple User Registration With PHP MYSQL – Code Boxx
- Simple User Login With PHP MYSQL – Code Boxx
- User Role Management With PHP MYSQL – Code Boxx
- Very Simple Pure HTML CSS Admin Panel – Code Boxx
THE END
Thank you for reading, and we have come to the end. I hope that it has helped you to better understand, and if you want to share anything with this guide, please feel free to comment below. Good luck and happy coding!