Welcome to a tutorial on how to create a simple bounce effect with pure CSS. Once upon a time in the Stone Age of the Internet, we have to work with all kinds of third-party plugins to do simple animation. Fast-forward today, things are so easy with CSS animation.
To create a simple bounce effect with CSS, we can use a combination of keyframes and animations.
- Create the HTML element.
<div id="demo"></div>#demo { width: 100px; height: 100px; background: red; }
- Define the bouncing keyframes, and attach them to the element.
@keyframes bounce { 0% { transform: translateY(0); } 100% { transform: translateY(-50px); } }#demo { animation: bounce 0.8s infinite alternate; }
That covers the basics, but read on for more examples!
TABLE OF CONTENTS
DOWNLOAD & NOTES
Here is the download link to the example code, so you don’t have to copy-paste everything.
EXAMPLE CODE DOWNLOAD
Click here to download | Example on CodePen
Just click on “download zip” or do a git clone. I have released it under the MIT license, so feel free to build on top of it or use it in your own project.
SORRY FOR THE ADS...
But someone has to pay the bills, and sponsors are paying for it. I insist on not turning Code Boxx into a "paid scripts" business, and I don't "block people with Adblock". Every little bit of support helps.
Buy Me A Coffee Code Boxx eBooks
CSS BOUNCE EFFECT
All right, let us now get into the example and create a bouncing ball with HTML and CSS.
TUTORIAL VIDEO
STEP 1) STATIC RED BALL
<div class="ball"></div>/* (A) STATIC BALL */
.ball {
/* (A1) DIMENSIONS */
width: 100px; height: 100px;
border-radius: 50%;
/* (A2) MORE TOP MARGIN FOR BOUNCE ANIMATION */
margin: 80px auto 0 auto;
/* (A3) COLOR */
background: #f45342;
}This should be pretty self-explanatory –
- We use
width: 100pxandheight: 100pxto create a square, thenborder-radius: 50%to turn it into a circle. - Leave some margin space to the top for the bouncing animation –
margin: 80px auto 0 auto.
STEP 2) SIMPLE BOUNCE ANIMATION
/* (B) SIMPLE BOUNCE */
@keyframes bounce {
  0% { transform: translateY(0); }
  100% { transform: translateY(-50px); }
}
.bounce { animation: 0.8s infinite alternate bounce; }
Yep, that is all the CSS we need to create a bouncing ball:
- Start by creating the
@keyframes bounce, we are just moving the ball up-and-down withtranslateYhere. - Next, attach the
@keyframesto the.ballCSS class withanimation: 0.8s bounce. - It would be weird if the bounce animation only ran in one direction. The ball would move nicely upward, then abruptly fall back into the
translateY(0)position. To “fix” this, we setanimation-direction: alternateto run the animation in alternate directions. - Finally, loop the animation infinitely with
animation-iteration-count: infinite.
STEP 3) ADDING “GRAVITY”
/* (C) ADDING "GRAVITY" */
@keyframes gbounce {
  0% { transform: translateY(0); }
  30% { transform: translateY(-50px); }
  50% { transform: translateY(0); }
  100% { transform: translateY(0); }
}
.gbounce { animation: 2s ease infinite gbounce; }
The above simple linear bounce works, but this is a small addition for those who want more – Let us give it a little more “life-like” characteristic by adding “gravity” to the equation.
- We now define more
@keyframesto give the ball “less airtime”, a faster fall, and a short delay before “jumping”. - Going along with the updated
@keyframesisanimation-timing-function: ease– Play around with the various timing functions, and see which works best. - Take note – We no longer need
animation-direction: alternatesince the@keyframeswill pretty much loop itself.
STEP 4) SPRING EFFECT
/* (D) ADDING "SPRING EFFECT" */
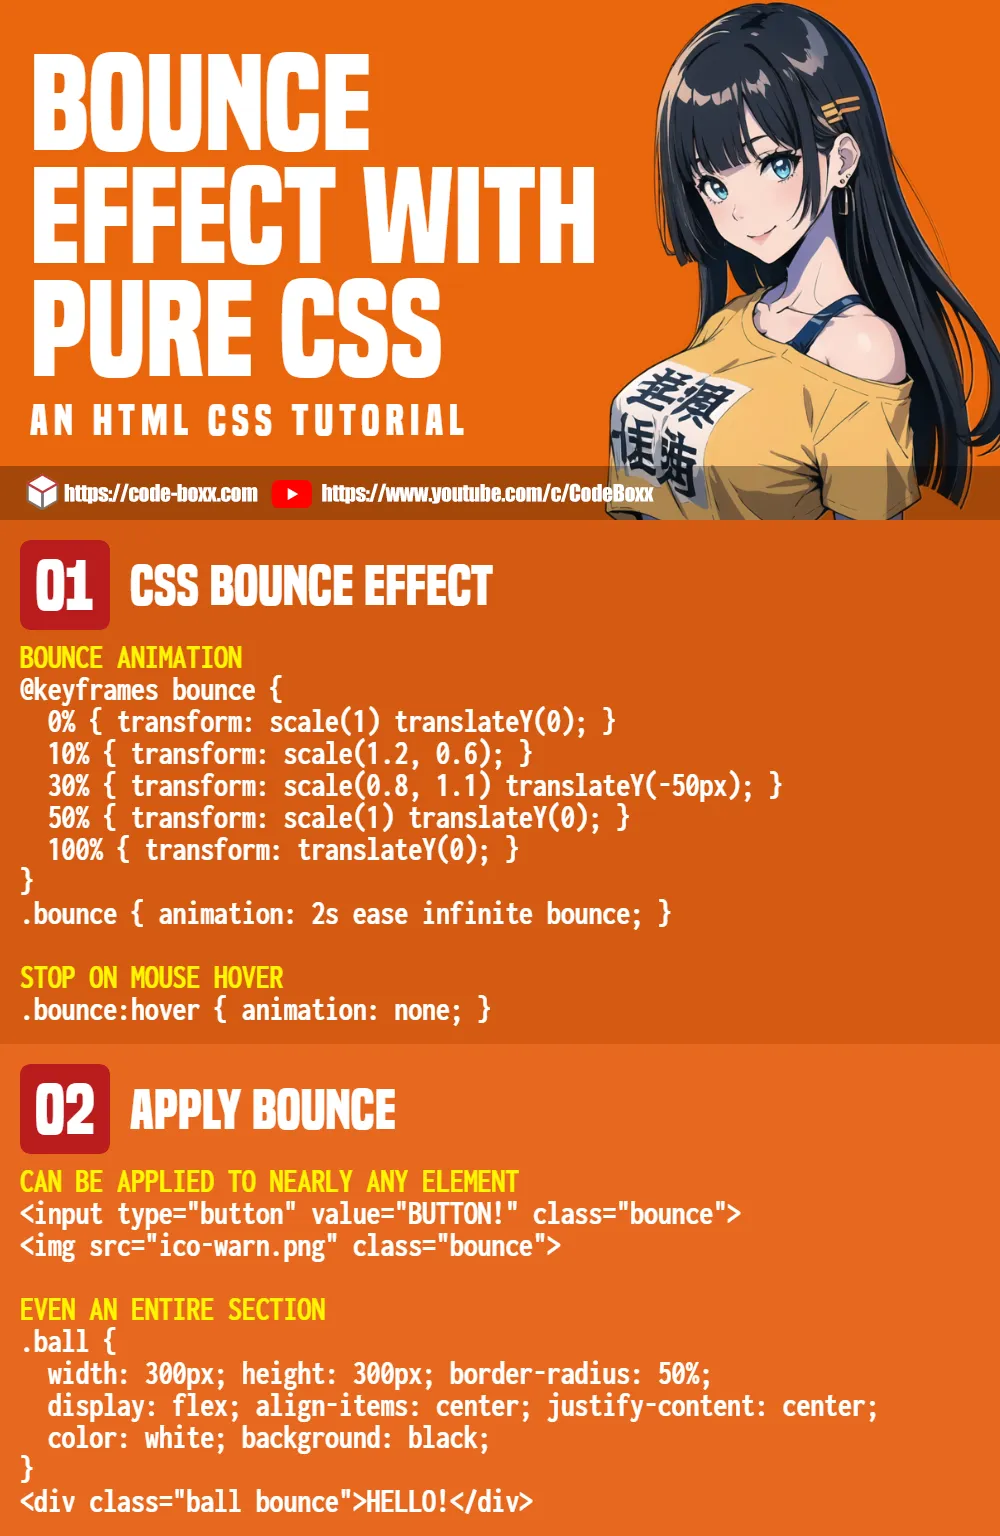
@keyframes spring {
0% { transform: scale(1) translateY(0); }
10% { transform: scale(1.2, 0.6); }
30% { transform: scale(0.8, 1.1) translateY(-50px); }
50% { transform: scale(1) translateY(0); }
100% { transform: translateY(0); }
}
.spring { animation: 2s ease infinite spring; }Finally, this one is for the “perfectionists” – A liquid bounce with spring effect:
- All we need to do is to add a couple more
scaletransformations. - Before the ball makes the jump, we will add a “spring compression” by scaling the horizontal to be longer, and the vertical to be shorter.
- As the ball makes the jump, we will make it look taller by scaling the horizontal to be shorter, and the vertical to be longer.
- Finally, as the ball drops, it reverts to the “normal proportions”.
EXTRAS
That’s it for the bouncing CSS, and here are a few small extras that you may find to be useful.
EXTRA) STOP ON MOUSE HOVER
.spring:hover { animation: none; }To stop the CSS animation, we simply set animation: none. We can combine this with the :hover CSS pseudo-class to stop the bounce effect on mouse hover, or even use Javascript to stop it programmatically.
EXTRA) BOUNCE ON IMAGES & BUTTONS
<input type="button" value="BUTTON!" class="spring">
<img src="ico-warn.png" class="spring">
Yes, the bounce effect can also be applied to other HTML elements such as images and buttons as well.
INFOGRAPHIC CHEAT SHEET
COMPATIBILITY CHECK
- CSS Animation – CanIUse
- CSS Transform – CanIUse
This example will work on most modern browsers – The required CSS3 properties are already well-supported at the time of writing.
LINKS & REFERENCES
- CSS Animation – MDN
- CSS Transform – MDN
THE END
Thank you for reading, and we have come to the end of this short guide. I hope that it has helped you to create a better website, and if you have anything to share with this guide, please feel free to comment below. Happy coding and good luck!
thank you for this! I haven’t implemented it yet, but will use in the future.
It was all good, up until the horrible example of “Subscribe now”.
If as a web developer you find yourself creating such a button, please stop and redirect your energy elsewhere.
Subscriptions are a pure dark pattern.
Wow. Much deep. Such reasoning. Very argument. Can you please share more reasons why a subtly animated bouncing button is bad? I am but a simple Earthling and don’t understand those cosmic bad dark energy stuff. So… In simple, proper, and pragmatic English, please?
P.S. This guy is a master troll, and I figure it is too funny to ignore – So I approved. 😆
The button is horrible, no need to be a troll to see that. Thanks for the effects though.
https://code-boxx.com/faq/#nolike
Interesting. Another master who can see the “dark side of the force” by “cosmic enlightenment”.
For the artsy-fartsy masters who may be ticked off in the future, here is a reminder – Personal opinions are fine, but they don’t benefit other readers. Please give your sound reasoning and arguments.