Welcome to a quick tutorial on how to remove or reset CSS styles from an HTML element. So a certain element on your webpage is showing the wrong CSS styles and needs to be reset?
- To reset a single CSS property for an element –
#ID { PROPERTY: initial; } - To reset all CSS styles for an HTML element –
#ID { all: initial; } - We can also use Javascript to reset the CSS styles –
document.getElementById("ID").style.all = "initial";
That covers the basics, but resetting CSS styles is actually not that simple. Let us walk through a few examples in this guide – Read on!
ⓘ I have included a zip file with all the example source code at the start of this tutorial, so you don’t have to copy-paste everything… Or if you just want to dive straight in.
TLDR – QUICK SLIDES
[web_stories_embed url=”https://code-boxx.com/web-stories/reset-css/” title=”How To Reset/Remove CSS From HTML Element” poster=”https://code-boxx.com/wp-content/uploads/2022/03/STORY-HTML-20230505.webp” width=”360″ height=”600″ align=”center”]
Fullscreen Mode – Click Here
TABLE OF CONTENTS
DOWNLOAD & NOTES

Firstly, here is the download link to the example code as promised.
QUICK NOTES
If you spot a bug, feel free to comment below. I try to answer short questions too, but it is one person versus the entire world… If you need answers urgently, please check out my list of websites to get help with programming.
EXAMPLE CODE DOWNLOAD
Click here to download the source code, I have released it under the MIT license, so feel free to build on top of it or use it in your own project.
CSS RESET

All right, let us now get into the examples on how to reset CSS styles, and how they work exactly.
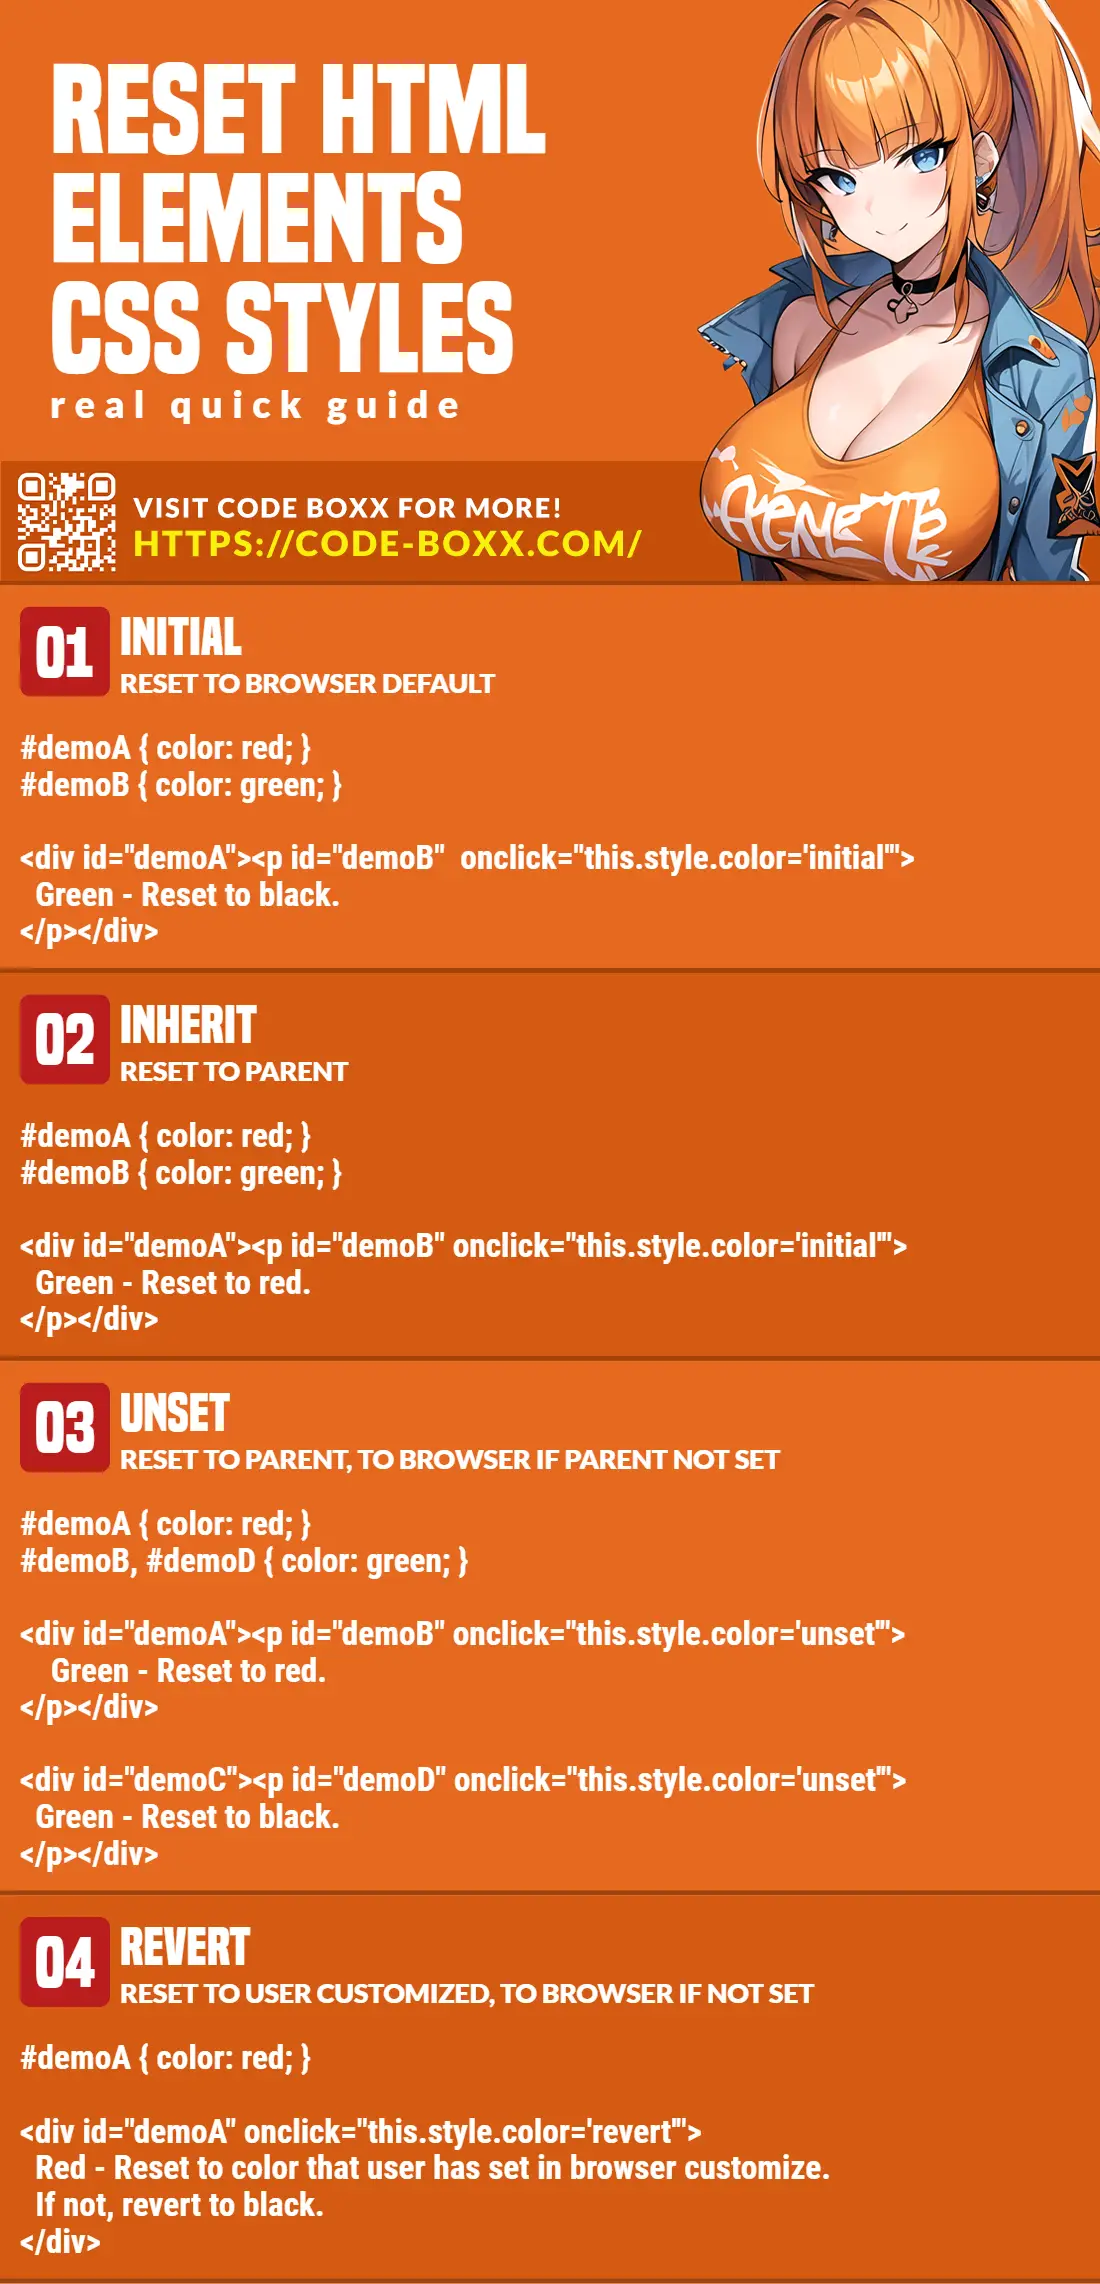
THE 4 HORSEMEN OF CSS RESET
In the introduction, we have only used inherit. But in actual fact, there are more ways to “reset” CSS styles.
| Reset Value | Description | Reference Link |
initial |
Reverts the CSS value back to the “browser default”. | Click Here |
inherit |
Restores the CSS value to follow the parent. | Click Here |
unset |
Attempt to revert to the inherited value first. If none is defined, it will revert to the initial value. | Click Here |
revert |
Restore back to the user style sheet first. If none is defined, it will go back to the initial. | Click Here |
Yes, it’s kind of confusing. Let us walk through simple examples to better explain each one.
1) RESET TO INITIAL
<!-- (A) CSS STYLES -->
<style>
#demoA-parent { color: red; }
#demoA-child { color: green; }
</style>

<!-- (B) HTML -->
<div id="demoA-parent">
  <p>Red</p>
  <p id="demoA-child" onclick="this.style.color='initial'">
    Green - Click To Reset
  </p>
</div>
Red
Green – Click To Reset
For you guys who are still new to CSS, here is what happens.
- When we set
#demoA-parent { color: red }, all the children will also adopt this style. Both<p>inside will have red text. #demoA-child { color: green }will override and turn the text green.- When we set
#demoA-child { color: initial }, it will do a hard reset and revert to the browser default black (instead of red).
2) RESET TO INHERIT
<!-- (A) CSS STYLES -->
<style>
#demoB-parent { color: red; }
#demoB-child { color: green; }
</style>

<!-- (B) HTML -->
<div id="demoB-parent">
  <p>Red</p>
  <p id="demoB-child" onclick="this.style.color='inherit'">
    Green - Click To Reset
  </p>
</div>
Red
Green – Click To Reset
Following up from the previous example, we now reset to inherit instead. Take note of how it reverts to the parent’s red instead of the browser default black.
3) UNSET
<!-- (A) CSS STYLES -->
<style>
#demoC-parent { color: red; }
#demoC-child, #demoD-child { color: green; }
</style>

<!-- (B) HTML -->
<div id="demoC-parent">
  <p id="demoC-child" onclick="this.style.color='unset'">
    Parent Red - Click To Reset
  </p>
</div>
<div id="demoD-parent">
  <p id="demoD-child" onclick="this.style.color='unset'">
    Parent None - Click To Reset
  </p>
</div>
Parent Red – Click To Reset
Parent None – Click To Reset
Now, unset is a “selective” one – If the parent has a user-defined style, it will resolve to use inherit. If not, it will resolve to use initial instead.
#demoC-parentis set tocolor: red, while#demoD-parentis not.- So when we set
#demoC-child { color: unset }, it will resolve toinheritand turns red. - But when we set
#demoD-child { color: unset }, it will resolve toinitialand turns black.
4) REVERT
<!-- (A) CSS STYLES -->
<style>
#demoE { color: red; }
</style>

<div id="demoE" onclick="this.style.color='revert'">
  Click To Revert
</div>
To fully understand how revert works, we have to go back to the basics of CSS first. The term “cascading” actually comes from the various places where the styles can be defined. In general, there are 3 sources of stylesheets:
- Author Style Sheet – Styles defined by the developer of the website. This one has the highest priority.
- User Style Sheet – The customizations that users set in their own browsers. I.E. Use a different font, different font size, font color, etc…
- User-Agent Style Sheet – This is the “browser default”. Has the lowest priority.
Now, revert is confusing in the sense that:
initialwill revert to the user-agent style sheet (browser default).revertwill try the user style sheet (user customization) first. If none is found, it will go back toinitial.
A quick example will illustrate this better:
- User A did not set any customizations,
revertwill fall back to the browser default black. - User B customized the browser default to funky neon green fonts,
revertwill fall back to the funky neon green.
EXTRA BITS & LINKS

That’s all for the tutorial, and here is a small section on some extras and links that may be useful to you.
LINKS & REFERENCES
- All – CSS Tricks
- Reset/remove CSS styles for element only – Stack Overflow
INFOGRAPHIC CHEAT SHEET
THE END

Thank you for reading, and we have come to the end. I hope that it has helped you to better understand, and if you want to share anything with this guide, please feel free to comment below. Good luck and happy coding!