Welcome to a tutorial on how to pass variables between pages in Javascript. Need to pass some data between different pages?
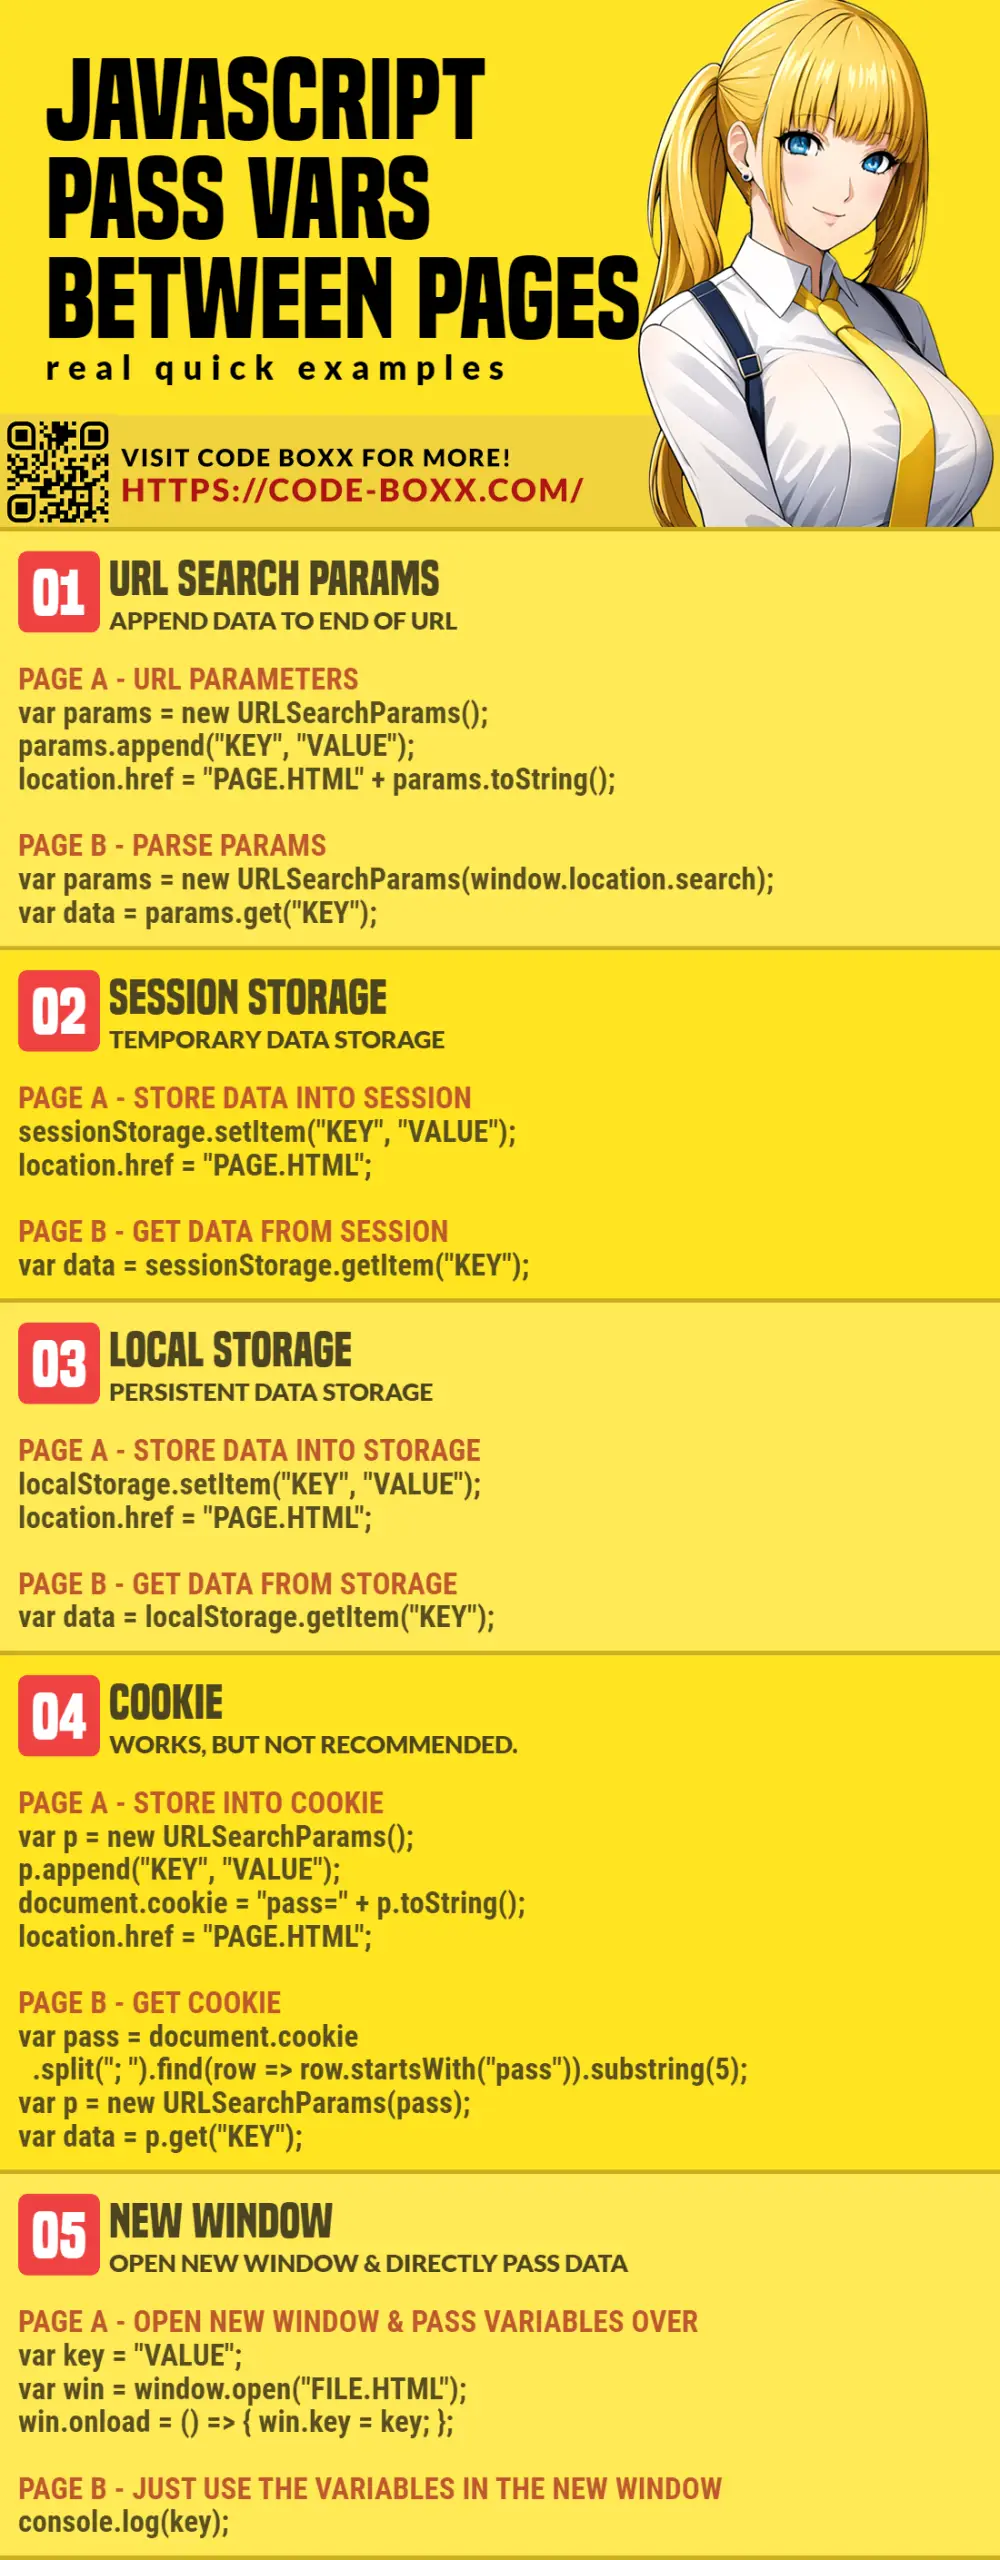
An easy way to pass variables between pages is to use a query string:
- On the first page:
var para = new URLSearchParams();para.append("KEY", "VALUE");location.href = "HTTP://SITE.COM/PAGE.HTML?" + para.toString();
- On the second page:
var para = new URLSearchParams(window.location.search);var pass = para.get("KEY");
That’s all. But let us walk through more methods and examples in this guide, read on!
TLDR – QUICK SLIDES
[web_stories_embed url=”https://code-boxx.com/web-stories/pass-variables-between-pages-in-javascript/” title=”Pass Variables Between Pages In Javascript” poster=”https://code-boxx.com/wp-content/uploads/2021/11/STORY-JS-20230518.webp” width=”360″ height=”600″ align=”center”]
Fullscreen Mode – Click Here
TABLE OF CONTENTS
PASS VARIABLES BETWEEN PAGES

All right, let us now get into the ways to pass variables between pages in Javascript.
METHOD 1) URL SEARCH PARAMETERS
<script>
function go () {
  // (A) VARIABLES TO PASS
  var one = "Foo Bar",
      two = ["Hello", "World"];

  // (B) URL PARAMETERS
  var params = new URLSearchParams();
  params.append("first", first);
  params.append("second", JSON.stringify(second));

  // (C) GO!
  var url = "1b-query.html?" + params.toString();
  location.href = url;
}
</script>
<input type="button" value="GO" onclick="go()"><script>
function get () {
// (A) GET THE PARAMETERS
var params = new URLSearchParams(window.location.search),
one = params.get("one"),
two = JSON.parse(params.get("two"));
// (B) IT WORKS!
console.log(one);
console.log(two);
}
</script>
<input type="button" value="GET" onclick="get()">Some like to call it “URL search parameters”, “search query”, or maybe you have heard of “GET variables”. Simply put, we are just appending a string of ?KEY=VALUE data to the end of the URL. Yep, Javascript is fully capable of accessing the query string, and we can use that to pass data.
P.S. Take note that we cannot pass arrays and objects directly. We use JSON.stringify() to turn it into a string first, then JSON.parse() to turn it back into an array/object.
METHOD 2) SESSION STORAGE
<script>
function go () {
  // (A) VARIABLES TO PASS
  var one = "Foo Bar",
      two = ["Hello", "World"];

  // (B) SAVE TO SESSION STORAGE
  sessionStorage.setItem("one", one);
  sessionStorage.setItem("two", JSON.stringify(two));

  // (C) REDIRECT
  location.href = "2b-session-storage.html";
}
</script>
<input type="button" value="GO" onclick="go()"><script>
function get () {
// (A) GET FROM SESSION STORAGE
var one = sessionStorage.getItem("one"),
two = JSON.parse(sessionStorage.getItem("two"));
// (B) IT WORKS!
console.log(one);
console.log(two);
// (C) CLEAR SESSION STORAGE
// sessionStorage.removeItem("KEY");
// sessionStorage.clear();
}
</script>
<input type="button" value="GET" onclick="get()">There is a temporary “sandbox data storage area” in Javascript called session storage. Very easy to use, only 4 functions to know:
sessionStorage.setItem(KEY, VALUE)sessionStorage.getItem(KEY)sessionStorage.removeItem(KEY)sessionStorage.clear()
But please take note that the session storage will be automatically deleted once the user closes the tab/window.
P.S. Data will also not be passed when the user manually opens another tab/window for 2b-session-storage.html.
METHOD 3) LOCAL STORAGE
<script>
function go () {
  // (A) VARIABLES TO PASS
  var one = "Foo Bar",
      two = ["Hello", "World"];

  // (B) SAVE TO LOCAL STORAGE
  localStorage.setItem("one", one);
  localStorage.setItem("two", JSON.stringify(two));

  // (C) REDIRECT OR OPEN NEW WINDOW IF YOU WANT
  location.href = "3b-local-storage.html";
}
</script>
<input type="button" value="GO" onclick="go()"><script>
function get () {
// (A) GET FROM LOCAL STORAGE
var first = localStorage.getItem("first"),
second = JSON.parse(localStorage.getItem("second"));
// (B) IT WORKS!
console.log(one);
console.log(two);
// (C) CLEAR LOCAL STORAGE
// localStorage.removeItem("KEY");
// localStorage.clear();
}
</script>
<input type="button" value="GET" onclick="get()">Looks familiar? That’s because local storage is the cousin of session storage. Yep, the same old temporary storage area, but local storage is persistent – Whatever is set in the local storage will stay until manually deleted. Yep, we can still retrieve data from the local storage even after the window is closed and reopened later.
METHOD 4) COOKIE
<script>
function store () {
  // (A) VARIABLES TO PASS
  var one = "Foo Bar",
      two = ["Hello", "World"];

  // (B) URL PARAMETERS + STORE INTO COOKIE
  // * WORKS, BUT NOT RECOMMENDED
  var params = new URLSearchParams();
  params.append("one", one);
  params.append("two", JSON.stringify(two));
  document.cookie = "pass=" + params.toString();

  // (C) REDIRECT
  location.href = "4b-cookie.html";
}
</script>
<input type="button" value="GO" onclick="go()"><script>
function get () {
// (A) GET BACK PASS VARS
var passvars = document.cookie
.split("; ")
.find(row => row.startsWith("pass"))
.substring(5);
// (B) PARSE BACK
var params = new URLSearchParams(passvars),
one = params.get("one"),
two = JSON.parse(params.get("two"));
// (C) IT WORKS!
console.log(one);
console.log(two);
}
</script>
<input type="button" value="GET" onclick="get()">You may have also heard of the cookie, a small token to keep some data… Anyway, just don’t mess with the cookie unless really necessary. Keep this one as a last desperate resort.
METHOD 5) NEW WINDOW
<script>
function go () {
  // (A) VARIABLES TO PASS
  var one = "Foo Bar",
      two = ["Hello", "World"];

  // (B) OPEN NEW WINDOW - JUST PASS VARIABLES TO NEW WINDOW
  var newwin = window.open("5b-window.html");
  newwin.onload = () => {
    newwin.one = one;
    newwin.two = two;
  };
}
</script>
<input type="button" value="GO" onclick="go()"><script>
function get () {
console.log(one);
console.log(two);
}
</script>
<input type="button" value="GET" onclick="get()">When we create var newwin = window.open(), we can “directly insert” the variables into the new window. As simple as that.
DOWNLOAD & NOTES

Here is the download link to the example code, so you don’t have to copy-paste everything.
SORRY FOR THE ADS...
But someone has to pay the bills, and sponsors are paying for it. I insist on not turning Code Boxx into a "paid scripts" business, and I don't "block people with Adblock". Every little bit of support helps.
Buy Me A Coffee Code Boxx eBooks
EXAMPLE CODE DOWNLOAD
Click here for the source code on GitHub gist, just click on “download zip” or do a git clone. I have released it under the MIT license, so feel free to build on top of it or use it in your own project.
EXTRA BITS & LINKS

That’s all for this guide, and here is a small section on some extras and links that may be useful to you.
RECONSIDER YOUR PROCESSES!
The Stone Age of the Internet is long past. Instead of reloading and redirecting pages, we should be creating a “seamless experience” with modern technologies instead. For example, if you want to create a wizard form – Modern web development is more than capable of doing that. Check out the wizard form and Dynamic HTML links below.
LINKS & REFERENCES
- Window.sessionStorage – MDN
- Window.localStorage – MDN
- URL Search Params – MDN
- Document.cookie – MDN
- Simple Wizard Form – Code Boxx
- Beginner AJAX Tutorial – Code Boxx
- Dynamic HTML Content – Code Boxx
TUTORIAL VIDEO
INFOGRAPHIC CHEAT SHEET
THE END

Thank you for reading, and we have come to the end of this guide. I hope that it has helped you with your project, and if you want to share anything with this guide, please feel free to comment below. Good luck and happy coding!