Welcome to a tutorial on how to create a simple leave management system with PHP and MySQL. Yep, there are already tons of such “leave management systems” all over the Internet. So here’s one that is slightly different, a barebones system with no third-party frameworks. Read on!
TABLE OF CONTENTS
DOWNLOAD & NOTES
Here is the download link to the example code, so you don’t have to copy-paste everything.
EXAMPLE CODE DOWNLOAD
Just click on “download zip” or do a git clone. I have released it under the MIT license, so feel free to build on top of it or use it in your own project.
SORRY FOR THE ADS...
But someone has to pay the bills, and sponsors are paying for it. I insist on not turning Code Boxx into a "paid scripts" business, and I don't "block people with Adblock". Every little bit of support helps.
Buy Me A Coffee Code Boxx eBooks
PHP MYSQL LEAVE MANAGEMENT
All right, let us now get into more details on how the leave management system works.
PART 1) THE DATABASE
1A) HOLIDAYS
-- (A) HOLIDAYS
CREATE TABLE `holidays` (
  `holiday_id` bigint(20) NOT NULL,
  `holiday_name` varchar(255) NOT NULL,
  `holiday_date` date NOT NULL,
  `holiday_half` tinyint(1) NOT NULL DEFAULT 0
) ENGINE=InnoDB DEFAULT CHARSET=utf8mb4;

ALTER TABLE `holidays`
  ADD PRIMARY KEY (`holiday_id`),
  ADD KEY `holiday_date` (`holiday_date`);

ALTER TABLE `holidays`
  MODIFY `holiday_id` bigint(20) NOT NULL AUTO_INCREMENT;
Captain Obvious to the rescue, this table is used to store the holidays.
holiday_idPrimary key and auto-increment.holiday_nameName of the holiday. E.g. Christmas, New Year, etc…holiday_dateThe date.holiday_halfDefine1if it is a “half-day holiday”. For example, New Year’s Eve is a half-day holiday.
P.S. If you want to be “accurate”, you can change holiday_half to “F” for a full day, “AM” or “PM”.
1B) ENTITLED LEAVE
-- (B) LEAVE ENTITLED
CREATE TABLE `leave_entitled` (
  `user_id` bigint(20) NOT NULL,
  `leave_type` varchar(1) NOT NULL,
  `leave_days` decimal(4,1) NOT NULL
) ENGINE=InnoDB DEFAULT CHARSET=utf8mb4;

ALTER TABLE `leave_entitled`
  ADD PRIMARY KEY (`user_id`,`leave_type`);
The “number of days leave” each user/staff has.
user_idForeign key and partial primary key.leave_typePartial primary key. An open character field for you to call whatever types of leave the company has. For example, “P”aid, “U”npaid, “M”edical.leave_daysThe number of days entitled for this type of leave.
1C) LEAVE TAKEN
-- (C) LEAVE TAKEN
CREATE TABLE `leave_taken` (
  `leave_id` bigint(20) NOT NULL,
  `user_id` bigint(20) NOT NULL,
  `leave_type` varchar(255) NOT NULL,
  `leave_status` varchar(1) NOT NULL DEFAULT 'P',
  `leave_from` datetime NOT NULL,
  `leave_to` datetime NOT NULL,
  `leave_days` decimal(4,1) NOT NULL
) ENGINE=InnoDB DEFAULT CHARSET=utf8mb4;

ALTER TABLE `leave_taken`
  ADD PRIMARY KEY (`leave_id`),
  ADD KEY `user_id` (`user_id`),
  ADD KEY `leave_type` (`leave_type`),
  ADD KEY `leave_status` (`leave_status`),
  ADD KEY `leave_from` (`leave_from`),
  ADD KEY `leave_to` (`leave_to`);

ALTER TABLE `leave_taken`
  MODIFY `leave_id` bigint(20) NOT NULL AUTO_INCREMENT;
This table records the leave applied by the users/staff.
leave_idPrimary key and auto-increment.user_idForeign key.leave_typeForeign key.leave_statusStatus for this leave entry. For example – “P”ending, “A”pproved, “D”eclined.leave_fromDate starting from.leave_toDate ending.
1D) LEAVE TAKEN (DAYS)
-- (D) LEAVE TAKEN INDIVIDUAL DAYS
CREATE TABLE `leave_taken_days` (
  `leave_id` bigint(20) NOT NULL,
  `leave_day` date NOT NULL,
  `leave_half` varchar(1) NOT NULL DEFAULT 'F'
) ENGINE=InnoDB DEFAULT CHARSET=utf8mb4;

ALTER TABLE `leave_taken_days`
  ADD PRIMARY KEY (`leave_id`,`leave_day`);
Some of you guys should be confused with this final table. Isn’t the leave period already captured above? Well, a quick example will explain things:
- John takes leave from Thursday afternoon to next Monday afternoon.
- That is – Thursday PM, Friday full day, Monday AM.
The above “start and end dates” cannot capture half days, thus the need for this table.
leave_idPartial primary key, foreign key.leave_dayPartial primary key.leave_halfFFull day leave.AMorning leave.PAfternoon leave.
PART 2) PHP LIBRARY
2A) INITIALIZE
class Leave {
  // (A) CONSTRUCTOR - CONNECT TO DATABASE
  private $pdo = null;
  private $stmt = null;
  public $error = "";
  function __construct () {
    $this->pdo = new PDO(
      "mysql:host=".DB_HOST.";dbname=".DB_NAME.";charset=".DB_CHARSET,
      DB_USER, DB_PASSWORD, [
      PDO::ATTR_ERRMODE => PDO::ERRMODE_EXCEPTION,
      PDO::ATTR_DEFAULT_FETCH_MODE => PDO::FETCH_ASSOC
    ]);
  }

  // (B) DESTRUCTOR - CLOSE DATABASE CONNECTION
  function __destruct () {
    if ($this->stmt!==null) { $this->stmt = null; }
    if ($this->pdo!==null) { $this->pdo = null; }
  }

  // (C) HELPER FUNCTION - EXECUTE SQL QUERY
  function query ($sql, $data=null) : void {
    $this->stmt = $this->pdo->prepare($sql);
    $this->stmt->execute($data);
  }
  // ...
}

// (H) DATABASE SETTINGS - CHANGE TO YOUR OWN!
define("DB_HOST", "localhost");
define("DB_NAME", "test");
define("DB_CHARSET", "utf8mb4");
define("DB_USER", "root");
define("DB_PASSWORD", "");

// (I) DEFINITIONS
define("LEAVE_MIN", date("Y-m-d"));
define("LEAVE_TYPES", [
  "P" => "Paid",
  "U" => "Unpaid",
  "M" => "Medical"
]);
define("LEAVE_STATUS", [
  "P" => "Pending",
  "A" => "Approved",
  "D" => "Denied"
]);

// (J) NEW LEAVE OBJECT
$_LEAVE = new Leave();
Now that we have established the database, we will build a PHP library to work with it. The top and bottom sections should be pretty self-explanatory.
- (A, B, J) When
$_LEAVE = new Leave()is created, the constructor automatically connects to the database. The destructor closes the database connection. - (C)
query()is a helper function to run SQL queries. - (H) Remember to change the database settings to your own.
- (I) As above, these are the “status code definitions”.
2B) HOLIDAYS
// (D) SET HOLIDAY
function holiday ($name, $date, $half=0, $id=null) {
  if ($id==null) {
    $sql = "INSERT INTO `holidays` (`holiday_name`, `holiday_date`, `holiday_half`) VALUES (?, ?, ?)";
    $data = [$name, $date, $half];
  } else {
    $sql = "UPDATE `holidays` SET `holiday_name`=?, `holiday_date`=?, `holiday_half`=? WHERE `holiday_id`=?";
    $data = [$name, $date, $half, $id];
  }
  $this->query($sql, $data);
  return true;
}
Next, we have a very obvious function… Use this to set the holidays.
2C) SET ENTITLED LEAVE
// (E) SET ENTITLED LEAVE
function entitle ($id, $type, $total, $taken, $left, $year=null) {
  $this->query(
    "REPLACE INTO `leave_entitled` (`user_id`, `leave_type`, `leave_days`) VALUES (?, ?, ?)",
    [$id, $type, $days]
  );
  return true;
}
Not much of a mystery for this one either. A function to set the leave entitled to a staff member.
2D) CHECK THE GIVEN DATE PERIOD
// (F) CHECK GIVEN PERIOD
function check ($from, $to) {
  // (F1) CHECK START & END DATES
  $start = strtotime($from);
  $end = strtotime($to);
  if ($start<strtotime(LEAVE_MIN)) { return ["error"=>"Earliest leave is ".LEAVE_MIN]; }
  if ($end < $start) { return ["error"=>"End date is earlier than start date?"]; }

  // (F2) DATE RANGE
  $days = [];
  for ($unix=$start; $unix<=$end; $unix+=86400) {
    $weekend = date("N", $unix) > 5;
    $days[date("Y-m-d", $unix)] = [
      "a" => $weekend ? 0 : 1,
      "n" => $weekend ? "Weekend" : ""
    ];
  }

  // (F3) HOLIDAYS
  $this->query(
    "SELECT * FROM `holidays` WHERE `holiday_date` BETWEEN ? AND ?",
    [$from, $to]
  );
  while ($r = $this->stmt->fetch()) {
    $days[$r["holiday_date"]] = [
      "a" => $r["holiday_half"]==1 ? 2 : 0,
      "n" => $r["holiday_name"]
    ];
  }

  // (F4) GET LEAVE ALREADY TAKEN WITHIN PERIOD
  $this->query(
    "SELECT d.* FROM `leave_taken_days` d
     LEFT JOIN `leave_taken` t
     ON (d.`leave_id`=t.`leave_id` AND t.`user_id`=?)
     WHERE d.`leave_day` BETWEEN ? AND ? AND t.`leave_status`!='D'",
    [$id, $from, $to]
  );
  while ($r = $this->stmt->fetch()) {
    $days[$r["leave_day"]] = [
      "a" => 0,
      "n" => "Already taken leave on this day"
    ];
  }

  // (F5) RESULTS
  // $days[YYYY-MM-DD] = ["a"=>CODE BELOW, "n"=>NOTES];
  // 2 : Can apply half/none
  // 1 : Can apply full/half/none
  // 0 : No need to apply leave
  return $days;
}
This function is a little on the heavy side. Let’s start with something simple, there are 2 steps in the leave application process.
- Select the type of leave and a date period.
- Then, select full/AM/PM/none for the individual days.
Yes, check() is something like a “helper function” for the second step. It checks the date period ($from and $to) selected in the first step, and determines if leave is applicable to every individual day.
P.S. Complete this function on your own. The rules are subjective to the company and region. For example, long leave of N days must be applied M weeks in advance.
2E) APPLY FOR LEAVE
// (G) APPLY LEAVE
function apply ($id, $type, $days) {
  // (G1) APPLIED LEAVE DAYS
  $days = json_decode($days, true);
  $from = array_key_first($days);
  $to = array_key_last($days);
  $year = substr($from, 0, 4);
  $total = 0;
  foreach ($days as $day=>$half) { $total += $half=="F" ? 1 : 0.5 ; }

  // (G2) GET ENTITLED LEAVE
  $this->query(
    "SELECT `leave_days` FROM `leave_entitled` WHERE `user_id`=? AND `leave_type`=?",
    [$id, $type]
  );
  $entitled = $this->stmt->fetchColumn();
  if (!is_numeric($entitled)) {
    $this->error = "Insufficient leave days.";
    return false;
  }

  // (G3) CALCULATE REMAINING LEAVE
  $this->query(
    "SELECT SUM(`leave_days`) FROM `leave_taken`
     WHERE `user_id`=? AND `leave_type`=?
     AND `leave_status`!='D' AND `leave_from` BETWEEN ? AND ?",
    [$id, $type, "$year-01-01", "$year-12-31"]
  );
  $taken = $this->stmt->fetchColumn();
  if (is_numeric($taken)) { $entitled -= $taken; }
  if ($total > $entitled) {
    $this->error = "Insufficient leave days.";
    return false;
  }

  // (G4) AUTO-COMMIT OFF
  $this->pdo->beginTransaction();

  // (G5) CREATE "MAIN LEAVE ENTRY"
  $this->query(
    "INSERT INTO `leave_taken`
    (`user_id`, `leave_type`, `leave_from`, `leave_to`, `leave_days`)
    VALUES (?, ?, ?, ?, ?)",
    [$id, $type, $from, $to, $total]
  );
  $id = $this->pdo->lastInsertId();

  // (G6) LEAVE DAYS
  $sql = "INSERT INTO `leave_taken_days` (`leave_id`, `leave_day`, `leave_half`) VALUES ";
  $data = [];
  foreach ($days as $d=>$h) {
    $sql .= "(?,?,?),";
    $data[] = $id; $data[] = $d; $data[] = $h;
  }
  $this->query(substr($sql,0,-1).";", $data);

  // (G7) DONE
  $this->pdo->commit();
  return true;
}
Lastly, this function completes the “checkout process” and saves the actual leave application. Once again, you may want to add your own touches – Double check the submitted dates, send an email after saving, and complete your own approval process.
2F) DUMMY DATA
<?php
// (A) LOAD LIBRARY
require "2-lib-leave.php";

// (B) ADD HOLIDAYS
echo $_LEAVE->holiday("Test Holiday Eve", date("Y-m-d", strtotime("+1 day")), 1) ? "OK" : $_LEAVE->error ;
echo $_LEAVE->holiday("Test Holiday", date("Y-m-d", strtotime("+2 days"))) ? "OK" : $_LEAVE->error ;

// (C) ENTITLE LEAVE
echo $_LEAVE->entitle(999, "M", 10) ? "OK" : $_LEAVE->error ;
echo $_LEAVE->entitle(999, "P", 11) ? "OK" : $_LEAVE->error ;
echo $_LEAVE->entitle(999, "U", 12) ? "OK" : $_LEAVE->error ;
We are done with the library. This is a small bit to demonstrate how the library works and to add simple example entries.
PART 3) AJAX HANDLER
<?php
// (A) LOAD LIBRARY + FIXED USER ID
require "2-lib-leave.php";
$user = 999;

if (isset($_POST["req"])) { switch ($_POST["req"]) {
  // (B) INVALID REQUEST
  default: echo "Invalid request"; break;

  // (C) CHECK SELECTED PERIOD
  case "check":
    echo json_encode($_LEAVE->check($user, $_POST["from"], $_POST["to"]));
    break;

  // (D) APPLY FOR LEAVE
  case "apply";
    echo $_LEAVE->apply($user, $_POST["type"], $_POST["days"])
      ? "OK" : $_LEAVE->error ;
    break;
}}
The library will not do anything by itself. So here’s a simple “API endpoint”. Very easy to use. Just send $_POST["req"] along with the required parameters. For example – To check a given period, send $_POST["req"] = "check", $_POST["from"] = "YYYY-MM-DD", and $_POST["to"] = "YYYY-MM-DD".
P.S. The user ID $user is fixed in this demo, tie this into your own user system. If you don’t have a login system, check out the links below.
PART 4) APPLY LEAVE PAGE
4A) THE HTML
<?php
// (A) LOAD PHP LIBRARY
require "2-lib-leave.php";
// (B) HTML ?>
<!-- (B1) SELECT LEAVE TYPE + PERIOD -->
<form id="form_period" onsubmit="return apply.check()">
<label>Leave Type</label>
<select id="leave_type"><?php foreach (LEAVE_TYPES as $c=>$t) {
echo "<option value='$c'>$t</option>";
} ?></select>
<label>Start Date</label>
<input type="date" id="leave_from" min="<?=LEAVE_MIN?>" value="<?=LEAVE_MIN?>" required>
<label>End Date</label>
<input type="date" id="leave_to" min="<?=LEAVE_MIN?>" value="<?=date("Y-m-d", strtotime(LEAVE_MIN)+604800)?>" required>
<input type="submit" value="Next">
</form>
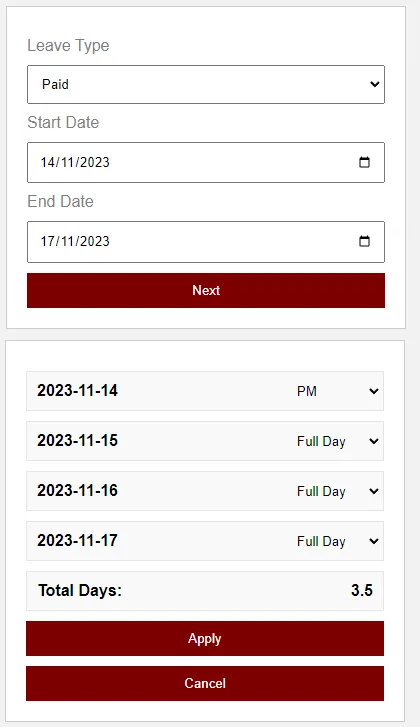
<!-- (B2) SELECT INDIVIDUAL DAYS -->
<form id="form_days" class="hide" onsubmit="return apply.go()">
<div id="form_days_list"></div>
<div id="form_days_total">
<div class="rowDate">Total Days: </div>
<div id="form_days_count"></div>
</div>
<input type="submit" value="Apply">
<input type="button" value="Cancel" onclick="apply.toggle(false)">
</form>So far so good? The system is actually fully functional with the API and library. This final step is nothing but a demo HTML page on what an “apply leave” page could look like.
- Load the PHP library.
- As above, there are 2 steps to the leave application.
- (B1) First step, select the leave type and period.
- (B2) Second step, select full/AM/PM for each individual day.
4B) THE JAVASCRIPT
var apply = {
  // (A) HTML INTERFACE - TOGGLE PERIOD/SELECT DAY
  toggle : direction => {
    if (direction) {
      document.getElementById("form_period").classList.add("hide");
      document.getElementById("form_days").classList.remove("hide");
    } else {
      document.getElementById("form_days").classList.add("hide");
      document.getElementById("form_period").classList.remove("hide");
    }
  },

  // (B) CHECK SELECTED PERIOD
  check : () => {
    // (B1) FROM & TO DATES
    let from = document.getElementById("leave_from").value,
        to = document.getElementById("leave_to").value;
    if (new Date(from) > new Date(to)) {
      alert("Start date cannot be later than end date");
    }

    // (B2) FORM DATA
    let data = new FormData();
    data.append("req", "check");
    data.append("type", document.getElementById("leave_type").value);
    data.append("from", from);
    data.append("to", to);

    // (B3) AJAX CHECK SELECTED PERIOD
    fetch ("3-ajax-leave.php", { method: "post", body: data })
    .then(res => res.json())
    .then(days => {
      // (B3-1) ERROR!
      if (days.error) {
        alert(days.error);
        return false;
      }

      // (B3-2) RESET "SELECT HALF/FULL DAY" FORM
      let row, wrap = document.getElementById("form_days");
      wrap.innerHTML = "";

      // (B3-3) DRAW "SELECT HALF/FULL DAY" FORM
      for (let [d,s] of Object.entries(days)) {
        row = document.createElement("div");
        row.className = "row";
        row.innerHTML =
        `<div class="rowDate">
          <div>${d}</div>
          <small>${s.n ? s.n : ""}</small>
        </div>
        <select class="rowHalf"></select>`;
        wrap.appendChild(row);

        row = row.getElementsByTagName("select")[0];
        row.onchange = apply.total;
        row.dataset.date = d;
        if (s["a"]==0) {
          row.innerHTML = `<option value="">NA</option>`;
          row.disabled = true;
        } else if (s["a"]==1) {
          row.innerHTML = `<option value="F">Full Day</option>
          <option value="P">PM</option>
          <option value="A">AM</option>
          <option value="">No Leave</option>`;
        } else {
          row.innerHTML = `<option value="P">PM</option>
          <option value="A">AM</option>
          <option value="">No Leave</option>`;
        }
      }

      // (B3-4) TOGGLE HTML FORMS
      apply.total();
      apply.toggle(true);
    });
    return false;
  },

  // (C) CALCULATE TOTAL DAYS
  total : () => {
    let days = 0;
    for (let d of document.querySelectorAll("#form_days_list select")) {
      if (d.value=="") { continue; }
      else if (d.value=="F") { days++; }
      else { days += 0.5; }
    }
    document.getElementById("form_days_count").innerHTML = days;
  },

  // (D) APPLY LEAVE
  go : () => {
    // (D1) GET DAYS
    let days = {};
    for (let d of document.querySelectorAll("#form_days_list select")) {
      if (d.value=="") { continue; }
      days[d.dataset.date] = d.value;
    }
    if (Object.keys(days).length==0) {
      alert("No dates selected!");
      return false;
    }

    // (D2) FORM DATA
    let data = new FormData();
    data.append("req", "apply");
    data.append("type", document.getElementById("leave_type").value);
    data.append("days", JSON.stringify(days));

    // (D3) AJAX SUBMIT
    fetch ("3-ajax-leave.php", { method: "post", body: data })
    .then(res => res.text())
    .then(res => {
      alert(res);
      console.log("@TODO - WHATEVER YOU WANT TO DO NEXT");
      // APPROVAL PROCESS
      // EMAIL CONFIRMATION
      // REDIRECT TO SOMEWHERE ELSE
    });
    return false;
  }
};
Not going to explain line-by-line and bore you to tears. Basically, this Javascript drives the HTML interface.
toggle()Toggle between the first and second steps.check()Sends the selected period to the PHP AJAX handler. Draws the full/AM/PM selectors for the individual days.total()Calculate the total number of leave days.go()Apply for the actual leave itself.
Well, this is a dummy demo after all. Feel free to rebuild the entire HTML page with your own preferred library and framework.
EXTRAS
That’s all for the tutorial, and here is a small section on some extras and links that may be useful to you.
IMPROVEMENTS NEEDED
My developer senses are tingling, trolls are going to scream “this is an incomplete system”! Of course, this is a tutorial only. There are a lot of things left to do.
- User login, role management, admin panel – See links below.
- The system currently works for one location only. If you are supporting multiple countries, a lot of timezone and region stuff needs to be factored in.
- You may want to create a separate “leave history” table to record all the changes to the leave records.
- Secure the API and library. Only administrators can access and use the functions.
- Complete your own
check()– Is Sat/Sun a working day? Any special rules? Cannot take more than N days leave in a row, must be N days in advance? - Complete your own
apply()– Add a “pending approval” flag. Add your own role management, and maybe even department as required. You may also want to double-check the submitted days. - How are leave days calculated if the leave crosses the year? E.G. Taking leave from 30 Dec 2076 to 5 Jan 2077.
- Leave days will be deducted from 2076?
- Leave days will be deducted from 2077?
- Or separate 2076 and 2077 accordingly?
- Add your own library functions as required – Delete holidays, cancel leave, etc…
- Do your own leave reports. Excel, Word, PDF, whatever is required.
Everyone has a different starting point and requirements. It is nearly impossible to create a “one size fits all” system, and I cannot provide free consultations for everyone – You have to complete your own system.
LINKS & REFERENCES
- Simple User Login System With PHP MySQL – Code Boxx
- JWT Login & Authentication With PHP MYSQL – Code Boxx
- Simple User Role Management System With PHP MySQL – Code Boxx
- HTML CSS Admin Panel – Code Boxx
THE END
Thank you for reading, and we have come to the end. I hope that it has helped you to better understand, and if you want to share anything with this guide, please feel free to comment below. Good luck and happy coding!