Welcome to a tutorial on how to include Javascript in HTML. So you have just started with Javascript and wondering how to properly “put Javascript” into an HTML file?
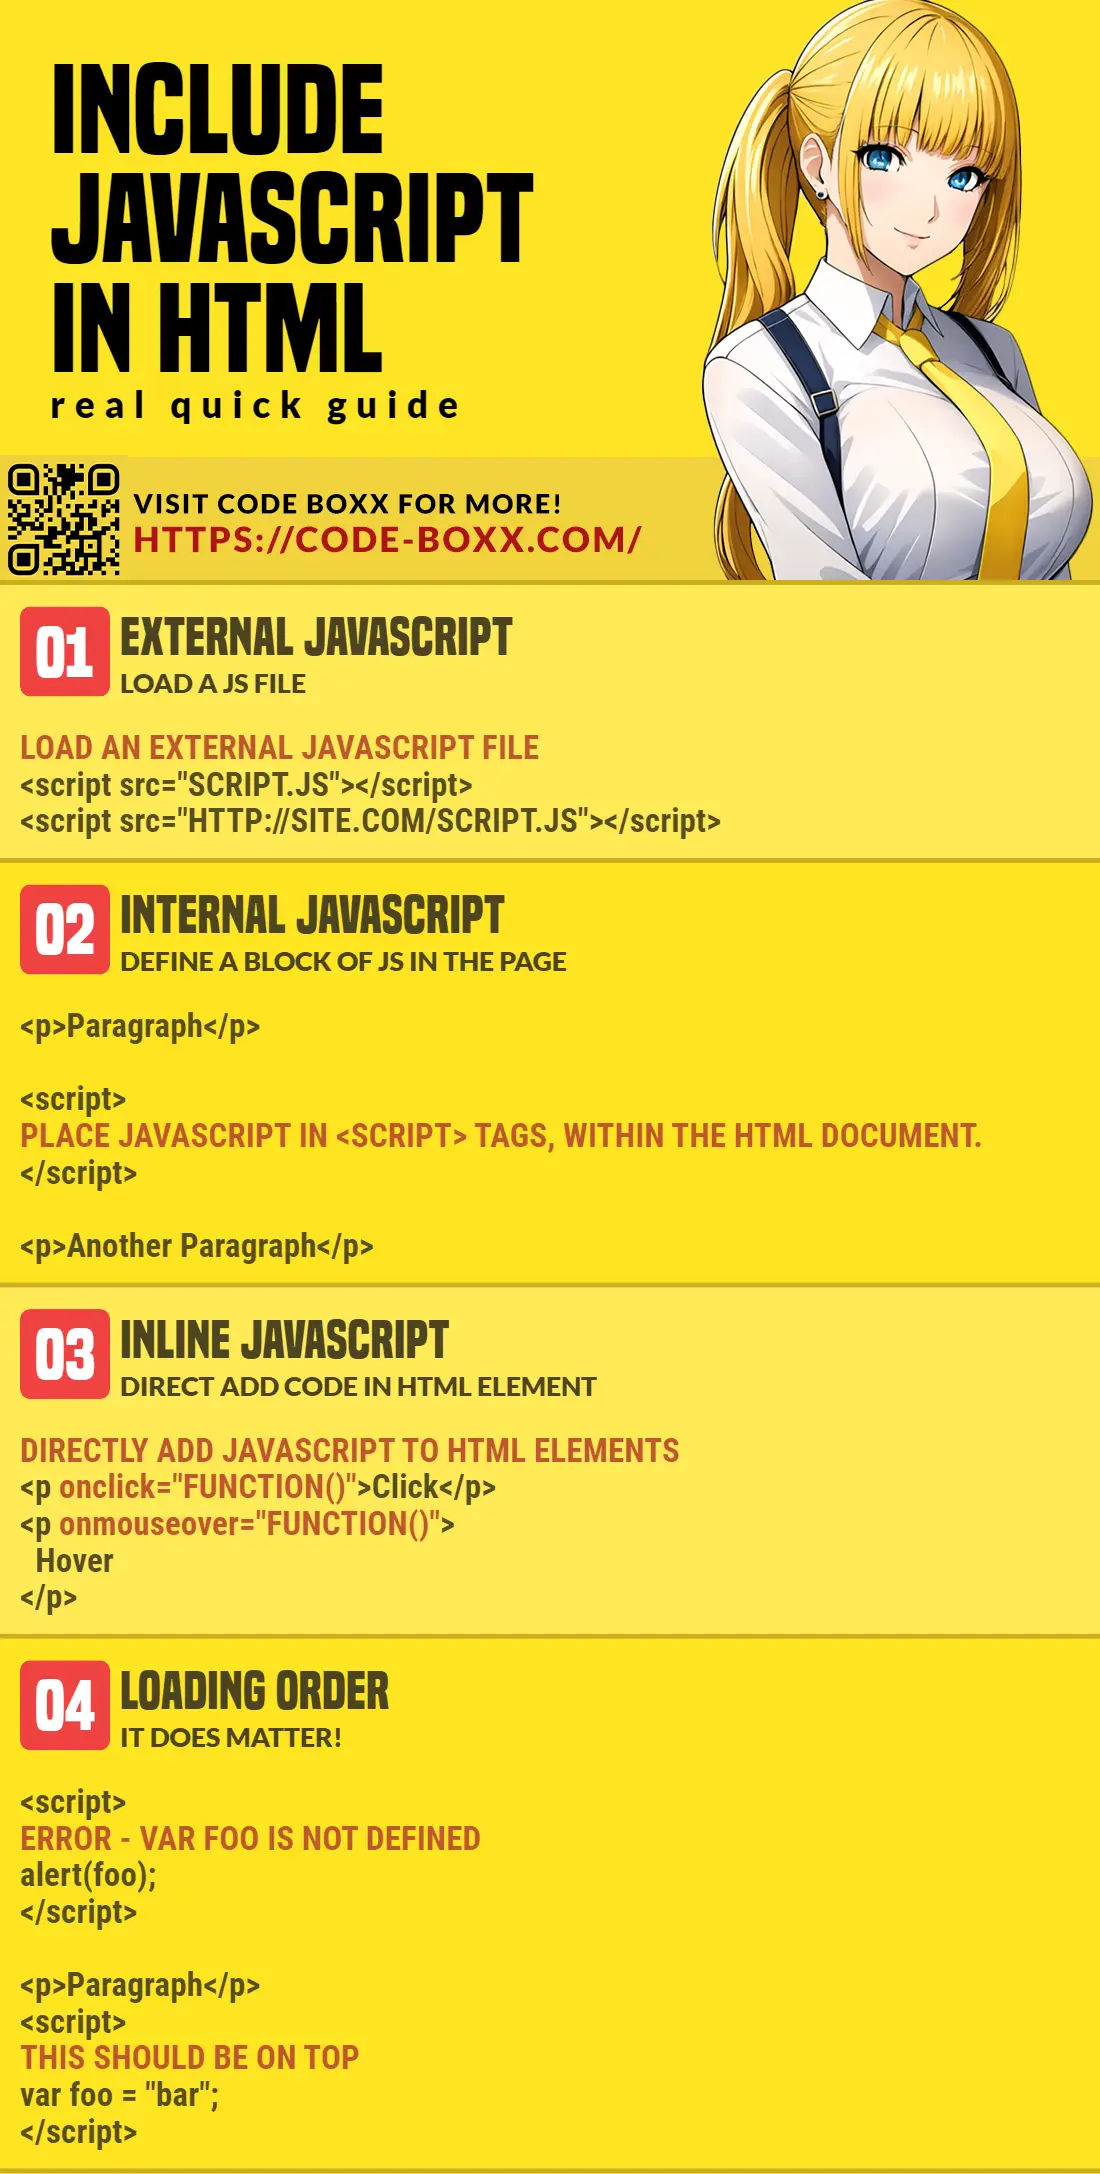
There are 3 ways to include Javascript in HTML:
- External Javascript, load a Javascript file –
<script src="FILE.JS"></script> - Internal Javascript, add a block of code in the HTML document itself –
<script>DO SOMETHING</script> - Inline Javascript, directly add Javascript to an HTML element –
<input type="button" value="Test" onclick="FUNCTION()">
That covers the quick basics, but there are more things to take note of. Read on for more examples!
TLDR – QUICK SLIDES
[web_stories_embed url=”https://code-boxx.com/web-stories/how-to-include-javascript-in-html/” title=”How To Include Javascript In HTML” poster=”https://code-boxx.com/wp-content/uploads/2021/11/STORY-JS-20230518.webp” width=”360″ height=”600″ align=”center”]
Fullscreen Mode – Click Here
TABLE OF CONTENTS
INCLUDE JAVASCRIPT IN HTML

All right, let us now get into the examples of how to include Javascript in HTML.
1) EXTERNAL JAVASCRIPT FILE
alert("1A Loaded");<!-- (A) RELATIVE URL -->
<script src="1a-external.js"></script>
<!-- (B) ABSOLUTE URL -->
<script src="http://localhost/1a-external.js"></script>This should be straightforward, we are simply loading external Javascript files. A couple of things to take note of:
- We can load the same script twice, it will run twice.
- Absolute URL refers to a “full address” with the host, path, and file name.
- Relative URL refers to a “short address” with the path and file name only, it will be resolved based on the current URL. For example, if the current URL is
http://site.com/pages/, the above will resolve tohttp://site.com/pages/1a-external.js.
Be careful when using relative URLs, beginners commonly confuse themselves with “script is not loading”. E.G. The script is placed in http://site.com/1a-external.js, but the relative URL resolves to http://site.com/pages/1a-external.js.
2) INTERNAL JAVASCRIPT
<p>Some HTML</p>
<script>
alert("Loaded");
</script>
Captain Obvious once again, internal Javascript is simply a block of Javascript code within the HTML file itself.
3) INLINE JAVASCRIPT
<p onmouseover="alert('Mouse Over');">Hover to alert.</p>
<input type="button" value="Say Hello" onclick="alert('Hello World!');">
Lastly, we can directly code Javascript into the HTML elements themselves. This is usually done to handle certain events and user actions, for example:
onclick– When the user clicks on the element.onhover– As the mouse cursor hovers over the element.onkeypress– When the user presses a key.
4) SCRIPT IN THE HEAD OR BODY?
function demoA () {
  alert("Demo A");
}<!DOCTYPE html>
<html>
<head>
<title>JS In HTML</title>
<!-- (A) SCRIPT IN HEAD -->
<script src="4a-demo.js"></script>
</head>
<body>
<!-- (B) SCRIPT IN BODY -->
<script>
function demoB () {
alert("Demo B");
}
</script>
<!-- (C) HTML ELEMENTS -->
<p onclick="demoA()">Demo A</p>
<p onclick="demoB()">Demo B</p>
</body>
</html>The next million-dollar question is – Shall we put the <script> tags in the <head> or <body> section of the HTML? Well, <script> tags can actually be put into both sections. But please take note that there is a difference where you put them and the order of the scripts does matter.
5) LOADING ORDER
alert("First loaded");alert("Second loaded");<!DOCTYPE html>
<html>
<head>
<title>JS In HTML</title>
<!-- (A) THIS WILL LOAD FIRST -->
<script src="5a-first.js"></script>
</head>
<body>
<!-- (B) FOLLOWED BY HTML ELEMENTS -->
<p>Demo A</p>
<p>Demo B</p>
<!-- (C) THIS WILL LOAD LAST -->
<script src="5b-second.js"></script>
</body>
</html>HTML and Javascript are loaded in the order of “top to bottom, left to right”; Scripts that are closer to the top will be loaded first, and scripts at the bottom of the page will be loaded last. This is very important, for a number of reasons:
- We place the critical scripts at the top.
- Place non-critical Javascript at the bottom to speed up the loading.
- The loading order does matter. Common beginner mistakes – Use library functions when the library itself is not loaded. Try to get an HTML element when it is not loaded.
Follow up with “How Javascript Files Load” in the extra links below if you are interested.
DOWNLOAD & NOTES

Here is the download link to the example code, so you don’t have to copy-paste everything.
SORRY FOR THE ADS...
But someone has to pay the bills, and sponsors are paying for it. I insist on not turning Code Boxx into a "paid scripts" business, and I don't "block people with Adblock". Every little bit of support helps.
Buy Me A Coffee Code Boxx eBooks
EXAMPLE CODE DOWNLOAD
Click here for the source code on GitHub gist, just click on “download zip” or do a git clone. I have released it under the MIT license, so feel free to build on top of it or use it in your own project.
EXTRA BITS & LINKS

That’s all for the tutorial, and here is a small section on some extras and links that may be useful to you.
A BLAST FROM THE PAST
<script src="my-script.js" type="text/javascript"></script>
<script src="my-script.js" language="javascript"></script>
If you have poked around the various tutorials all over the Internet, you might have spotted a few <script> tags with the type or language attribute. That is actually something from the past, where we have to define the type of script being used. But with today’s standards, we can safely omit it and browsers will automatically assume it is Javascript by default.
LINKS & REFERENCES
- HTML Script Tag – MDN
- Javascript Events – MDN
TUTORIAL VIDEO
INFOGRAPHIC CHEAT SHEET
THE END

Thank you for reading, and we have come to the end. I hope that it has helped you to better understand, and if you want to share anything with this guide, please feel free to comment below. Good luck and happy coding!
Awesome! Thank your for the fine tutorial.