Welcome to a tutorial on how to create a grocery list with PHP and MySQL. Yes, the grocery list. A classic school assignment that lecturers have “reused” over many decades, staying true to the “reusability” concept. That aside, it is still a good way to learn full-stack web development – Read on for the example!
TABLE OF CONTENTS
DOWNLOAD & NOTES
Here is the download link to the example code, so you don’t have to copy-paste everything.
EXAMPLE CODE DOWNLOAD
Just click on “download zip” or do a git clone. I have released it under the MIT license, so feel free to build on top of it or use it in your own project.
SORRY FOR THE ADS...
But someone has to pay the bills, and sponsors are paying for it. I insist on not turning Code Boxx into a "paid scripts" business, and I don't "block people with Adblock". Every little bit of support helps.
Buy Me A Coffee Code Boxx eBooks
PHP MYSQL GROCERY LIST
All right, let us now get into the details of building a grocery list using PHP and MySQL.
PART 1) GROCERY ITEMS DATABASE
CREATE TABLE `items` (
  `id` bigint(20) NOT NULL,
  `name` varchar(255) CHARACTER SET utf8mb4 NOT NULL,
  `qty` int(11) NOT NULL,
  `got` tinyint(1) NOT NULL DEFAULT 0
) ENGINE=InnoDB DEFAULT CHARSET=utf8mb4;

ALTER TABLE `items`
  ADD PRIMARY KEY (`id`);

ALTER TABLE `items`
  MODIFY `id` bigint(20) NOT NULL AUTO_INCREMENT;
The first step of every project, start with the database and establish the foundations. This is a simple table to store the grocery items.
idPrimary key and auto-increment.nameItem name.qtyItem quantity.gotItem “status” – 0 for “not yet” and 1 for “accquired”.
PART 2) GROCERY ITEMS LIBRARY
<?php
class Items {
  // (A) CONSTRUCTOR - CONNECT TO DATABASE
  private $pdo = null;
  private $stmt = null;
  public $error = null;
  function __construct () {
    $this->pdo = new PDO(
      "mysql:host=".DB_HOST.";dbname=".DB_NAME.";charset=".DB_CHARSET,
      DB_USER, DB_PASSWORD, [
      PDO::ATTR_ERRMODE => PDO::ERRMODE_EXCEPTION,
      PDO::ATTR_DEFAULT_FETCH_MODE => PDO::FETCH_ASSOC
    ]);
  }

  // (B) DESTRUCTOR - CLOSE DATABASE CONNECTION
  function __destruct () {
    if ($this->stmt !== null) { $this->stmt = null; }
    if ($this->pdo !== null) { $this->pdo = null; }
  }

  // (C) HELPER FUNCTION - RUN SQL QUERY
  function query ($sql, $data=null) : void {
    $this->stmt = $this->pdo->prepare($sql);
    $this->stmt->execute($data);
  }

  // (D) GET ALL ITEMS
  function get () {
    $this->query("SELECT * FROM `items`");
    return $this->stmt->fetchAll();
  }

  // (E) ADD NEW ITEM
  function add ($name, $qty) {
    $this->query("INSERT INTO `items` (`name`, `qty`) VALUES (?,?)", [$name, $qty]);
    return true;
  }

  // (F) UPDATE ITEM STATUS
  function update ($got, $id) {
    $this->query("UPDATE `items` SET `got`=? WHERE `id`=?", [$got, $id]);
    return true;
  }

  // (G) DELETE ITEM
  function delete ($id) {
    $this->query("DELETE FROM `items` WHERE `id`=?", [$id]);
    return true;
  }
}

// (H) DATABASE SETTINGS - CHANGE TO YOUR OWN!
define("DB_HOST", "localhost");
define("DB_NAME", "test");
define("DB_CHARSET", "utf8mb4");
define("DB_USER", "root");
define("DB_PASSWORD", "");

// (I) NEW ITEMS OBJECT
$_ITEMS = new Items();
Next, we create a PHP library to work with the database. This may look complicated at first, but keep calm and look closely.
- (A, B, I) When
$_ITEMS = new Items()is created, the constructor will automatically connect to the database. The destructor closes the connection. - (C)
query()is a simple helper function to run an SQL query. - (D To G) The actual functions to deal with the grocery items.
get()Get all items.add()Add a new item.update()Update the “got it/not yet” status of the item.delete()Remove an item.
- (H) Self-explanatory. Change these to your own.
Yep, the entire library is pretty much just a collection of SQL statements.
PART 3) AJAX HANDLER
<?php
if ($_POST["req"]) {
  require "2-lib-items.php";
  switch ($_POST["req"]) {
  // (A) GET ALL ITEMS
  case "get":
    echo json_encode($_ITEMS->get());
    break;

  // (B) ADD ITEM
  case "add":
    $_ITEMS->add($_POST["name"], $_POST["qty"]);
    echo "OK";
    break;

  // (C) UPDATE ITEM STATUS
  case "update":
    $_ITEMS->update($_POST["got"], $_POST["id"]);
    echo "OK";
    break;

  // (D) DELETE ITEM
  case "delete":
    $_ITEMS->delete($_POST["id"]);
    echo "OK";
    break;
}}
Of course, the library is not going to do anything by itself. So we need to create an “endpoint” to accept requests from the client side. How this works is very simple – Just send $_POST["req"] = "REQUEST" to this script, followed by the required parameters. For example, send $_POST["req"] = "delete" and $_POST["id"] = 999 to delete item 999.
PART 4) USER INTERFACE
4A) THE HTML
<div id="gro-wrap">
  <!-- (A) ADD ITEM -->
  <form id="gro-form">
    <input type="number" id="gro-qty" min="1" value="1" placeholder="Quantity" required disabled>
    <input type="text" id="gro-item" placeholder="Item Name" required disabled>
    <button id="gro-add" class="material-icons" disabled>add</button>
  </form>

  <!-- (B) ITEM LIST -->
  <div id="gro-list"></div>
</div>
Well, the server-side foundations are now complete. All that’s left is to deal with the client-side HTML/CSS/Javascript. This is a simple page with only 2 sections.
- An “add item”
<form>with 2 fields – The item name and quantity. - An empty
<div>to generate the grocery list into.
4B) AJAX HELPER
var glist = {
  // (A) SUPPORT FUNCTION - AJAX FETCH
  ajax : (data, onload) => {
    // (A1) FORM DATA
    var form = new FormData;
    for (let [k,v] of Object.entries(data)) { form.append(k, v); }

    // (A2) AJAX FETCH
    fetch("3-ajax-items.php", { method:"post", body:form })
    .then(res => res.text())
    .then(txt => {
      if (txt == "OK") { onload(); }
      else {
        try {
          var json = JSON.parse(txt);
          onload(json);
        } catch (err) {
          alert("AJAX fetch error");
          console.error(err, txt);
        }
      }
    })
    .catch(err => {
      alert("AJAX fetch error");
      console.error(err);
    });
  }
}
With that, we can now move into the Javascript. Since this app is pretty much AJAX-driven, we will start with creating a glist.ajax() helper function to fire an AJAX call to 3-ajax-items.php.
4C) INITIALIZE
// (B) INITIALIZE GROCERY LIST
items : [], // current grocery list
hqty : null, // html add quantity field
hitem : null, // html add item field
hlist : null, // html <div> grocery list
init : () => {
  // (B1) GET HTML ELEMENTS
  glist.hqty = document.getElementById("gro-qty");
  glist.hitem = document.getElementById("gro-item");
  glist.hlist = document.getElementById("gro-list");

  // (B2) ENABLE FORM
  glist.hqty.disabled = false;
  glist.hitem.disabled = false;
  document.getElementById("gro-add").disabled = false;
  document.getElementById("gro-form").onsubmit = glist.add;

  // (B3) DRAW HTML GROCERY LIST
  glist.draw();
},

// ...

window.addEventListener("load", glist.init);
Next, we initialize the “app”. Pretty much just getting the related HTML elements, enabling the HTML “add item” form, and drawing the grocery list.
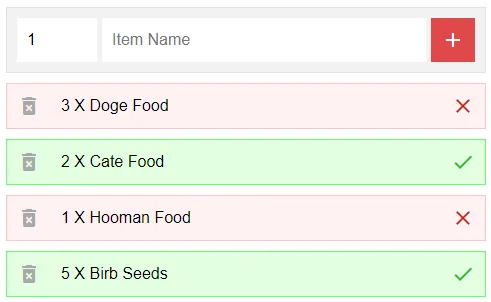
4D) DRAW GROCERY ITEMS
 // (C) DRAW GROCERY LIST
draw : () => glist.ajax({ req : "get" }, (items) => {
  // (C1) NO ITEMS
  if (items.length == 0) {
    glist.hlist.innerHTML = "<div class='item-row item-name'>No items found.</div>";
  }

  // (C2) DRAW ITEMS
  else {
    glist.hlist.innerHTML = "";
    for (let i of items) {
      // (C2-1) ITEM ROW
      let row = document.createElement("div");
      row.className = i.got=="1" ? "item-row yes" : "item-row no";
      glist.hlist.appendChild(row);

      // (C2-2) DELETE BUTTON
      let del = document.createElement("div");
      del.className = "item-del material-icons";
      del.innerHTML = "delete";
      del.onclick = () => glist.delete(i.id);
      row.appendChild(del);

      // (C2-3) ITEM QUANTITY & NAME
      let name = document.createElement("div");
      name.innerHTML = `${i.qty} X ${i.name}`;
      name.className = "item-name";
      if (i.got=="1") { name.classList.add("item-got"); }
      row.appendChild(name);

      // (C2-4) ITEM ACCQUIRED
      let ok = document.createElement("button");
      ok.className = "item-ok material-icons";
      ok.innerHTML = i.got=="1" ? "done" : "clear";
      ok.onclick = () => glist.toggle(i.got=="1" ? 0 : 1, i.id);
      row.appendChild(ok);
    }
  }
}),
Once again, no need to panic. This function pretty much fetches the grocery items from 3-ajax-items.php, and generates the HTML list. That’s all.
4E) ADD, UPDATE, DELETE GROCERY ITEMS
// (C) ADD NEW ITEM TO THE LIST
add : () => {
  glist.ajax({
    req : "add",
    name : glist.hitem.value,
    qty : glist.hqty.value
  }, () => {
    glist.hqty.value = 1;
    glist.hitem.value = "";
    glist.draw();
  });
  return false;
},

// (D) TOGGLE ITEM ACCQUIRED STATUS
toggle : (got, id) => glist.ajax({
  req : "update",
  got: got,
  id : id
}, glist.draw),

// (E) DELETE SELECTED ITEM
delete : id => { if (confirm("Remove this item?")) {
  glist.ajax({
    req : "delete",
    id : id
  }, glist.draw);
}}
Lastly, to add/update/delete grocery items – It’s all just doing AJAX calls to 3-ajax-items.php.
EXTRAS
That’s all for the tutorial, and here is a small section on some extras and links that may be useful to you.
COMPATIBILITY CHECKS
- Arrow Functions – CanIUse
- JSON – CanIUse
This example will work on all modern “Grade A” browsers.
LINKS & REFERENCES
- Offline Javascript Grocery List – Code Boxx
THE END
Thank you for reading, and we have come to the end. I hope that it has helped you to better understand, and if you want to share anything with this guide, please feel free to comment below. Good luck and happy coding!