Welcome to a quick tutorial on how to create a simple customer queue system with Python Flask. Want to create your own simple queue management system? Well, the basics are actually pretty simple – Read on for an example!
TABLE OF CONTENTS
DOWNLOAD & NOTES
Firstly, here is the download link to the example code as promised.
EXAMPLE CODE DOWNLOAD
Just click on “download zip” or do a git clone. I have released it under the MIT license, so feel free to build on top of it or use it in your own project.
SORRY FOR THE ADS...
But someone has to pay the bills, and sponsors are paying for it. I insist on not turning Code Boxx into a "paid scripts" business, and I don't "block people with Adblock". Every little bit of support helps.
Buy Me A Coffee Code Boxx eBooks
PYTHON CUSTOMER QUEUE
All right, let us now get into the details of creating a simple Python customer queue system.
QUICK SETUP
- Create a virtual environment
virtualenv venvand activate it –venv\Scripts\activate(Windows)venv/bin/activate(Linux/Mac) - Install required libraries –
pip install tk
STEP 1) QUEUE MECHANICS
# (B) QUEUE MECHANICS
# (B1) COUNTERS
qAll = 0 # total number of people in queue
qNow = 0 # current queue number

# (B2) ISSUE QUEUE NUMBER
def issue():
  global qAll
  qAll += 1
  issL1["text"] = qAll

# (B3) NEXT CUSTOMER
def next():
  global qAll, qNow
  if qNow < qAll:
    qNow += 1
    issL2["text"] = qNow
nowL1["text"] = qNow- (B1) For the queue system, we have 2 simple variables to keep track of the queue number.
qAllThe total number of customers.qNow“Now serving” number.
- (B2)
issue()is “step 1” of the process, where a staff hits the “issue queue number” button. - (B3)
next()is “step 2” to advance the “now serving” number.
Yep, that’s all to the basic mechanics.
STEP 2) USER INTERFACE
# (A) LOAD MODULES
from tkinter import *

# (C) BUILD INTERFACE
# (C1) ISSUE QUEUE NUMBER
issFONTA = ("Arial", 20)
issFONTB = ("Arial", 16)
issTK = Tk()
issF1 = Frame(issTK)
issB1 = Button(issF1, width=6, bg="red", fg="white", text="Issue", font=issFONTB, command=issue)
issB2 = Button(issF1, width=6, bg="blue", fg="white", text="Next", font=issFONTB, command=next)
issL1 = Label(issF1, text="0", fg="red", font=issFONTA)
issL2 = Label(issF1, text="0", fg="blue", font=issFONTA)
#issTK.geometry("640x480")
issF1.place(relx=.5, rely=.5, anchor=CENTER)
issB1.grid(row=0, column=0, pady=2)
issB2.grid(row=1, column=0, pady=2)
issL1.grid(row=0, column=1, pady=2, padx=10)
issL2.grid(row=1, column=1, pady=2, padx=10)

# (C2) NOW SERVING
issFONTA = ("Arial", 180)
issFONTB = ("Arial", 20)
nowTK = Tk()
nowF1 = Frame(nowTK)
nowL1 = Label(nowF1, text="0", font=issFONTA)
nowL2 = Label(nowF1, text="NOW SERVING", font=issFONTB)
nowTK.geometry("350x450")
nowF1.place(relx=.5, rely=.5, anchor=CENTER)
nowL1.pack()
nowL2.pack()

# (C3) START!
issTK.mainloop()
nowTK.mainloop()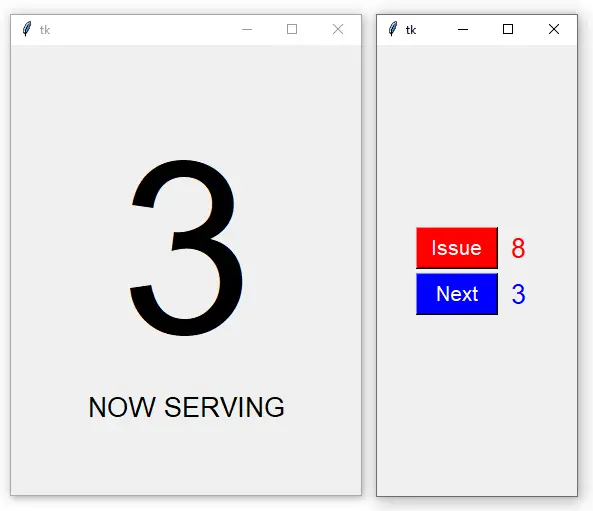
Not the prettiest interface design in the world, but it works…
- (A) Yes, we are using
tkinterto build the interface here. For you guys who are new – This is basically the de facto module to build GUI apps in Python. - (C) There are 2 windows.
- (C1)
issTKFor admin to issue a queue number, and to advance the queue. - (C2)
nowTKPretty much a big “now serving” display board.
- (C1)
- (C3) Start the app. Captain Obvious at your service.
Yep. This simple app can pretty much run on a single device but requires 2 display monitors.
EXTRAS
That’s all for the tutorial, and here is a small section on some extras and links that may be useful to you.
IMPROVEMENT IDEAS
Of course, this is only a tutorial and covers the bare basics. A lot of improvements can be made:
- A better interface. Big numbers, funky fonts, and stuff.
- Play a sound on “next customer”, and flash the screen.
- Find ways to better manage the queue number… Or it will run to very big numbers eventually.
- Maybe even save the current queue numbers in a file, so that it is not lost when the system crashes.
- Attach a thermal printer, print, and issue a “hard copy” to the customer.
- If there is an Internet connection, maybe even send out a reminder to the customer.
The possibilities are endless, so it’s up to you to create your own “perfect system”.
LINKS & REFERENCES
THE END
Thank you for reading, and we have come to the end. I hope that it has helped you to better understand, and if you want to share anything with this guide, please feel free to comment below. Good luck and happy coding!