Welcome to a quick tutorial on how to change or override CSS with Javascript. Want to dynamically update or change some styles on a web page?
The common ways to change or override CSS in Javascript are:
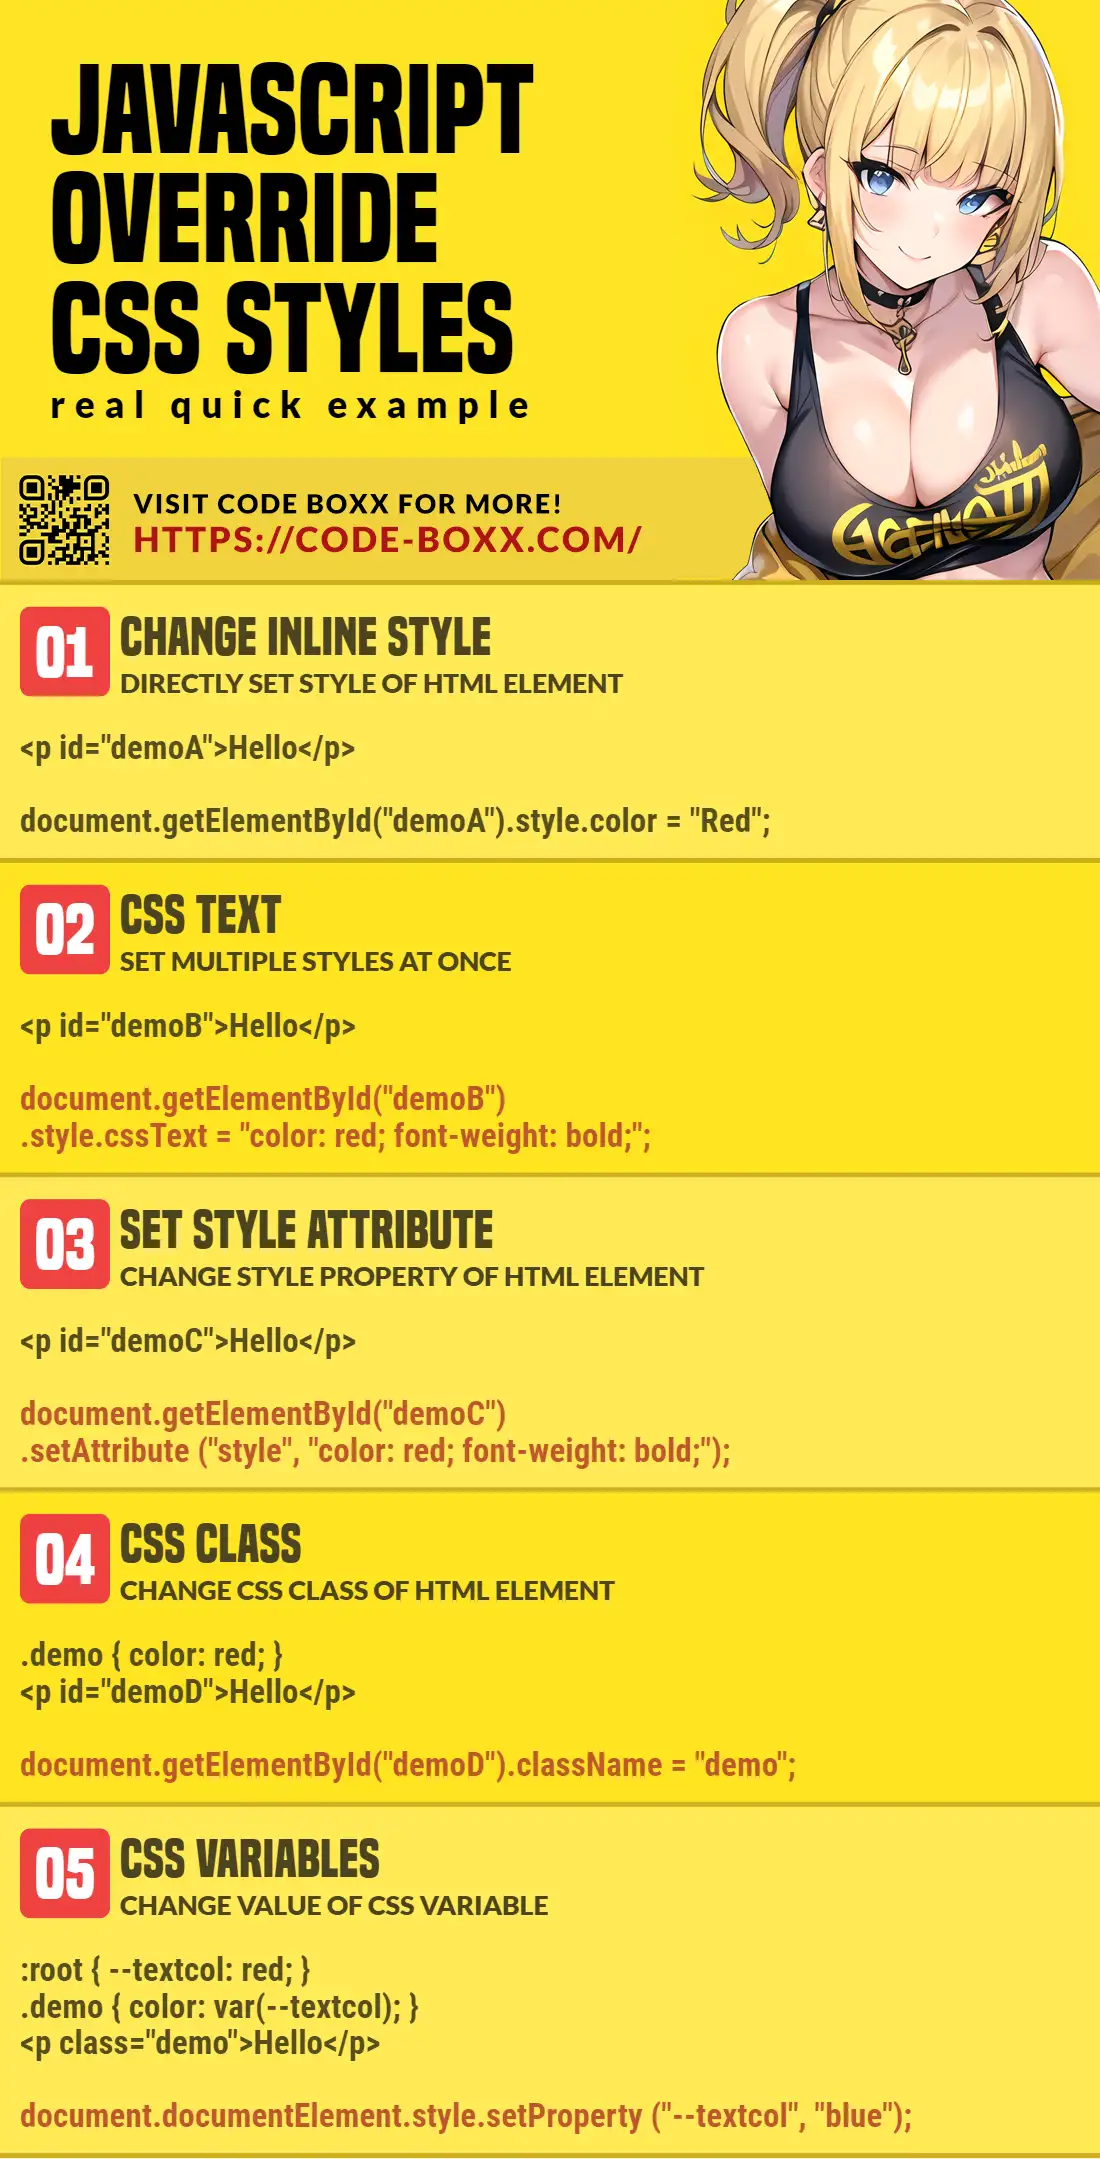
document.getElementById("ID").style.PROPERTY = "VALUE";document.getElementById("ID").style.cssText = "PROPERTY: VALUE";document.getElementById("ID").setAttribute("style", "PROPERTY: VALUE");document.getElementById("ID").className = "CLASS";document.documentElement.style.setProperty("--VAR", "VALUE");
That covers the basics, but read on for more examples!
ⓘ I have included a zip file with all the source code at the start of this tutorial, so you don’t have to copy-paste everything… Or if you just want to dive straight in.
TLDR – QUICK SLIDES
[web_stories_embed url=”https://code-boxx.com/web-stories/change-override-css-with-javascript/” title=”Change Override CSS With Javascript” poster=”https://code-boxx.com/wp-content/uploads/2023/02/STORY-JS-R4.webp” width=”360″ height=”600″ align=”center”]
Fullscreen Mode – Click Here
TABLE OF CONTENTS
DOWNLOAD & NOTES

Firstly, here is the download link to the example code as promised.
QUICK NOTES
If you spot a bug, feel free to comment below. I try to answer short questions too, but it is one person versus the entire world… If you need answers urgently, please check out my list of websites to get help with programming.
EXAMPLE CODE DOWNLOAD
Click here to download all the example source code, I have released it under the MIT license, so feel free to build on top of it or use it in your own project.
CHANGE OVERRIDE CSS

All right, let us now get into the examples of how to change or override CSS in Javascript.
1) CHANGE INLINE STYLE
<!-- (A) HTML ELEMENT WITH INLINE STYLE -->
<p id="demoA" style="color:red">Hello World!</p>

<!-- (B) CHANGE COLOR -->
<script>
function changeA (col) {
  document.getElementById("demoA").style.color = col;
}
</script>
<input type="button" value="Red" onclick="changeA('red')">
<input type="button" value="Green" onclick="changeA('green')">
<input type="button" value="Green" onclick="changeA('blue')">
Yes, it’s that simple if you just want to change a single CSS property – ELEMENT.style.PROPERTY = VALUE.
2) CHANGING MULTIPLE PROPERTIES
<!-- (A) HTML ELEMENT -->
<p id="demoB">Hello World!</p>

<!-- (B) CHANGE STYLES -->
<script>
function changeB (css) {
  document.getElementById("demoB").style.cssText = css;
}
</script>
<input type="button" value="Red" onclick="changeB('color:red; font-size:1em;')">
<input type="button" value="Green" onclick="changeB('color:green; font-size:2em;')">
<input type="button" value="Blue" onclick="changeB('color:blue; font-size:3em;')">
To set multiple properties at once, use ELEMENT.style.cssText = "CSS" instead.
3) CHANGING MULTIPLE PROPERTIES (ALTERNATIVE)
<!-- (A) HTML ELEMENT -->
<p id="demoC">Hello World!</p>

<!-- (B) CHANGE STYLES -->
<script>
function changeC (css) {
  document.getElementById("demoC").setAttribute("style", css);
}
</script>
<input type="button" value="Red" onclick="changeC('color:red; font-size:1em;')">
<input type="button" value="Green" onclick="changeC('color:green; font-size:2em;')">
<input type="button" value="Blue" onclick="changeC('color:blue; font-size:3em;')">
Alternatively, we can also use ELEMENT.setAttribute("style", "CSS") to set multiple styles at once.
4) CHANGING CSS CLASS
<!-- (A) CSS STYLES -->
<style>
.styleA { color: red; font-size: 1em; }
.styleB { color: green; font-size: 2em; }
.styleC { color: blue; font-size: 3em; }
</style>

 <!-- (B) HTML ELEMENT -->
<p id="demoD">Hello World!</p>

<!-- (C) JS CHANGE CLASS -->
<script>
function changeD (css) {
  document.getElementById('demoD').className = "style" + css;
}
</script>
<input type="button" value="A" onclick="changeD('A')">
<input type="button" value="B" onclick="changeD('B')">
<input type="button" value="C" onclick="changeD('C')">
To change the CSS class, use ELEMENT.className = "CLASS". Take note, we can also set multiple classes this way.
5) CHANGING CSS VARIABLES
<!-- (A) CSS -->
<style>
:root { --textcol: red; }
.demoE { color: var(--textcol); }
</style>

<!-- (B) HTML ELEMENT -->
<p class="demoE">Hello!</p>
<p class="demoE">World!</p>

<!-- (C) CHANGE CSS VAR -->
<script>
function changeE (col) {
  document.documentElement.style.setProperty("--textcol", col);
}
</script>
<input type="button" value="Red" onclick="changeE('red')">
<input type="button" value="Green" onclick="changeE('green')">
<input type="button" value="Blue" onclick="changeE('blue')">
Finally, for you guys who are using CSS variables to create themes – We can also change the CSS variable itself using setProperty().
EXTRA BITS & LINKS

That’s all for the tutorial, and here is a small section on some extras and links that may be useful to you.
LINKS & REFERENCES
- Inline Style – MDN
- CSS Text – MDN
- Set Attribute – MDN
- Class Name – MDN
- CSS Variable – MDN
INFOGRAPHIC CHEAT SHEET
THE END

Thank you for reading, and we have come to the end. I hope that it has helped you to better understand, and if you want to share anything with this guide, please feel free to comment below. Good luck and happy coding!
That last one solved a massive issue for me. Thanks!
gosh!!!!…hehehehe… thanks a lot man…