Welcome to a tutorial on how to send POST and GET without an HTML form in Javascript. So you want to send some data to the server in Javascript, but not involve the use of an HTML form?
An easy way to do a GET request without an HTML form is to use a query string:
var url = "http://site.com/page?KEY=VALUE";location.href = url;
Yep, it’s that simple. But there are more methods that we can use, let us walk through more examples in this guide – Read on!
TLDR – QUICK SLIDES
[web_stories_embed url=”https://code-boxx.com/web-stories/post-get-javascript-without-html-form/” title=”POST & GET In Javascript Without HTML Form” poster=”https://code-boxx.com/wp-content/uploads/2021/11/STORY-JS-20230518.webp” width=”360″ height=”600″ align=”center”]
Fullscreen Mode – Click Here
TABLE OF CONTENTS
POST & GET IN JAVASCRIPT

All right, let us now get into the various ways and examples of doing POST and GET without an HTML form.
METHOD 1) QUERY STRING
<script>
function qget () {
  // (A) APPEND DATA
  var data = new URLSearchParams();
  data.append("name", "Jon Doe");
  data.append("email", "jon@doe.com");

  // (B) URL + REDIRECT
  var url = "http://mysite.com/script?" + data.toString();
  location.href = url;
}
</script>
<input type="button" value="Go" onclick="qget()">
As in the introduction, a query string is one of the easiest ways to do GET without an HTML form – We are literally just appending data to the URL, and doing a redirection.
METHOD 2) AJAX
2A) AJAX POST
<script>
// (A) POST WITH AJAX
function ajaxPOST () {
  // (A1) DATA
  var data = new FormData();
  data.append("name", "Jon Doe");
  data.append("email", "jon@doe.com");

  // (A2) AJAX
  var xhr = new XMLHttpRequest();
  xhr.open("POST", "http://mysite.com/SCRIPT");
  xhr.onload = function () {
    console.log(this.response);
  };
  xhr.send(data);
}
</script>
<input type="button" value="AJAX POST" onclick="ajaxPOST()">
AJAX stands for “Asynchronous Javascript And XML”, and in simple terms, communicating with the server without reloading the entire page. The basic usage is a very straightforward 2-step process –
- Create a
new FormData()object, append all the data you want to send. - Create a
new XMLHttpRequest()object, execute the AJAX request itself.
2B) AJAX GET
<script>
// (B) GET WITH AJAX
function ajaxGET () {
  // (B1) URL + DATA
  var data = new URLSearchParams();
  data.append("name", "Jon Doe");
  data.append("email", "jon@doe.com");
  var url = "http://mysite.com/SCRIPT?" + data.toString();

  // (B2) AJAX
  var xhr = new XMLHttpRequest();
  xhr.open("GET", url);
  xhr.onload = function () {
    console.log(this.response);
  };
  xhr.send();
}
</script>
<input type="button" value="AJAX GET" onclick="ajaxGET()">
Doing a GET request with AJAX is still the same 2-steps process. But take extra note that we are creating a new URLSearchParams() object here for the data – The parameters are appended to the URL itself.
METHOD 3) FETCH
3A) FETCH POST
<script>
// (A) POST WITH FETCH
function fetchPOST () {
  // (A1) DATA
  let data = new URLSearchParams();
  data.append("name", "Jon Doe");
  data.append("email", "jon@doe.com");

  // (A2) FETCH
  fetch("http://mysite.com/SCRIPT", { method: "post", body: data })
  .then(res => res.text())
  .then(txt => console.log(txt))
  .catch(err => console.log(error));
}
</script>
<input type="button" value="POST Fetch" onclick="fetchPOST()">
Now fetch() is supposedly the “advanced better version of AJAX” with more controls and stuff. Not too sure about that, but do take note that it is not supported in older browsers – You might want to stick with AJAX.
3B) FETCH GET
<script>
// (B) GET WITH FETCH
function fetchGET () {
  // (B1) DATA
  let data = new URLSearchParams();
  data.append("name", "Jon Doe");
  data.append("email", "jon@doe.com");

  // (B2) FETCH
  fetch("http://mysite.com/SCRIPT?" + data.toString(), { method: "get" })
  .then(res => res.text())
  .then(txt => console.log(txt))
  .catch(err => console.log(error));
}
</script>
<input type="button" value="GET Fetch" onclick="fetchGET()"/>
That’s right – Take note of how the data is appended to the URL string for the GET request again; Do not append the parameters to the body.
DOWNLOAD & NOTES

Here is the download link to the example code, so you don’t have to copy-paste everything.
SORRY FOR THE ADS...
But someone has to pay the bills, and sponsors are paying for it. I insist on not turning Code Boxx into a "paid scripts" business, and I don't "block people with Adblock". Every little bit of support helps.
Buy Me A Coffee Code Boxx eBooks
EXAMPLE CODE DOWNLOAD
Click here for the source code on GitHub gist, just click on “download zip” or do a git clone. I have released it under the MIT license, so feel free to build on top of it or use it in your own project.
EXTRA BITS & LINKS

That’s all for this guide, and here is a small section on some extras and links that may be useful to you.
RESTRICTION – URL LENGTH LIMIT!
While appending URL search parameters is simple and easy, please take note that there is a maximum length limit to the URL. A quick search on the Internet turns out with different answers – 2048 characters, 2083 characters, 2000 characters. It depends on the browser and server, so yep, the general rule of thumb is not to exceed 2000 characters.
LINKS & REFERENCES
- Window.location – Web APIs | MDN
- URLSearchParams – MDN
- FormData – MDN
- Javascript AJAX – A Beginner’s Tutorial – Code Boxx
- Using Fetch – Web APIs | MDN
- How do I post form data with fetch API? – Stack Overflow
- Promise – MDN
TUTORIAL VIDEO
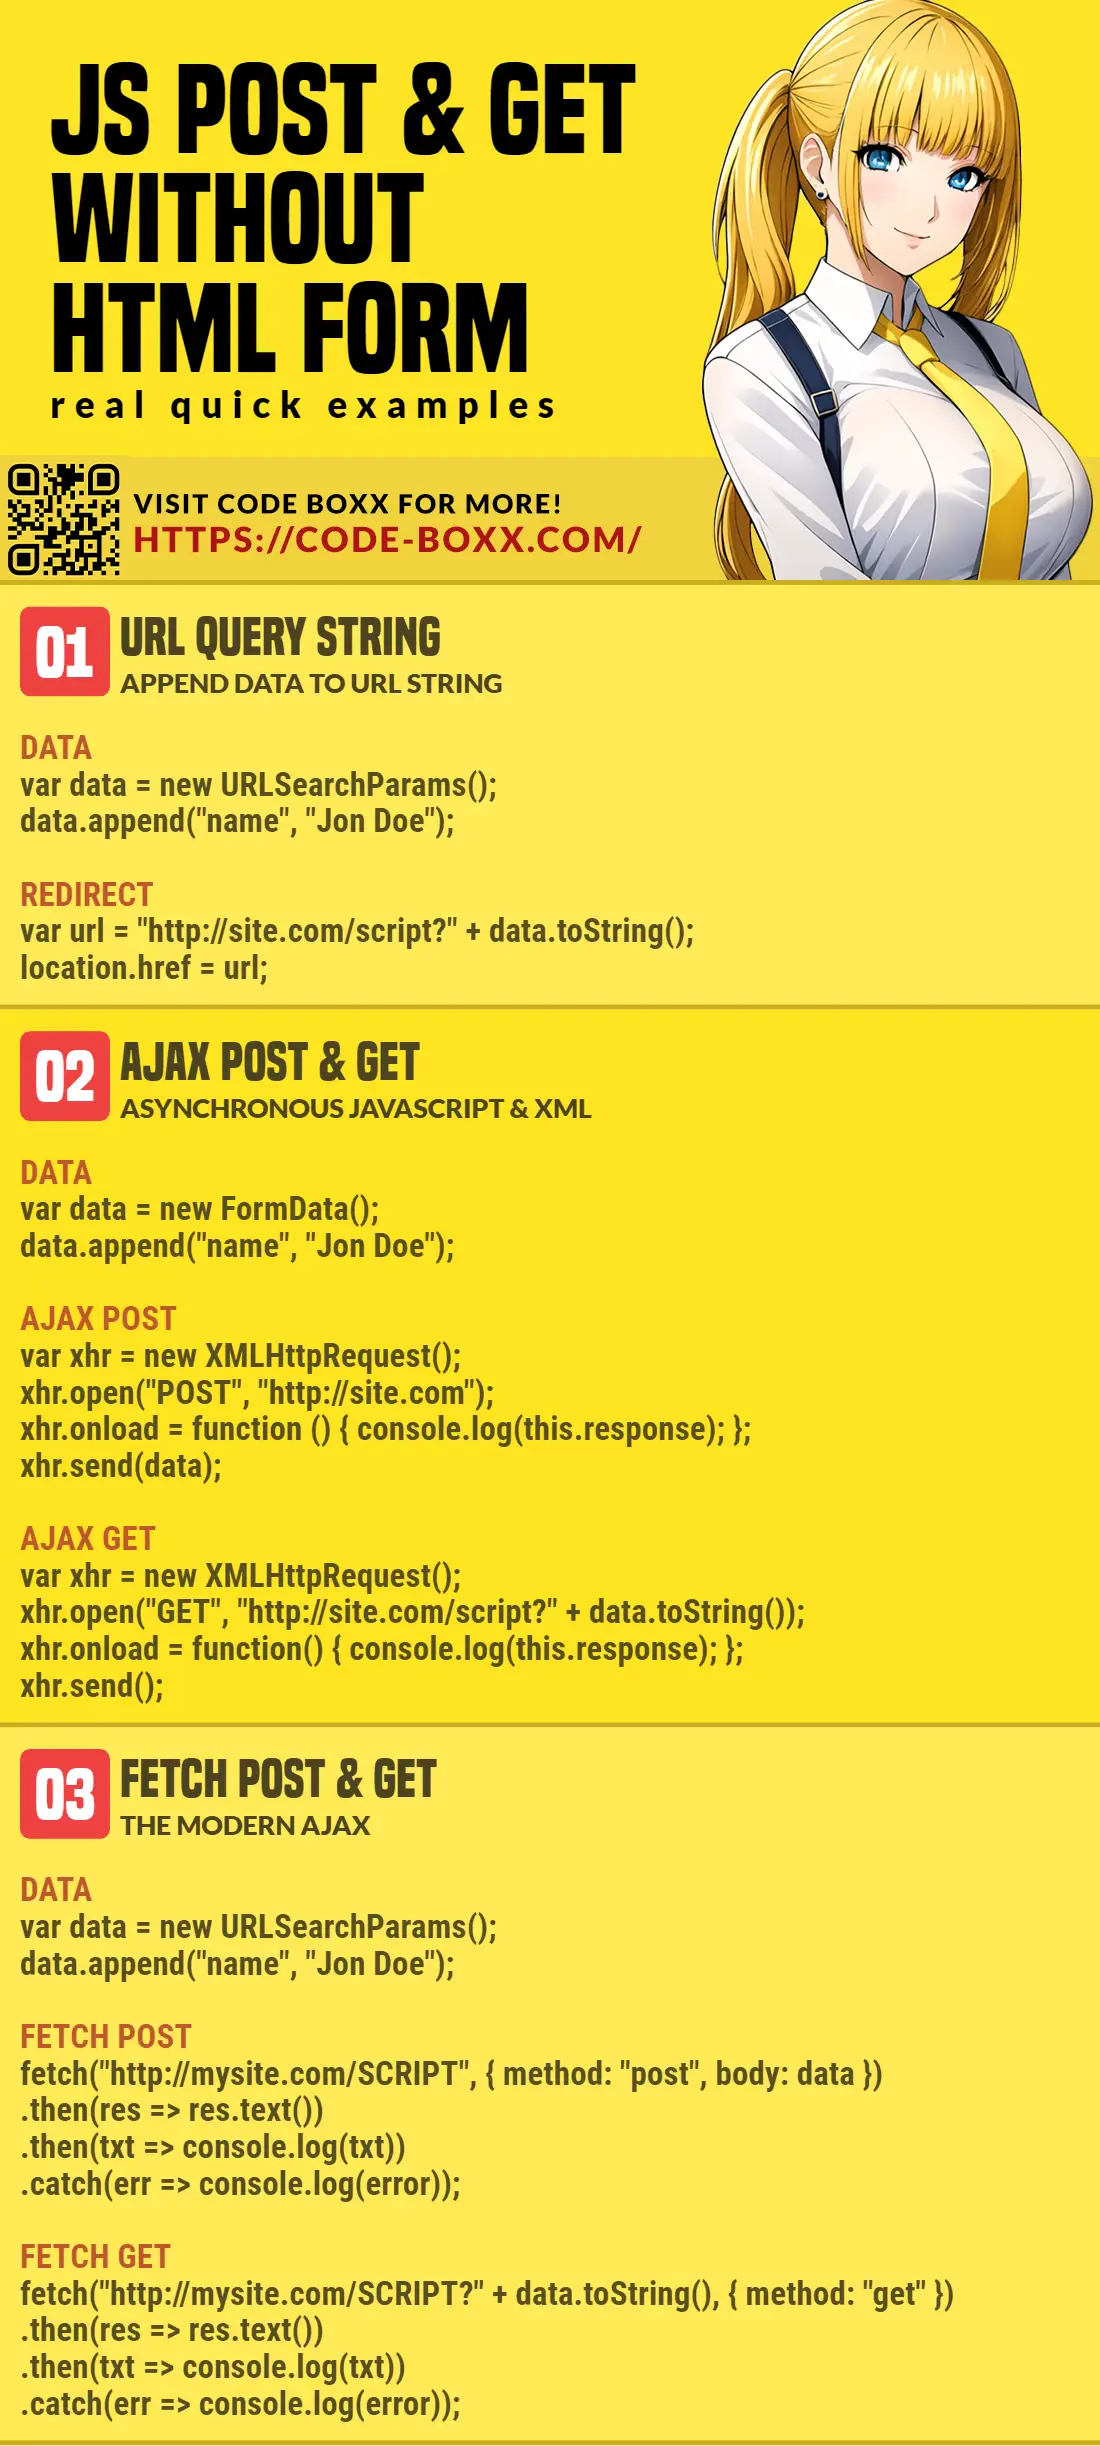
INFOGRAPHIC CHEATSHEET
THE END

Thank you for reading, and we have come to the end of this guide. I hope that it has helped you with your project, and if you want to share anything with this guide, please feel free to comment below. Good luck and happy coding!
This is by far the most helpful piece of information I came across on web to solve this query (POST & GET In JavaScript Without HTML Form) encountered in our project, Thankyou so much for helping us fellow beginners with your experience and knowledge.