Welcome to a quick tutorial on how to develop a simple web application with PHP and MySQL. When it comes to building a full-stack web application, some beginners go blank and do not know where to get started.
Web applications are developed in stages, in a step-by-step manner.
- Gather the requirements – Know what the users want, what the application should do, what the goals are.
- Design the structure of the database.
- Build the core PHP scripts and libraries.
- Design the interface, build the pages with HTML, CSS, Javascript.
- Finally, test and deploy the web application.
Yes, some of you may have already heard of it, this is called the software development life cycle (SDLC). One does not tackle a project without any plans but takes it apart piece by piece. Let us walk through the development cycle of a simple example to-do list in this guide – Read on!
TABLE OF CONTENTS
DOWNLOAD & NOTES
Here is the download link to the example code, so you don’t have to copy-paste everything.
EXAMPLE CODE DOWNLOAD
Just click on “download zip” or do a git clone. I have released it under the MIT license, so feel free to build on top of it or use it in your own project.
SORRY FOR THE ADS...
But someone has to pay the bills, and sponsors are paying for it. I insist on not turning Code Boxx into a "paid scripts" business, and I don't "block people with Adblock". Every little bit of support helps.
Buy Me A Coffee Code Boxx eBooks
PHP WEB APP DEVELOPMENT
All right, let us now get into the details of developing a simple “to-do” list in PHP and MYSQL – Step by step.
PART 1) GATHER THE REQUIREMENTS
This is the most important step that some people miss out on, thinking that it’s useless and a waste of time. Well, no. Big or small projects, it all starts with “boring planning”. Even for the smallest personal projects, we need to have a plan on “what to build” and “how to build”.
Projects that start with “everything and anything” will most likely end with “nothing”. So start by asking a lot of questions. Understand the problem, know what the users want, and have a general idea of what needs to be done. For this example project:
- We need to create a simple to-do list.
- The task list should be stored in a database.
- There should be flags to indicate if a task is still “pending”, “done”, or “canceled”.
- Have a page to manage (add, update, delete) the tasks.
That simple.
PART 2) BUILD THE DATABASE
CREATE TABLE `todo` (
  `todo_id` bigint(20) NOT NULL,
  `todo_task` text NOT NULL,
  `todo_status` tinyint(1) NOT NULL DEFAULT 0
) ENGINE=InnoDB DEFAULT CHARSET=utf8mb4;

ALTER TABLE `todo`
  ADD PRIMARY KEY (`todo_id`);

ALTER TABLE `todo`
  MODIFY `todo_id` bigint(20) NOT NULL AUTO_INCREMENT;
Now that we are done with the planning and have a rough idea of the system, let’s move on to deal with the foundation of the project – The database tables. This should be straightforward enough:
todo_idThe task ID, primary key.todo_taskDescription of the task itself.todo_statusThe current status of the task, 0 for pending, 1 for done, 2 for canceled.
Yep, that should be sufficient to cover the requirements of “keeping the tasks and tracking their status”.
PART 3) PHP LIBRARY
<?php
class ToDo {
  // (A) CONSTRUCTOR - CONNECT TO DATABASE
  private $pdo = null;
  private $stmt = null;
  public $error = "";
  function __construct () {
    $this->pdo = new PDO(
      "mysql:host=".DB_HOST.";dbname=".DB_NAME.";charset=".DB_CHARSET,
      DB_USER, DB_PASSWORD, [
      PDO::ATTR_ERRMODE => PDO::ERRMODE_EXCEPTION,
      PDO::ATTR_DEFAULT_FETCH_MODE => PDO::FETCH_ASSOC
    ]);
  }

  // (B) DESTRUCTOR - CLOSE DATABASE CONNECTION
  function __destruct () {
    if ($this->stmt!==null) { $this->stmt = null; }
    if ($this->pdo!==null) { $this->pdo = null; }
  }

  // (C) HELPER - RUN SQL QUERY
  function query ($sql, $data) :void {
    $this->stmt = $this->pdo->prepare($sql);
    $this->stmt->execute($data);
  }

  // (D) SAVE TO-DO TASK
  function save ($task, $status, $id=null) {
    if ($id===null) {
      $sql = "INSERT INTO `todo` (`todo_task`, `todo_status`) VALUES (?,?)";
      $data = [$task, $status];
    } else {
      $sql = "UPDATE `todo` SET `todo_task`=?, `todo_status`=? WHERE `todo_id`=?";
      $data = [$task, $status, $id];
    }
    $this->query($sql, $data);
    return true;
  }

  // (E) GET ALL TASKS
  function getAll () {
    $this->query("SELECT * FROM `todo`");
    return $this->stmt->fetchAll();
  }

  // (F) DELETE TASK
  function del ($id) {
    $this->query("DELETE FROM `todo` WHERE `todo_id`=?", [$id]);
    return true;
  }
}

// (G) DATABASE SETTINGS - CHANGE TO YOUR OWN!
define("DB_HOST", "localhost");
define("DB_NAME", "test");
define("DB_CHARSET", "utf8mb4");
define("DB_USER", "root");
define("DB_PASSWORD", "");

// (H) NEW TO-DO OBJECT
$TODO = new ToDo();
With the database in place, we can now build a library to work with it. This looks complicated, but keep calm and study closely:
- (A, B, H) When
$TODO = new ToDo()is created, the constructor automatically connects to the database. The destructor closes the connection. - (C)
query()A simple helper function to run SQL queries. - (D to F) There are only 3 essential functions to cover the “manage to-do tasks”.
save()Add or update a task.getAll()Get all to-do tasks.del()Delete a task.
- (G) Database settings – Change to your own.
Long story short, this library is quite literally just a collection of INSERT UPDATE DELETE SELECT SQL.
PART 4) USER INTERFACE
4A) HTML PAGE
<?php
// (A) ADD/UPDATE/DELETE TASK IF FORM SUBMITTED
require "2-todo-lib.php";
if (isset($_POST["action"])) {
// (A1) SAVE TASK
if ($_POST["action"]=="save") {
$pass = $TODO->save($_POST["task"], $_POST["status"], (isset($_POST["id"])?$_POST["id"]:null));
}
// (A2) DELETE TASK
else { $pass = $TODO->del($_POST["id"]); }
// (A3) SHOW RESULT
echo "<div class='notify'>";
echo $pass ? "OK" : $TODO->error ;
echo "</div>";
}
?>
<!-- (B) NINJA DELETE FORM -->
<form id="ninForm" method="post">
<input type="hidden" name="action" value="del">
<input type="hidden" name="id" id="ninID">
</form>
<div id="tasks">
<!-- (C) ADD NEW TASK -->
<form method="post">
<input type="hidden" name="action" value="save">
<input type="text" id="taskadd" name="task" placeholder="Task" required>
<select name="status">
<option value="0">Pending</option>
<option value="1">Done</option>
<option value="2">Canceled</option>
</select>
<input type="submit" value="Add">
</form>
<!-- (D) LIST TASKS -->
<?php
$tasks = $TODO->getAll();
if (count($tasks)!=0) { foreach ($tasks as $t) { ?>
<form method="post">
<input type="hidden" name="action" value="save">
<input type="text" id="taskadd" name="task" placeholder="Task" required>
<select name="status">
<option value="0">Pending</option>
<option value="1">Done</option>
<option value="2">Canceled</option>
</select>
<input type="submit" value="Add">
</form>
<?php }} ?>
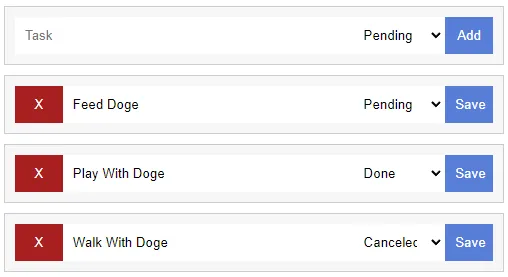
</div>This may look confusing once again, but it should be easier to study in this order:
- (B & C) Straightforward. HTML forms to delete and add a task.
- (D) We use the PHP library to get all tasks and display them in “nice HTML rows”.
- (A) When add/update/delete task is submitted, we use the PHP library once again to update the database accordingly.
4B) CSS COSMETICS
* {
  font-family: Arial, Helvetica, sans-serif;
  box-sizing: border-box;
}
.notify {
  background: #ecefff;
  border: 1px solid #bfc4ff;
  padding: 5px;
  margin-bottom: 10px;
}
#tasks { max-width: 500px; }
#tasks form {
  display: grid;
  grid-template-columns: 10% 60% 20% 10%;
  padding: 10px;
  background: #f7f7f7;
  border: 1px solid #ccc;
  margin-bottom: 10px;
}
#tasks input, #tasks select {
  box-sizing: border-box;
  padding: 10px;
  cursor: pointer;
  border: 0;
}
#tasks input[type=button], #tasks input[type=submit] { color: #fff; }
#tasks input[type=button] { background: #a72020; }
#tasks input[type=submit] { background: #577ed8; }
#taskadd { grid-column: span 2; }
As it is… Some CSS cosmetics to make things look better.
4C) THE JAVASCRIPT
function deltask (id) { if (confirm("Delete task?")) {
  document.getElementById("ninID").value = id;
  document.getElementById("ninForm").submit();
}}
Finally, a small snippet of necessary Javascript to handle the “delete task” HTML form.
EXTRAS
That’s all for this example, and here is a small section on some extras and links that may be useful to you.
SOFTWARE DEVELOPMENT NEVER ENDS
One last thing to place here as a “disclaimer”, software development never ends. For example, we might want to improve the to-do list in the future:
- Requirement – Add a timestamp to track when the task is last updated.
- Database – Add a new new “updated” timestamp column.
- PHP library – Update the functions to also include the timestamp.
- To-do page – Show the timestamp somewhere.
Yes, that is running through the development cycle once again; It never ends and will continue to loop when new requirements pop up.
LINKS & REFERENCES
The above example pretty much… scratched the surface. Here are a couple more links if you want to learn more.
- Software Development Life Cycle (SDLC) – Wikipedia
- Create Read Update Delete (CRUD) – Wikipedia
- How To Create a Simple CRUD Application With PHP MySQL – Code Boxx
- Model–view–controller (MVC) – Wikipedia
- Simple PHP MVC – Code Boxx
- Rapid Application Development – Wikipedia
THE END
Thank you for reading, and we have come to the end of this guide. It may not be easy to develop a full-stack application at first, but break the project down into smaller parts, and you will be able to conquer them piece by piece. If you have anything to share, please feel free to comment below. Good luck and happy coding!
Thanks for this article!
For some reason deleting task, causes error:
SQLSTATE[42S22]: Column not found: 1054 Unknown column ‘task_id’ in ‘where clause’
Super quick fix – Just change
task_idtotodo_idin2-todo-lib.phpCould you give an example what 2-todo-lib.php should look like when modified with custom database name, username and password.
I guess you mean these .DB_HOST .DB_NAME .DB_CHARSET, DB_USER and DB_PASSWORD in 2-todo-lib.php?
Yes, just change those database settings to your own. There is literally no way I can show you “how the database settings should look like” – It is what it is.
* DB_HOST is the IP or domain name of where your database server is installed.
* DB_NAME is whatever database name you have created.
* DB_USER and DB_PASSWORD. Self-explanatory.
* DB_CHARSET – Leave as UTF8 if unsure.
Do a search for “php pdo mysql tutorial” on the internet if you have missed it.
Thanks…figured it out.
As not being a devops fellow i was actually searching an simple app to use as an sample for docker & kubernetes examples. Your app works great for that also…thanks!
Thanks for this tutorial.
Is there a specific reason you set “tinyint(1)” – instead of simply “tinyint” – for “todo_status”, since you don’t use zerofill?
No particular reason actually, I would say it’s more for “cosmetics”. An “uncapped” TINYINT can go up to 127, but a simple status flag wouldn’t need that many… TINYINT(1) does well enough to serve that purpose.