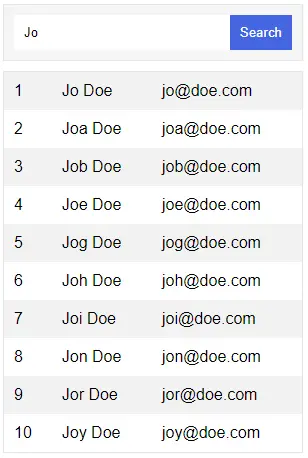
Welcome to a tutorial on how to search and display results from the database using Python Flask and SQLite. So you need to add a search box to your website? Well, it actually a 2-steps process in the simplest design.
- Add an HTML search form to the page – Text box and submit button.
- Once submitted, do a
SELECT * FROM `TABLE` WHERE `FIELD` LIKE '%SEARCH%'SQL query and output the results in HTML.
Yep, that’s all. But just how is this done exactly? Let us walk through an example in this guide – Read on!
TABLE OF CONTENTS
DOWNLOAD & NOTES
Here is the download link to the example code, so you don’t have to copy-paste everything.
EXAMPLE CODE DOWNLOAD
Just click on “download zip” or do a git clone. I have released it under the MIT license, so feel free to build on top of it or use it in your own project.
SORRY FOR THE ADS...
But someone has to pay the bills, and sponsors are paying for it. I insist on not turning Code Boxx into a "paid scripts" business, and I don't "block people with Adblock". Every little bit of support helps.
Buy Me A Coffee Code Boxx eBooks
PYTHON SEARCH RESULTS
All right, let us now get into the example of doing a database search and displaying the results in Python Flask.

QUICK SETUP
- Create a virtual environment
virtualenv venvand activate it –venv\Scripts\activate(Windows)venv/bin/activate(Linux/Mac) - Install required libraries –
pip install flask - For those who are new, the default Flask folders are –
staticPublic files (JS/CSS/images/videos/audio)templatesHTML pages
STEP 1) THE DATABASE
1A) DUMMY USERS TABLE
-- (A) USERS TABLE
CREATE TABLE users (
  uid INTEGER,
  name TEXT NOT NULL,
  email TEXT NOT NULL,
  tel TEXT NOT NULL,
  PRIMARY KEY("uid" AUTOINCREMENT)
);

CREATE INDEX `idx_name`
  ON `users` (`name`);

CREATE UNIQUE INDEX `idx_email`
  ON `users` (`email`);

-- (B) DUMMY DATA
INSERT INTO "users" VALUES
(1,'Jo Doe','jo@doe.com','465785'),
(2,'Joa Doe','joa@doe.com','123456'),
(3,'Job Doe','job@doe.com','234567'),
(4,'Joe Doe','joe@doe.com','345678'),
(5,'Jog Doe','jog@doe.com','578456'),
(6,'Joh Doe','joh@doe.com','378945'),
(7,'Joi Doe','joi@doe.com','456789'),
(8,'Jon Doe','jon@doe.com','987654'),
(9,'Jor Doe','jor@doe.com','754642'),
(10,'Joy Doe','joy@doe.com','124578');
For a start, here is a simple dummy user table and data.
uidUser ID. Primary key and auto-increment.nameThe user’s name, indexed.emailThe user’s email, unique.telTelephone number.
1B) CREATE THE DATABASE
# (A) LOAD PACKAGES
import sqlite3, os
from sqlite3 import Error

# (B) DATABASE + SQL FILE
DBFILE = "users.db"
SQLFILE = "S1A_users.sql"

# (C) DELETE OLD DATABASE IF EXIST
if os.path.exists(DBFILE):
  os.remove(DBFILE)

# (D) IMPORT SQL
conn = sqlite3.connect(DBFILE)
with open(SQLFILE) as f:
  conn.executescript(f.read())
conn.commit()
conn.close()
print("Database created!")
Not much of a mystery here. We read S1A_users.sql and create the actual database file users.db.
STEP 2) FLASK SERVER
2A) MODULES & SETTINGS
# (A) INIT
# (A1) LOAD MODULES
from flask import Flask, render_template, request, make_response
import sqlite3

# (A2) FLASK SETTINGS + INIT
HOST_NAME = "localhost"
HOST_PORT = 80
DBFILE = "users.db"
app = Flask(__name__)
# app.debug = True

# (B) HELPER FUNCTION - SEARCH USERS
def getusers(search):
  conn = sqlite3.connect(DBFILE)
  cursor = conn.cursor()
  cursor.execute(
    "SELECT * FROM `users` WHERE `name` LIKE ? OR `email` LIKE ?",
    ("%"+search+"%", "%"+search+"%",)
  )
  results = cursor.fetchall()
  conn.close()
  return results
The top half of the Flask server script shouldn’t need a lot of explanation.
- (A) Load the required modules and define a bunch of server settings.
- (B) A helper function to do a search on the user database.
2B) VIEWS
# (C) DEMO SEARCH PAGE
@app.route("/", methods=["GET", "POST"])
def index():
  # (C1) SEARCH FOR USERS
  if request.method == "POST":
    data = dict(request.form)
    users = getusers(data["search"])
  else:
    users = []

  # (C2) RENDER HTML PAGE
  return render_template("S3_users.html", usr=users)

# (D) START
if __name__ == "__main__":
  app.run(HOST_NAME, HOST_PORT)
No need to panic, we are only serving a single page at / here. Take a look at how this works.
- (C1) When the HTML search form is submitted, we will use the helper function
getusers()to do the database search. - (C2) We pass the search results into the HTML template for rendering.
- (D) Start the Flask server. Captain Obvious at your service.
STEP 3) HTML SEARCH PAGE
<!-- (A) SEARCH FORM -->
<form method="post">
  <input type="text" name="search" required>
  <input type="submit" value="Search">
</form>

<!-- (B) OUTPUT SEARCH RESULTS -->
{% if usr | length != 0 %}
<table id="demo">
  {% for u in usr %}
  <tr>
    <td>{{ u[0] }}</td>
    <td>{{ u[1] }}</td>
    <td>{{ u[2] }}</td>
  </tr>
  {% endfor %}
</table>
{% else %}
<div id="demo">No search results.</div>
{% endif %}
Finally, the HTML page itself. It’s nothing more than a “regular search form”, and we generate the search results in a table.
EXTRAS
That’s all for the search example, and here are a few extra bits that may be useful to you.
INDEX YOUR SEARCHABLE FIELDS!
As you can see, we have created an index on the name and email columns in this example – CREATE INDEX `NAME` ON `TABLE` (`COL`). Many beginners will probably brush this aside and not think too much about the “confusing index”.
To set things straight – Indexes are important when it comes to search performance. In layman’s terms, it’s like creating a book catalog for a library. Is searching book-by-book faster? Or referring to the catalog faster? The answer is obvious, so always index your searchable columns.
ADOPT A “BETTER” DATABASE
Yes, SQLite works great. It is convenient and does not require any installation. But it will eventually run into performance and security issues in a cloud (Internet/Intranet) environment. So take your time to pick up a “professional database” – MySQL, MSSQL, PostgreSQL, MongoDB, and whatever else. It is not as difficult as some think, and it is beneficial for you in the long run.
LINKS & REFERENCES
- Python Flask
- SQLite Where – SQLite Tutorial
THE END
Thank you for reading, and we have come to the end. I hope that it has helped you to better understand, and if you want to share anything with this guide, please feel free to comment below. Good luck and happy coding!
